Salta al contenuto principale
N-Strike Nite Finder EX-3 Trigger Replacement

N-Strike Nite Finder EX-3 Trigger Replacement

Kyle Schober

Kyle Schober e 6 altri collaboratori

Ultimo aggiornamento il January 4, 2024

10 minuti
Moderato

Introduzione

Vai al passo 1

If pulling the trigger of your Nerf Nite Finder doesn't cause it to fire, the trigger might need to be replaced. This guide shows how to do so.
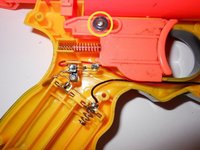
==CAUTION==

Be aware of springs under compression. Take care so these small parts do not fly off the blaster and get lost.

Cosa ti serve

Strumenti

  1. N-Strike Nite Finder EX-3 Trigger Replacement, Trigger: passo 1, immagine 1 di 1
    • Place the blaster upside down on the table, and remove the screw in the bottom of the handle.

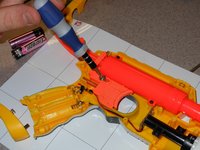
    • Remove the battery door and take the batteries out.

  2. N-Strike Nite Finder EX-3 Trigger Replacement: passo 2, immagine 1 di 3 N-Strike Nite Finder EX-3 Trigger Replacement: passo 2, immagine 2 di 3 N-Strike Nite Finder EX-3 Trigger Replacement: passo 2, immagine 3 di 3
    • Set the blaster on its side with the screws facing up (the blaster will be placed on its left side). Remove all 14 phillips head, 8.2 mm screws and set them aside.

    • Lift the side of the blaster off exposing its internal parts.

  3. N-Strike Nite Finder EX-3 Trigger Replacement: passo 3, immagine 1 di 2 N-Strike Nite Finder EX-3 Trigger Replacement: passo 3, immagine 2 di 2
    • Remove the phillips head, 10.2 mm screw holding the trigger in place.

  4. N-Strike Nite Finder EX-3 Trigger Replacement: passo 4, immagine 1 di 1
    • Remove the trigger by pulling the piece straight up.

    • Caution: Do not let the spring fly off the spring

Conclusione

To reassemble your device, follow these instructions in reverse order.

Un'altra persona ha completato questa guida.

Team

0 Commenti

Aggiungi Commento

Visualizza Statistiche:

Ultime 24 Ore: 0

Ultimi 7 Giorni: 4

Ultimi 30 Giorni: 7

Tutti i Tempi: 1,890