Salta al contenuto principale
Unisciti alla Community delle riparazioni - Crea un account
Motorola Droid Bionic LCD Replacement

Motorola Droid Bionic LCD Replacement

Taylor

Taylor e 3 altri collaboratori

Ultimo aggiornamento il 3 ott 2013

30 minuti
Facile
Foto Azione
Necessarie Immagini Migliori
Guida fornita dalla comunità
Introduzione Migliore

Cosa ti serve

Ricambi

Strumenti

Mostra di più…

  1. Motorola Droid Bionic LCD Replacement, LCD: passo 1, immagine 1 di 1
    • Remove the back battery cover.

  2. Motorola Droid Bionic LCD Replacement: passo 2, immagine 1 di 1
    • Remove the battery

  3. Motorola Droid Bionic LCD Replacement: passo 3, immagine 1 di 2 Motorola Droid Bionic LCD Replacement: passo 3, immagine 2 di 2
    • Remove the 11 T4 Torx Screws

    • Next, remove the information sticker.

  4. Motorola Droid Bionic LCD Replacement: passo 4, immagine 1 di 2 Motorola Droid Bionic LCD Replacement: passo 4, immagine 2 di 2
    • Using a plastic removal tool, work around the edges of the back housing.

    • Lift off the back housing.

  5. Motorola Droid Bionic LCD Replacement: passo 5, immagine 1 di 3 Motorola Droid Bionic LCD Replacement: passo 5, immagine 2 di 3 Motorola Droid Bionic LCD Replacement: passo 5, immagine 3 di 3
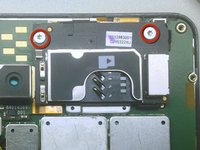
    • Remove the two silver T4 screws securing the SIM tray.

    • Carefully lift the SIM tray to disconnect it from the board.

    • Carefully remove the plastic spacer beneath by lifting gently in the center with a plastic removal tool.

    • Then, using a plastic removal tool, disconnect the speaker & front facing camera assembly from the board. The speaker is attached with adhesive, so be careful not to rip the flex cable.

  6. Motorola Droid Bionic LCD Replacement: passo 6, immagine 1 di 1
    • Disconnect the 2 digitizer connectors using a plastic removal tool.

    • Then disconnect the LCD connector

  7. Motorola Droid Bionic LCD Replacement: passo 7, immagine 1 di 2 Motorola Droid Bionic LCD Replacement: passo 7, immagine 2 di 2
    • The board is now free from all connections. Carefully lift from the top and remove the board.

  8. Motorola Droid Bionic LCD Replacement: passo 8, immagine 1 di 2 Motorola Droid Bionic LCD Replacement: passo 8, immagine 2 di 2
    • Carefully peel the two flex cables from the back housing of the LCD. Be exceptionally careful during this process, as those flex cables can be easily ripped.

    • With the flex cables out of the way, you can now use a plastic opening tool to carefully pry the old LCD loose and out of the display.

    • If you're installing a new LCD, simply add it now and follow these instructions in reverse to complete the installation.

Conclusione

To reassemble your device, follow these instructions in reverse order.

Altre 4 persone hanno completato questa guida.

Taylor

Membro da: 08/30/12

244 Reputazione

1 Guida realizzata

0Commenti sulla guida

Aggiungi Commento

Visualizza Statistiche:

Ultime 24 Ore: 0

Ultimi 7 Giorni: 0

Ultimi 30 Giorni: 0

Tutti i Tempi: 1,794