Salta al contenuto principale
MiTM Pressure Washers CA2703HDHB1 2017 Output Assembly Replacement

MiTM Pressure Washers CA2703HDHB1 2017 Output Assembly Replacement

Arthur Shi

Arthur Shi

Ultimo aggiornamento il April 23, 2020

Nessuna stima
Moderato
Solo Prerequisita
Questa guida è destinata a essere usata solo come prerequisito per altre guide. Da sola è incompleta.

Introduzione

Vai al passo 1

This is a prerequisite guide only! This is not a complete guide, and is meant to be used as part of other guides.

This guide shows how to remove the output assembly from the pump. The output assembly includes the unloader, along with various pipe fittings.

  1. MiTM Pressure Washers CA2703HDHB1 2017 Output Assembly Replacement, Determine the unloader assembly: passo 1, immagine 1 di 3 MiTM Pressure Washers CA2703HDHB1 2017 Output Assembly Replacement, Determine the unloader assembly: passo 1, immagine 2 di 3 MiTM Pressure Washers CA2703HDHB1 2017 Output Assembly Replacement, Determine the unloader assembly: passo 1, immagine 3 di 3
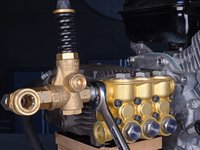
    • There are two versions of the unloader assembly:

    • First image—earlier pressure washers feature an all-in-one assembly (part 8-0631) that’s easy to replace, but gave users the ability to break the pump.

    • Second image—later models use a tamper-proof, harder to remove unloader (part 8-0656), connected by a series of pipe fittings.

    • This guide is written for the tamper-proof unloader assembly.

    • If you need to remove an all-in-one style unloader, use a large adjustable wrench to unscrew the two large Banjo bolts. This will disconnect the unloader from the pump assembly.

  2. MiTM Pressure Washers CA2703HDHB1 2017 Output Assembly Replacement: passo 2, immagine 1 di 2 MiTM Pressure Washers CA2703HDHB1 2017 Output Assembly Replacement: passo 2, immagine 2 di 2
    • Before you begin, be sure that the engine is powered off and is cool to the touch.

    • Grab the plastic housing at the end of the spark plug wire.

    • Pull firmly to disconnect the wire from the spark plug.

  3. MiTM Pressure Washers CA2703HDHB1 2017 Output Assembly Replacement, Loosen the hose clamp: passo 3, immagine 1 di 2 MiTM Pressure Washers CA2703HDHB1 2017 Output Assembly Replacement, Loosen the hose clamp: passo 3, immagine 2 di 2
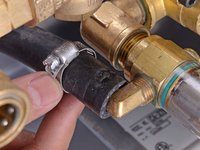
    • Use a 1/4" socket or a large flathead screwdriver to loosen the hose clamp near the inlet filter.

    • Slide the hose clamp away from the end of the hose.

  4. MiTM Pressure Washers CA2703HDHB1 2017 Output Assembly Replacement, Disconnect the return hose: passo 4, immagine 1 di 2 MiTM Pressure Washers CA2703HDHB1 2017 Output Assembly Replacement, Disconnect the return hose: passo 4, immagine 2 di 2
    • Wiggle the hose and pull it off of the brass nipple.

  5. MiTM Pressure Washers CA2703HDHB1 2017 Output Assembly Replacement, Position the support block: passo 5, immagine 1 di 1
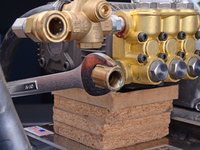
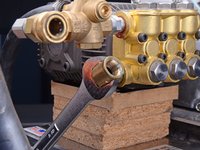
    • Slide a 3" tall block underneath the pump assembly to help support the pump.

  6. MiTM Pressure Washers CA2703HDHB1 2017 Output Assembly Replacement, Re-position the return elbow: passo 6, immagine 1 di 2 MiTM Pressure Washers CA2703HDHB1 2017 Output Assembly Replacement, Re-position the return elbow: passo 6, immagine 2 di 2
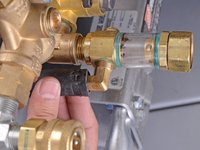
    • Use a 1/2" or adjustable wrench to loosen and twist the return elbow half a turn, so that it faces the opposite direction.

    • This will allow the fitting to clear the pump edge without being removed.

  7. MiTM Pressure Washers CA2703HDHB1 2017 Output Assembly Replacement, Loosen the filter: passo 7, immagine 1 di 2 MiTM Pressure Washers CA2703HDHB1 2017 Output Assembly Replacement, Loosen the filter: passo 7, immagine 2 di 2
    • Use a large adjustable wrench to loosen and unscrew the filter.

  8. MiTM Pressure Washers CA2703HDHB1 2017 Output Assembly Replacement, Remove the filter: passo 8, immagine 1 di 1
    • Remove the filter with the return elbow attached.

  9. MiTM Pressure Washers CA2703HDHB1 2017 Output Assembly Replacement, Loosen the input elbow: passo 9, immagine 1 di 2 MiTM Pressure Washers CA2703HDHB1 2017 Output Assembly Replacement, Loosen the input elbow: passo 9, immagine 2 di 2
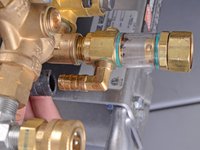
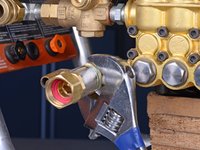
    • Use a 1" or large adjustable wrench to loosen and unscrew the pump input elbow.

  10. MiTM Pressure Washers CA2703HDHB1 2017 Output Assembly Replacement, Remove the input elbow: passo 10, immagine 1 di 1
    • Remove the input elbow fitting.

  11. MiTM Pressure Washers CA2703HDHB1 2017 Output Assembly Replacement, Loosen the output assembly: passo 11, immagine 1 di 2 MiTM Pressure Washers CA2703HDHB1 2017 Output Assembly Replacement, Loosen the output assembly: passo 11, immagine 2 di 2
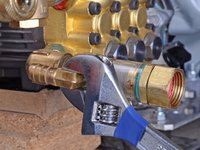
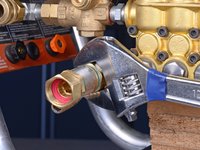
    • Use a 3/4" or adjustable wrench to loosen and disconnect the coupling from the pump assembly.

  12. MiTM Pressure Washers CA2703HDHB1 2017 Output Assembly Replacement, Remove the output assembly: passo 12, immagine 1 di 1
    • Remove the output assembly.

Conclusione

To reassemble your device, follow these instructions in reverse order.

When you re-connect the fittings, clean off the old thread sealant and apply new thread sealant (tape or pipe dope).

Arthur Shi

Membro da: 01/03/18

282.691 Reputazione

587 Guide realizzate

Team

iFixit Membro di iFixit

Staff

118 Membri

19.455 Guide realizzate

0 Commenti

Aggiungi Commento

Visualizza Statistiche:

Ultime 24 Ore: 1

Ultimi 7 Giorni: 3

Ultimi 30 Giorni: 3

Tutti i Tempi: 23