Salta al contenuto principale
MSI GS66 Stealth 11UE-007 Speakers Replacement

MSI GS66 Stealth 11UE-007 Speakers Replacement

Alex Robinson

Alex Robinson e 3 altri collaboratori

Ultimo aggiornamento il December 29, 2023

5 - 25 minuti
Difficile

Introduzione

Vai al passo 1

If your MSI GS66 Stealth laptop (model 11UE-007) is having problems with distorted sound, no sound at all or sound loss of any kind from your speakers, this guide is here to help! Broken speakers are a frequent problem with this laptop and are an essential part of any laptop.

Broken speakers can be a result of many different reasons for example, dropping the laptop, water damage, the volume being maxed regularly or even something as small as debris. This guide will take a step-by-step process in the replacement of ths speakers in the MSI GS66 Stealth laptop.

Cosa ti serve

Strumenti

Mostra di più…

  1. MSI GS66 Stealth 11UE-007 Speakers Replacement, Battery: passo 1, immagine 1 di 1
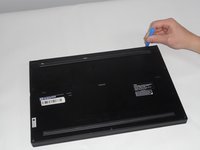
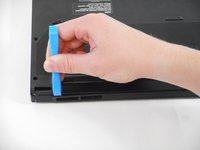
    • Orient your laptop so that the bottom is facing up and the hinge is away from yourself.

    • Make sure to unplug device.

  2. MSI GS66 Stealth 11UE-007 Speakers Replacement: passo 2, immagine 1 di 1
    • Identify the nine screws around the perimeter. One screw will be under the factory seal sticker.

  3. MSI GS66 Stealth 11UE-007 Speakers Replacement: passo 3, immagine 1 di 1
    • Remove eight 10 mm Phillips #1 screws.

  4. MSI GS66 Stealth 11UE-007 Speakers Replacement: passo 4, immagine 1 di 1
    • Remove one 7 mm Phillips #1 screw from the center bottom of backplate.

  5. MSI GS66 Stealth 11UE-007 Speakers Replacement: passo 5, immagine 1 di 3 MSI GS66 Stealth 11UE-007 Speakers Replacement: passo 5, immagine 2 di 3 MSI GS66 Stealth 11UE-007 Speakers Replacement: passo 5, immagine 3 di 3
    • Use the tip of the blue plastic opening tool to slip between the backplate and the body of the laptop at the hinge side.

    • Wiggle the blue plastic opening tool as you slide it around the perimeter of the backplate to separate is from the body of the laptop.

  6. MSI GS66 Stealth 11UE-007 Speakers Replacement: passo 6, immagine 1 di 1
    • Peal back metallic tape on the right side of the USB port.

  7. MSI GS66 Stealth 11UE-007 Speakers Replacement: passo 7, immagine 1 di 2 MSI GS66 Stealth 11UE-007 Speakers Replacement: passo 7, immagine 2 di 2
    • Remove three 6 mm Phillips #1 screws.

  8. MSI GS66 Stealth 11UE-007 Speakers Replacement: passo 8, immagine 1 di 1
    • Use the tip of the spudger or your fingernail to gently push out the white connector.

  9. MSI GS66 Stealth 11UE-007 Speakers Replacement: passo 9, immagine 1 di 2 MSI GS66 Stealth 11UE-007 Speakers Replacement: passo 9, immagine 2 di 2
    • Remove the battery from the device.

  10. MSI GS66 Stealth 11UE-007 Speakers Replacement, Speakers: passo 10, immagine 1 di 2 MSI GS66 Stealth 11UE-007 Speakers Replacement, Speakers: passo 10, immagine 2 di 2
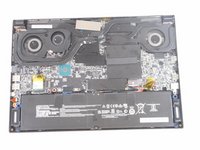
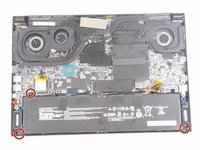
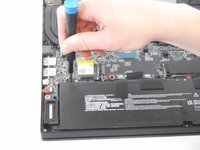
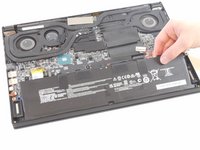
    • Disconnect the speaker power using the tip of the spudger or fingernail to gently push on either side of the connector.

  11. MSI GS66 Stealth 11UE-007 Speakers Replacement: passo 11, immagine 1 di 2 MSI GS66 Stealth 11UE-007 Speakers Replacement: passo 11, immagine 2 di 2
    • Lift up the clip using the spudger.

    • Pull out the ribbon cable away from the clips.

  12. MSI GS66 Stealth 11UE-007 Speakers Replacement: passo 12, immagine 1 di 2 MSI GS66 Stealth 11UE-007 Speakers Replacement: passo 12, immagine 2 di 2
    • Remove the wire from the channel it's sitting in.

  13. MSI GS66 Stealth 11UE-007 Speakers Replacement: passo 13, immagine 1 di 3 MSI GS66 Stealth 11UE-007 Speakers Replacement: passo 13, immagine 2 di 3 MSI GS66 Stealth 11UE-007 Speakers Replacement: passo 13, immagine 3 di 3
    • Lift up the left and right speakers.

Conclusione

To reassemble your device, follow these instructions in reverse order.

Un'altra persona ha completato questa guida.

0 Commenti

Aggiungi Commento

Visualizza Statistiche:

Ultime 24 Ore: 1

Ultimi 7 Giorni: 3

Ultimi 30 Giorni: 10

Tutti i Tempi: 213