
MSI GS60 6QE GHOST PRO 4K Battery Replacement
Introduzione
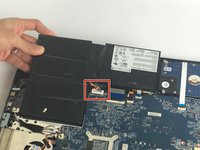
Vai al passo 1The process to replace the battery involves a few steps. The first step is unscrewing the 15 screws that hold the bottom plate together to gain access to the battery. The second step is unplugging the battery carefully to be replaced.
Cosa ti serve
Strumenti

-
-
Remove the eleven 5mm screws with a Phillips #0 bit.
-
Remove the four 2.5mm screws with a Phillips #0 bit.
-
-


To reassemble your device, follow these instructions in reverse order.
To reassemble your device, follow these instructions in reverse order.
Annulla: non ho completato questa guida.
Altre 5 persone hanno completato questa guida.
Team

USF Tampa, Team S1-G4, Nance Fall 2017 Membro di USF Tampa, Team S1-G4, Nance Fall 2017
USFT-NANCE-F17S1G4
3 Membri
5 Guide realizzate
Un commento
The screws on corners doesnt have the same length. The Guide is wrong carefull!