
Lenovo IdeaPad S340-15IWL Battery Replacement

Introduzione
Vai al passo 1Use this guide to replace the battery in the Lenovo IdeaPad S340-15 IWL laptop.
Failure to charge or inability to hold charge may indicate a faulty battery. Make sure to look at the troubleshooting guide before continuing with battery replacement as inadequate power settings, broken or obstructed charging ports, or a defective charger may be the culprit and are easy and affordable fixes.
Make sure to keep any food or liquid away from the computer during the replacement process as the computer’s internal components will be exposed. If the battery appears swollen, follow the appropriate steps to handle and dispose of it properly.
Cosa ti serve
Ricambi


Strumenti


Mostra di più…
-
-
Power off the laptop and place it face-down on a non-scratching surface.
-
Using a Torx T5 screwdriver head, remove all ten 6 mm screws holding the back panel in place.
-
-
-
-
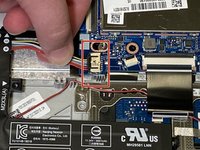
Disconnect the battery cable by gently pulling it straight out of the connector.
-
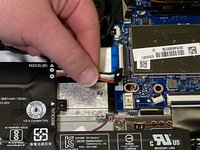
Remove the battery from the laptop.
-


To reassemble your device, follow these instructions in reverse order.
To reassemble your device, follow these instructions in reverse order.
Annulla: non ho completato questa guida.
Altre 2 persone hanno completato questa guida.

Team

Western Carolina University, Team 1-3, Virtue Fall 2021 Membro di Western Carolina University, Team 1-3, Virtue Fall 2021
WCU-VIRTUE-F21S1G3
4 Membri
9 Guide realizzate