Salta al contenuto principale
Lenovo IdeaPad 330-15AST Hard Drive Replacement

Lenovo IdeaPad 330-15AST Hard Drive Replacement

Chloe Powell

Chloe Powell e 4 altri collaboratori

Ultimo aggiornamento il August 28, 2024

30 - 50 minuti
Moderato
Foto Azione
Necessarie Più Immagini

Introduzione

Vai al passo 1

If your Lenovo IdeaPad 330-15AST is experiencing slow performance, frequent crashes it might be time to change your hard drive. Use this guide to help you replace your hard drive on the Lenovo IdeaPad 330-15AST.

Before using this guide make sure that you backup the important data that you have before replacing your hard drive to prevent any data loss.

Before you start this guide make sure that your device is completely turned off and disconnected from any power source.


Cosa ti serve

Kit di riparazione

Questi kit contengono tutti i ricambi e gli strumenti necessari per completare questa guida.

Ricambi

Strumenti

Mostra di più…

  1. Lenovo IdeaPad 330-15AST Hard Drive Replacement, Optical Drive: passo 1, immagine 1 di 1
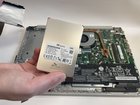
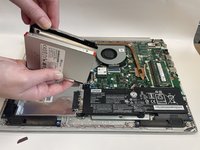
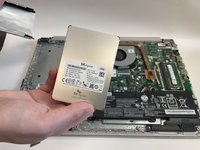
    • Remove the 7 mm Phillips screw from the back of the laptop that secures the optical drive in place.

  2. Lenovo IdeaPad 330-15AST Hard Drive Replacement: passo 2, immagine 1 di 1
    • Carefully slide the optical drive out of the laptop.

  3. Lenovo IdeaPad 330-15AST Hard Drive Replacement, Back Cover: passo 3, immagine 1 di 1
    • Remove the twelve 7 mm Phillips screw from the back of the device.

  4. Lenovo IdeaPad 330-15AST Hard Drive Replacement: passo 4, immagine 1 di 1
    • Use opening picks or a plastic pry tool to remove the cover on all sides then lift.

  5. Lenovo IdeaPad 330-15AST Hard Drive Replacement, Hard Drive: passo 5, immagine 1 di 1
    • Detach the battery connector from the socket on the motherboard.

  6. Lenovo IdeaPad 330-15AST Hard Drive Replacement: passo 6, immagine 1 di 1
    • Pull the hard drive case out to remove it.

  7. Lenovo IdeaPad 330-15AST Hard Drive Replacement: passo 7, immagine 1 di 2 Lenovo IdeaPad 330-15AST Hard Drive Replacement: passo 7, immagine 2 di 2
    • Remove the hard drive from the hard drive case.

Conclusione

To reassemble your device, follow these instructions in reverse order.

0 Commenti

Aggiungi Commento

Visualizza Statistiche:

Ultime 24 Ore: 2

Ultimi 7 Giorni: 31

Ultimi 30 Giorni: 82

Tutti i Tempi: 3,293