Salta al contenuto principale
Lenovo G50-80 80E5 Fan Replacement

Lenovo G50-80 80E5 Fan Replacement

Noah Baldwin

Noah Baldwin e 4 altri collaboratori

Ultimo aggiornamento il May 24, 2022

10 minuti
Facile

Introduzione

Vai al passo 1

The Lenovo G50-80 80E5 is a high-performing laptop capable of running multiple applications at the same time. Because of this, a well performing fan is needed to ensure that all the components of the laptop stay cool as the fan keeps air circulating throughout the inside of the laptop. If you feel as if your laptop is getting hotter than normal, or you think you can hear bearings in the fan starting to struggle, it may be time to replace the fan. If you identify with either of these issues, refer to this guide to remove and replace the fan in your Lenovo G50-80 80E5.

The laptop will need to be disassembled to reach the fan. Make sure the laptop is powered off and disconnected from any external power sources such as the laptop's charger.

Cosa ti serve

Strumenti

Mostra di più…

  1. Lenovo G50-80 80E5 Fan Replacement, Battery: passo 1, immagine 1 di 1
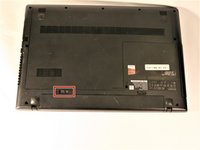
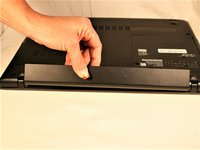
    • Place the laptop on a flat surface with the back cover facing up and the hinges facing you.

  2. Lenovo G50-80 80E5 Fan Replacement: passo 2, immagine 1 di 3 Lenovo G50-80 80E5 Fan Replacement: passo 2, immagine 2 di 3 Lenovo G50-80 80E5 Fan Replacement: passo 2, immagine 3 di 3
    • Slide the tab positioned on the right side to the right.

    • You will know this has been done correctly when you can see the red surface beneath the tab.

  3. Lenovo G50-80 80E5 Fan Replacement: passo 3, immagine 1 di 3 Lenovo G50-80 80E5 Fan Replacement: passo 3, immagine 2 di 3 Lenovo G50-80 80E5 Fan Replacement: passo 3, immagine 3 di 3
    • Move the left tab to the left to release the battery.

    • You will hear an audible 'click' and see the battery separate from the rest of the laptop.

  4. Lenovo G50-80 80E5 Fan Replacement: passo 4, immagine 1 di 3 Lenovo G50-80 80E5 Fan Replacement: passo 4, immagine 2 di 3 Lenovo G50-80 80E5 Fan Replacement: passo 4, immagine 3 di 3
    • Hold the battery at the top seam between it and the laptop.

    • Roll the battery towards yourself.

    • Lift the battery out of the laptop.

  5. Lenovo G50-80 80E5 Fan Replacement, Bottom Access Panel: passo 5, immagine 1 di 2 Lenovo G50-80 80E5 Fan Replacement, Bottom Access Panel: passo 5, immagine 2 di 2
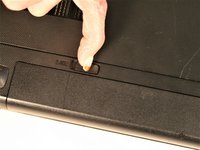
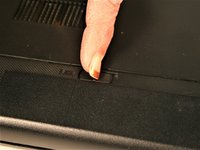
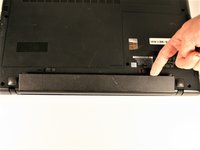
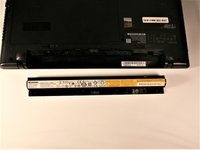
    • Remove the three screws securing the outer cover of the laptop using a Phillips #0 screwdriver.

  6. Lenovo G50-80 80E5 Fan Replacement: passo 6, immagine 1 di 2 Lenovo G50-80 80E5 Fan Replacement: passo 6, immagine 2 di 2
    • Slide the cover away from the hinges and lift the panel off.

  7. Lenovo G50-80 80E5 Fan Replacement, Fan: passo 7, immagine 1 di 1
    • Rotate the laptop so that you are positioned over the fan.

  8. Lenovo G50-80 80E5 Fan Replacement: passo 8, immagine 1 di 1
    • Remove the three 6 mm screws securing the fan using a Phillips #00 screwdriver.

  9. Lenovo G50-80 80E5 Fan Replacement: passo 9, immagine 1 di 1
    • Unplug the cable from the tri-color end connected to the motherboard.

  10. Lenovo G50-80 80E5 Fan Replacement: passo 10, immagine 1 di 1
    • Remove the fan from the laptop.

Conclusione

To reassemble your device, follow these instructions in reverse order.

Altre 2 persone hanno completato questa guida.

0 Commenti

Aggiungi Commento

Visualizza Statistiche:

Ultime 24 Ore: 0

Ultimi 7 Giorni: 1

Ultimi 30 Giorni: 8

Tutti i Tempi: 596