N-Strike Nite Finder EX-3 Leaf Spring Switch Replacement Guide

Introduzione
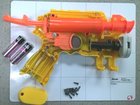
Vai al passo 1If the laser is not turning on, or flickering on your N-Strike Nite Finder EX-3, the problem may be caused by a faulty leaf spring. In order to replace this part, follow the steps in this guide.
Cosa ti serve
Strumenti


Mostra di più…

-
-
Place the blaster upside down on the table, and remove the screw in the bottom of the handle.
-
Remove the battery door and take the batteries out.
-


To reassemble your device, follow these instructions in reverse order.
To reassemble your device, follow these instructions in reverse order.
Annulla: non ho completato questa guida.
Un'altra persona ha completato questa guida.
Preparati per le riparazioni future
Acquista tutti


Team

Michigan Tech, Team 5-8, Lauer Spring 2014 Membro di Michigan Tech, Team 5-8, Lauer Spring 2014
MTU-LAUER-S14S5G8
3 Membri
13 Guide realizzate