
LG G8 ThinQ Midframe Replacement

Introduzione
Vai al passo 1Is the Midframe on your LG G8 ThinQ damaged or broken and needs to be replaced? Use this guide to help you replace it.
The midframe on any electrical device acts as the backbone to the phone as it holds everything together and contributes to its overall durability and design aesthetic. Replacement is essential if needed for any electrical device.
Make sure the SIM card is kept in a safe place when making repairs as you will need it when putting the device back together.
Before starting, ensure the device is completely powered off and not plugged into any external electrical sources.
Cosa ti serve


-
-
Unplug and power off your phone before you begin.
-
Insert the SIM card eject tool into the pinhole in the lower right side of the phone.
-
Remove the SIM card and tray.
-
-
-
Place the phone so that the screen is facing down.
-
Insert opening cards between the back panel and frame of the phone to loosen the clips and adhesive.
-
Using equal pressure, carefully pry the back panel away from the phone.
-
Once enough space has been created, use an opening tool to completely separate the back panel from the phone.
-
-
-
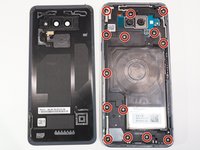
Remove all 14 screws from the midframe using a Phillips #000 screwdriver.
-
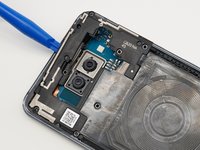
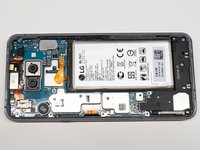
Work an opening tool around the perimeter of the midframe to pry and remove it from the phone.
-


To reassemble your device, follow these instructions in reverse order.
To reassemble your device, follow these instructions in reverse order.

