Salta al contenuto principale

LG G3 Vigor Headphone Jack Replacement

Cosa ti serve

  1. LG G3 Vigor Headphone Jack Replacement, Rear Case: passo 1, immagine 1 di 1
    • Locate the notch on the bottom right of the phone.

  2. LG G3 Vigor Headphone Jack Replacement: passo 2, immagine 1 di 1
    • Gently pull the cover on the back of the phone off to locate the battery.

  3. LG G3 Vigor Headphone Jack Replacement, Battery: passo 3, immagine 1 di 1
    • Remove the battery by lifting from the slot at the bottom of the battery.

  4. LG G3 Vigor Headphone Jack Replacement, Midframe: passo 4, immagine 1 di 1
    • Remove the twelve Phillips #00 screws securing the midframe to the rest of the phone.

  5. LG G3 Vigor Headphone Jack Replacement: passo 5, immagine 1 di 3 LG G3 Vigor Headphone Jack Replacement: passo 5, immagine 2 di 3 LG G3 Vigor Headphone Jack Replacement: passo 5, immagine 3 di 3
    • Work a plastic opening tool around the perimeter of the phone to separate the midframe from the rest of the phone.

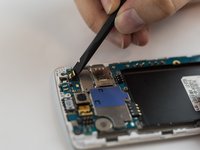
  6. LG G3 Vigor Headphone Jack Replacement, Rear Facing Camera: passo 6, immagine 1 di 1
    • Use the spudger to gently unplug the ribbon cable connected to the motherboard. Then remove the rear facing camera.

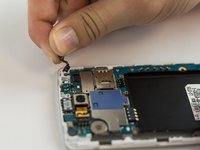
  7. LG G3 Vigor Headphone Jack Replacement, Front Facing Camera: passo 7, immagine 1 di 2 LG G3 Vigor Headphone Jack Replacement, Front Facing Camera: passo 7, immagine 2 di 2
    • Use the spudger to gently unplug the ribbon cable connected to the motherboard.

    • Remove the front camera.

  8. LG G3 Vigor Headphone Jack Replacement, Motherboard: passo 8, immagine 1 di 1
    • Use the flat edge of a spudger to disconnect the motherboard ribbon connector.

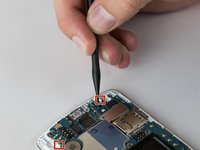
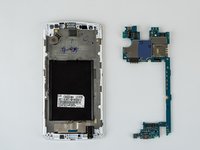
  9. LG G3 Vigor Headphone Jack Replacement: passo 9, immagine 1 di 2 LG G3 Vigor Headphone Jack Replacement: passo 9, immagine 2 di 2
    • Use the pointed end of a spudger to push back the two motherboard retaining flaps.

    • The motherboard should now be able to be lifted out of the device.

  10. LG G3 Vigor Headphone Jack Replacement, Headphone Jack: passo 10, immagine 1 di 1
    • Remove the headphone jack by inserting the spudger into the jack and pulling it up and out.

Conclusione

To reassemble your device, follow these instructions in reverse order.

Altre 2 persone hanno completato questa guida.

Geoff Wacker

Membro da: 09/30/13

89.934 Reputazione

89 Guide realizzate

Un commento

Works also with D855. There are only a view differences, e.g. screws and a minimal different motherboarddesign.

flux - Replica

Aggiungi Commento

Visualizza Statistiche:

Ultime 24 Ore: 0

Ultimi 7 Giorni: 0

Ultimi 30 Giorni: 0

Tutti i Tempi: 451