
Infant Optics DXR-8 Power Button Replacement
Introduzione
Vai al passo 1If your Infant Optics DXR-8 baby monitor's power button is not responding, jammed, or broken, this guide will help you to replace it. Follow the simple steps described here to safely take out the old button and replace it with a new one.
Make sure to turn off the device and unplug it from the charger before you begin.
Cosa ti serve


-
-
Using the plastic opening tool, remove screen protector from front of monitor.
-
-
-
-
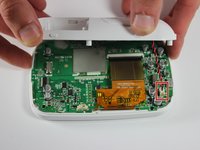
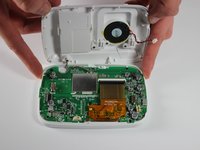
Disconnect speaker from monitor for ease of access by unplugging wire.
Thank you so much for this - and thank you to the commenter who walked through the additional screen replacement steps! I’ve never done anything like this and I managed to replace the screen myself.
-


To reassemble your device, follow the instructions in reverse order.
To reassemble your device, follow the instructions in reverse order.
Annulla: non ho completato questa guida.
Altre 3 persone hanno completato questa guida.
Team

The Citadel Military College of South Carolina, Team S2-G1, Eggleston Fall 2019 Membro di The Citadel Military College of South Carolina, Team S2-G1, Eggleston Fall 2019
CMCSC-EGGLESTON-F19S2G1
3 Membri
3 Guide realizzate
2 Commenti
Where did you get the replacement switch?
Where can you purchase a new power switch on the circuit board for replacement?
There's a layer of adhesive between the screen protector and the white plastic behind it.
Jared Astillero - Replica
The cover is glued on. So you’ll nee d quite a bit of force to bend it up. But then it’ll come lose glue point by glue point. At first I was afraid that I’ll break it.
Marco Smolla - Replica