
How to Repair Damaged Door or Window Casing
Introduzione
Vai al passo 1Door or window casing is very easily damaged in the home whether it be from moving furniture or being chewed up by a dog. This guide provides simple steps to fix multiple types of trim without breaking the bank.
Cosa ti serve
Strumenti


Mostra di più…
-
-
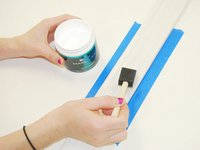
Sand down the damaged area of the trim using the block sanding sponge to make a smooth surface.
-
-


Repairing chipped and/or broken door or window casing in the home as a do-it-yourself project overall saves time and money. There is no hassle of having to take off of work to meet the installers, no outrageous costs for materials and proper equipment, and no stress because this guide has everything necessary to complete the repair. So have fun, good luck, and happy fixing.
Repairing chipped and/or broken door or window casing in the home as a do-it-yourself project overall saves time and money. There is no hassle of having to take off of work to meet the installers, no outrageous costs for materials and proper equipment, and no stress because this guide has everything necessary to complete the repair. So have fun, good luck, and happy fixing.
Annulla: non ho completato questa guida.
Un'altra persona ha completato questa guida.
Team

Texas Tech, Team S1-G6, Rauch Summer 2017 Membro di Texas Tech, Team S1-G6, Rauch Summer 2017
TTU-RAUCH-SU17S1G6
3 Membri
1 Guida realizzata