Salta al contenuto principale
Unisciti alla Community delle riparazioni - Crea un account
How to Remove a Filament Clog on a Cubify Cube 3D Printer (3rd Generation)

How to Remove a Filament Clog on a Cubify Cube 3D Printer (3rd Generation)

Hector Vazquez

Hector Vazquez e 2 altri collaboratori

Ultimo aggiornamento il 3 ago 2023

25 - 30 minuti
Moderato
Necessarie Immagini Migliori
Introduzione Migliore

Introduzione

Vai al passo 1

If your Cubify Printer has stopped printing and refuses to start a new print, this guide to remove a clog in a Cubify White Cube 3D Printer (3rd Generation) filament cartridge.

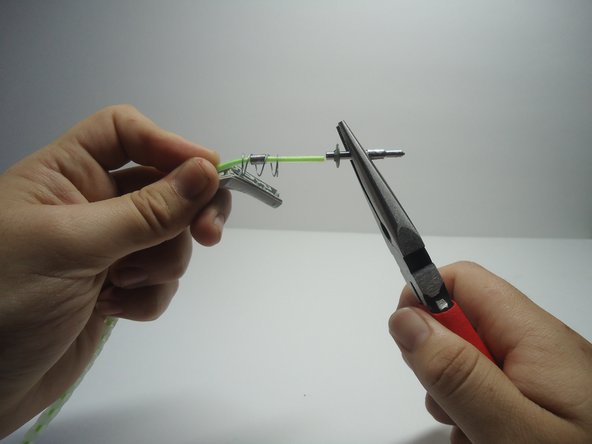
The injector needles transfer the plastic filament to the printing bed and also layer the plastic. A clogged injector can damage the cartridge and ruin the filament.

Cosa ti serve

Strumenti

Mostra di più…

  1. How to Remove a Filament Clog on a Cubify Cube 3D Printer (3rd Generation), How to Remove a Filament Clog on a Cubify Cube 3D Printer (3rd Generation): passo 1, immagine 1 di 2 How to Remove a Filament Clog on a Cubify Cube 3D Printer (3rd Generation), How to Remove a Filament Clog on a Cubify Cube 3D Printer (3rd Generation): passo 1, immagine 2 di 2
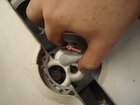
    • On the top of the printer, turn the injector counter-clockwise and pull the tab.

  2. How to Remove a Filament Clog on a Cubify Cube 3D Printer (3rd Generation): passo 2, immagine 1 di 3 How to Remove a Filament Clog on a Cubify Cube 3D Printer (3rd Generation): passo 2, immagine 2 di 3 How to Remove a Filament Clog on a Cubify Cube 3D Printer (3rd Generation): passo 2, immagine 3 di 3
    • Insert your fingers in the center of the filament cartridge and slowly pull it away from the printer.

  3. How to Remove a Filament Clog on a Cubify Cube 3D Printer (3rd Generation): passo 3, immagine 1 di 1
    • Place the cartridge face up and pry off the lid of the cartridge.

  4. How to Remove a Filament Clog on a Cubify Cube 3D Printer (3rd Generation): passo 4, immagine 1 di 2 How to Remove a Filament Clog on a Cubify Cube 3D Printer (3rd Generation): passo 4, immagine 2 di 2
    • Gently flip the cartridge on its front and remove the two 2mm Hex screws using a Hex key.

  5. How to Remove a Filament Clog on a Cubify Cube 3D Printer (3rd Generation): passo 5, immagine 1 di 1
    • Flip the cartridge face up and remove the gearbox and extractor tube.

  6. How to Remove a Filament Clog on a Cubify Cube 3D Printer (3rd Generation): passo 6, immagine 1 di 3 How to Remove a Filament Clog on a Cubify Cube 3D Printer (3rd Generation): passo 6, immagine 2 di 3 How to Remove a Filament Clog on a Cubify Cube 3D Printer (3rd Generation): passo 6, immagine 3 di 3
    • Place your thumb on the front of the injector head and your middle finger on the needle.

    • Firmly pull the needle towards your thumb until the injector head cases cracks and pulls apart the case.

  7. How to Remove a Filament Clog on a Cubify Cube 3D Printer (3rd Generation): passo 7, immagine 1 di 2 How to Remove a Filament Clog on a Cubify Cube 3D Printer (3rd Generation): passo 7, immagine 2 di 2
    • Heat the needle using a lighter, making sure that the flame does not touch the needle.

    • Using needle-nose pliers, pull the needle from the tube.

    • Do not touch the needle as it may still be hot.

  8. How to Remove a Filament Clog on a Cubify Cube 3D Printer (3rd Generation): passo 8, immagine 1 di 1
    • Insert a paper clip and turn until the clog is removed.

Conclusione

To reassemble your device, follow these instructions in reverse order.

Preparati per le riparazioni future

Acquista tutti

Hector Vazquez

Membro da: 10/23/20

157 Reputazione

1 Guida realizzata

Team

0Commenti sulla guida

Aggiungi Commento

Visualizza Statistiche:

Ultime 24 Ore: 0

Ultimi 7 Giorni: 6

Ultimi 30 Giorni: 20

Tutti i Tempi: 678