Salta al contenuto principale
Unisciti alla Community delle riparazioni - Crea un account
How to Remove a Blob from an AnkerMake M5 3D Printer

How to Remove a Blob from an AnkerMake M5 3D Printer

Adolfo Fabian

Adolfo Fabian e 2 altri collaboratori

Ultimo aggiornamento il March 30, 2025

2 ore
Moderato

Introduzione

Vai al passo 1

This guide will show how to fix a filament blob on the AnkerMake M5 3D printer. Blobs from a loose nozzle can cause clogs, poor print quality, or even damage the printer. My guide provides clear, simple steps to remove the blob and check the nozzle, helping users keep their printer working well without expensive repairs. This fix is designed to be easy for beginners to follow, making 3D printing smoother and less frustrating.

Cosa ti serve

iFixit guadagna commissioni quando acquisti tramite questi link.
  1. How to Remove a Blob from an AnkerMake M5 3D Printer, Prepare to Remove Extruder Housing: passo 1, immagine 1 di 3 How to Remove a Blob from an AnkerMake M5 3D Printer, Prepare to Remove Extruder Housing: passo 1, immagine 2 di 3 How to Remove a Blob from an AnkerMake M5 3D Printer, Prepare to Remove Extruder Housing: passo 1, immagine 3 di 3
    • Press down on the black collar while pulling up on the PTFE tubing.

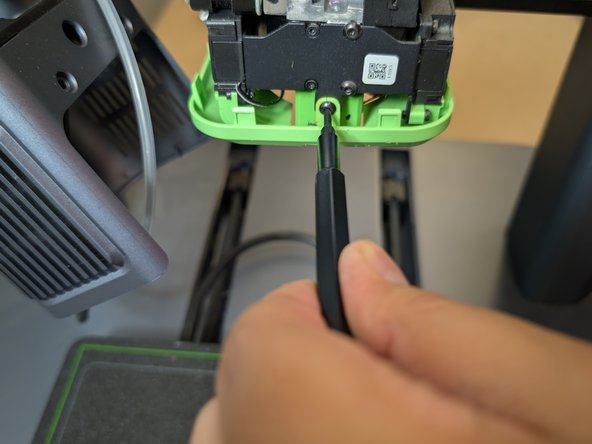
    • Using a 1.5mm hex wrench, remove the two screws on either side of the USB-C cable.

  2. How to Remove a Blob from an AnkerMake M5 3D Printer, Remove the USB-C Cable: passo 2, immagine 1 di 2 How to Remove a Blob from an AnkerMake M5 3D Printer, Remove the USB-C Cable: passo 2, immagine 2 di 2
    • Pull straight up on the USB-C cable.

  3. How to Remove a Blob from an AnkerMake M5 3D Printer, Clear Blob Chunks to Remove Extruder Housing Trim: passo 3, immagine 1 di 3 How to Remove a Blob from an AnkerMake M5 3D Printer, Clear Blob Chunks to Remove Extruder Housing Trim: passo 3, immagine 2 di 3 How to Remove a Blob from an AnkerMake M5 3D Printer, Clear Blob Chunks to Remove Extruder Housing Trim: passo 3, immagine 3 di 3
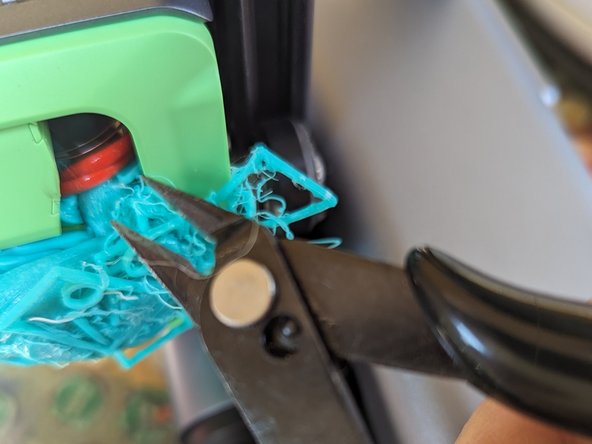
    • Use clippers to remove the blobs in order to remove the extruder housing rim.

  4. How to Remove a Blob from an AnkerMake M5 3D Printer, Clean Heater Block After Blob Has Melted Off: passo 4, immagine 1 di 2 How to Remove a Blob from an AnkerMake M5 3D Printer, Clean Heater Block After Blob Has Melted Off: passo 4, immagine 2 di 2
    • Plug the printer back in.

    • Power on the printer and heat the nozzle to 250°C for a few minutes to soften the blob. In many cases, the heat will melt off the blob if the extruder housing is removed.

  5. How to Remove a Blob from an AnkerMake M5 3D Printer, Clean Thermal Sleeve: passo 5, immagine 1 di 2 How to Remove a Blob from an AnkerMake M5 3D Printer, Clean Thermal Sleeve: passo 5, immagine 2 di 2
    • Once heated, turn off and unplug the printer. Carefully wiggle off the softened filament blob.

  6. How to Remove a Blob from an AnkerMake M5 3D Printer, Remove the Trim Screws: passo 6, immagine 1 di 2 How to Remove a Blob from an AnkerMake M5 3D Printer, Remove the Trim Screws: passo 6, immagine 2 di 2
    • Use the Phillips #00 Screwdriver to remove the screws from the housing of the nozzle.

  7. How to Remove a Blob from an AnkerMake M5 3D Printer, Remove Extruder Housing Trim: passo 7, immagine 1 di 2 How to Remove a Blob from an AnkerMake M5 3D Printer, Remove Extruder Housing Trim: passo 7, immagine 2 di 2
    • After the screws have been removed, the housing comes off by pulling down.

  8. How to Remove a Blob from an AnkerMake M5 3D Printer, Look for Electrical Damage and Wires to Avoid: passo 8, immagine 1 di 3 How to Remove a Blob from an AnkerMake M5 3D Printer, Look for Electrical Damage and Wires to Avoid: passo 8, immagine 2 di 3 How to Remove a Blob from an AnkerMake M5 3D Printer, Look for Electrical Damage and Wires to Avoid: passo 8, immagine 3 di 3
    • For any remaining blob pieces, use a heated craft knife and clippers.

    • Be careful to avoid any electrical wiring for the fans and thermistor.

  9. How to Remove a Blob from an AnkerMake M5 3D Printer, The Blob is Removed! Inspect the Parts: passo 9, immagine 1 di 3 How to Remove a Blob from an AnkerMake M5 3D Printer, The Blob is Removed! Inspect the Parts: passo 9, immagine 2 di 3 How to Remove a Blob from an AnkerMake M5 3D Printer, The Blob is Removed! Inspect the Parts: passo 9, immagine 3 di 3
    • Now that the blob has been removed, it it time to clean the thermal sleeve.

    • The thermal sleeve may be embedded in the blob, and removing it might damage it. In that case install a new one.

  10. How to Remove a Blob from an AnkerMake M5 3D Printer, Print a Test Object to Ensure the Printer Works: passo 10, immagine 1 di 1
    • With the blob removed, inspect the nozzle for tightness and alignment. Adjust if necessary.

    • If the nozzle appears to be clear, create a test object to ensure that the nozzle is clean and in good condition.

  11. How to Remove a Blob from an AnkerMake M5 3D Printer, Assess Damaged Parts: passo 11, immagine 1 di 2 How to Remove a Blob from an AnkerMake M5 3D Printer, Assess Damaged Parts: passo 11, immagine 2 di 2
    • Some parts might have cosmetic damage.

    • Some parts might have functional damage. They can be replaced or reprinted, such as these orange fan ducts.

  12. How to Remove a Blob from an AnkerMake M5 3D Printer, Reassembled Extruder: passo 12, immagine 1 di 1
    • Now the nozzle is clean and ready for use again.

Linea Traguardo

Un'altra persona ha completato questa guida.

Team

0Commenti sulla guida

Aggiungi Commento

Visualizza Statistiche:

Ultime 24 Ore: 2

Ultimi 7 Giorni: 14

Ultimi 30 Giorni: 97

Tutti i Tempi: 583