Salta al contenuto principale
HP TouchSmart 15-r015dx Keyboard Replacement

HP TouchSmart 15-r015dx Keyboard Replacement

Jacob Kleinsorge

Jacob Kleinsorge e 11 altri collaboratori

Ultimo aggiornamento il June 8, 2023

5 minuti
Facile

Introduzione

Vai al passo 1

Easy five minute guide, with pictures on how to replace the original keyboard on a HP TouchSmart 15-r015dx laptop to a Cruus NSK-CN6SC keyboard. Replacement may be needed for damaged or broken keyboards. Change your keyboard with three easy steps and using two tools, 1 iFixit Opening Tool and 1 Phillips #00 Screwdriver. Learn how to replace the keyboard on your laptop and spend less than $8 on tools.

Cosa ti serve

Strumenti

  1. HP TouchSmart 15-r015dx Keyboard Replacement, Keyboard: passo 1, immagine 1 di 2 HP TouchSmart 15-r015dx Keyboard Replacement, Keyboard: passo 1, immagine 2 di 2
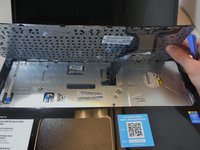
    • Using your Phillips #00 screwdriver, remove the two screws to loosen the fittings of the keyboard.

    • One of the screws lies in the label.

  2. HP TouchSmart 15-r015dx Keyboard Replacement: passo 2, immagine 1 di 3 HP TouchSmart 15-r015dx Keyboard Replacement: passo 2, immagine 2 di 3 HP TouchSmart 15-r015dx Keyboard Replacement: passo 2, immagine 3 di 3
    • Flip the laptop over to view the top and lift the screen up.

    • There are sixteen clips holding the keyboard in place. Gently pry up each clip using a plastic opening tool. Once all clips are loose, lift the keyboard from the computer.

    • Do NOT pull the keyboard up more than 2-3 inches as there is a film-material connecting the keyboard to the laptop.

  3. HP TouchSmart 15-r015dx Keyboard Replacement: passo 3, immagine 1 di 3 HP TouchSmart 15-r015dx Keyboard Replacement: passo 3, immagine 2 di 3 HP TouchSmart 15-r015dx Keyboard Replacement: passo 3, immagine 3 di 3
    • There is a small black latch holding the film-material in place.

    • Flip the black latch up to release the film-material. Once flipped up, simply pull the film-material out from the laptop to release the keyboard.

    • There are tiny prongs on the ribbon; it must be carefully removed and upon re-installation the prongs must be lined up exactly in each tiny track in order for the keyboard to work.

Conclusione

To reassemble your device, follow these instructions in reverse order.

Altre 2 persone hanno completato questa guida.

Team

USF Tampa, Team 16-4, Watkins Winter 2015 Membro di USF Tampa, Team 16-4, Watkins Winter 2015

USFT-WATKINS-W15S16G4

4 Membri

6 Guide realizzate

0Commenti sulla guida

Aggiungi Commento

Visualizza Statistiche:

Ultime 24 Ore: 0

Ultimi 7 Giorni: 2

Ultimi 30 Giorni: 23

Tutti i Tempi: 3,063