Salta al contenuto principale
HP ProBook 450 G4 Battery Replacement

HP ProBook 450 G4 Battery Replacement

Sebastian Dow

Sebastian Dow e 6 altri collaboratori

Ultimo aggiornamento il April 7, 2023

20 - 50 minuti
Moderato
Guida Studente in Evidenza

Introduzione

Vai al passo 1

If your HP ProBook 450 G4 laptop’s battery dies quickly between each charge, this could indicate that your battery is getting old and dying. All laptops have a certain life span and after owning one for a long time, the battery gets worn out. The best way to resolve this issue is to replace the battery with a new one. Before using this guide, check to make sure your charging cable is working properly and is not faulty. In some rare cases, all you need to do is replace the charging cable and not the battery. This guide is designed to help you safely and properly remove your laptop’s battery in an easy to follow way. Before beginning, make sure to power off your laptop and disconnect it from all power sources.

Cosa ti serve

Kit di riparazione

Questo kit contiene tutti i ricambi e gli strumenti necessari per completare questa guida.

Ricambi

Strumenti

Mostra di più…

  1. HP ProBook 450 G4 Battery Replacement, Hard Drive: passo 1, immagine 1 di 2 HP ProBook 450 G4 Battery Replacement, Hard Drive: passo 1, immagine 2 di 2
    • Power your laptop off.

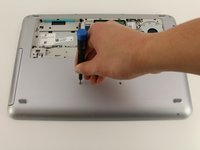
    • Flip the laptop over.

    • Orient the laptop so the two vents on the bottom face upward and are further away from you.

  2. HP ProBook 450 G4 Battery Replacement: passo 2, immagine 1 di 3 HP ProBook 450 G4 Battery Replacement: passo 2, immagine 2 di 3 HP ProBook 450 G4 Battery Replacement: passo 2, immagine 3 di 3
    • Use the Phillips #0 screwdriver to remove the 6.8 mm screw that secures the vent panel to the laptop.

    • Use the spudger to separate the vent panel from the laptop.

    • Slide the vent panel off the backside of the laptop.

  3. HP ProBook 450 G4 Battery Replacement: passo 3, immagine 1 di 2 HP ProBook 450 G4 Battery Replacement: passo 3, immagine 2 di 2
    • Use the Phillips #0 screwdriver to remove the black 3.2mm screw that secures the hard drive to the left side of the laptop.

  4. HP ProBook 450 G4 Battery Replacement: passo 4, immagine 1 di 2 HP ProBook 450 G4 Battery Replacement: passo 4, immagine 2 di 2
    • Use the spudger to lift the left side of the hard drive up.

    • Pull the hard drive diagonally to the left to release the hard drive from the laptop.

  5. HP ProBook 450 G4 Battery Replacement, Keyboard: passo 5, immagine 1 di 3 HP ProBook 450 G4 Battery Replacement, Keyboard: passo 5, immagine 2 di 3 HP ProBook 450 G4 Battery Replacement, Keyboard: passo 5, immagine 3 di 3
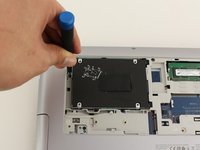
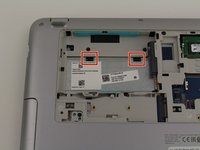
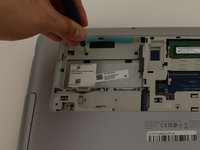
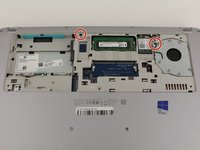
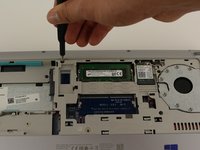
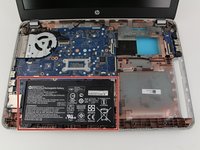
    • Remove the 6.6mm T8 Torx screw located below where the hard drive used to be.

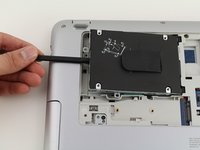
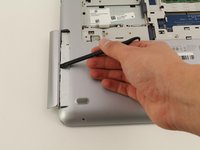
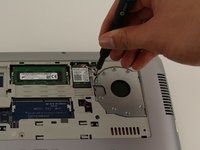
    • Remove the 6.6mm T8 Torx screw located below and to the left of the circular, silver and black fan.

  6. HP ProBook 450 G4 Battery Replacement: passo 6, immagine 1 di 3 HP ProBook 450 G4 Battery Replacement: passo 6, immagine 2 di 3 HP ProBook 450 G4 Battery Replacement: passo 6, immagine 3 di 3
    • Use the spudger to press down on the two black tabs that are underneath where the hard drive used to be.

    • Apply pressure to the black tabs until they release and pop out.

  7. HP ProBook 450 G4 Battery Replacement: passo 7, immagine 1 di 3 HP ProBook 450 G4 Battery Replacement: passo 7, immagine 2 di 3 HP ProBook 450 G4 Battery Replacement: passo 7, immagine 3 di 3
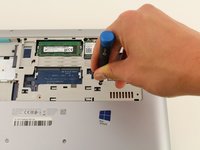
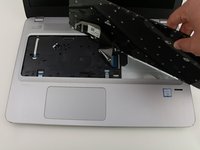
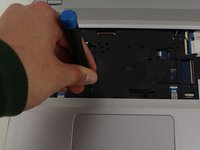
    • Orient the laptop so the keyboard is facing upwards and towards you.

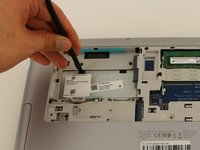
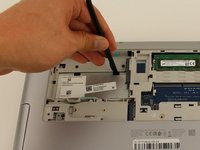
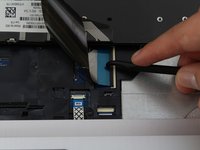
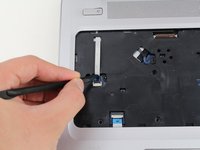
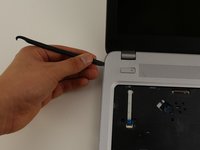
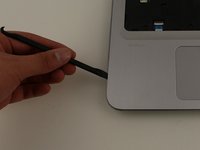
    • Insert the spudger in between the edge of the keyboard and the computer frame.

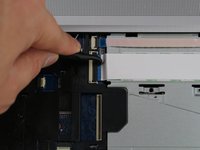
    • Slide the spudger around the edge of the keyboard until the keyboard is loose.

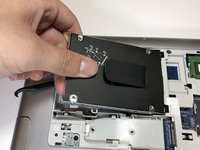
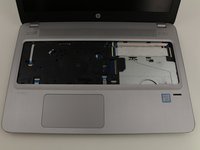
    • Gently pull the keyboard away from the body of the laptop.

    • Do not pull the keyboard all the way off because there is still a connector cable underneath that needs to be disconnected.

  8. HP ProBook 450 G4 Battery Replacement: passo 8, immagine 1 di 2 HP ProBook 450 G4 Battery Replacement: passo 8, immagine 2 di 2
    • Use a spudger to gently lift up the black locking bar on the keyboard connector.

    • Slide the keyboard ribbon out of the connector.

    • Remove the keyboard.

    • To re-attach the keyboard ribbon, slide it into the connector and swing the locking bar down.

  9. HP ProBook 450 G4 Battery Replacement, Battery: passo 9, immagine 1 di 2 HP ProBook 450 G4 Battery Replacement, Battery: passo 9, immagine 2 di 2
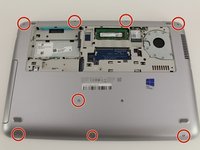
    • Flip the laptop back over.

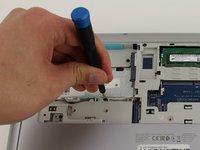
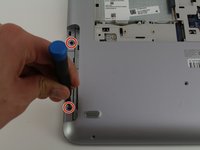
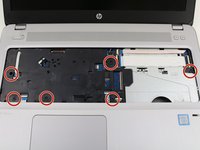
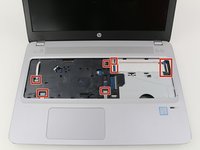
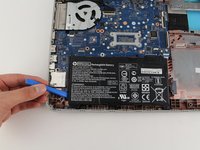
    • Remove the eight 6.8mm T8 Torx screws on the backside of the laptop.

  10. HP ProBook 450 G4 Battery Replacement: passo 10, immagine 1 di 2 HP ProBook 450 G4 Battery Replacement: passo 10, immagine 2 di 2
    • Use a Phillips #0 screwdriver to remove the three 6.6mm screws from the upper left corner of the laptop.

  11. HP ProBook 450 G4 Battery Replacement: passo 11, immagine 1 di 2 HP ProBook 450 G4 Battery Replacement: passo 11, immagine 2 di 2
    • Use the spudger to slide the disk drive out of the laptop.

    • Use the Phillips #0 screwdriver to remove the two 3.2mm screws that are underneath where the disk drive previously was.

  12. HP ProBook 450 G4 Battery Replacement: passo 12, immagine 1 di 3 HP ProBook 450 G4 Battery Replacement: passo 12, immagine 2 di 3 HP ProBook 450 G4 Battery Replacement: passo 12, immagine 3 di 3
    • Use a Phillips #0 screwdriver to remove the two 6.6mm screws.

  13. HP ProBook 450 G4 Battery Replacement: passo 13, immagine 1 di 2 HP ProBook 450 G4 Battery Replacement: passo 13, immagine 2 di 2
    • Flip the laptop back over so it is facing upwards.

    • Remove the six 6.6mm T8 Torx screws underneath where the keyboard used to be.

  14. HP ProBook 450 G4 Battery Replacement: passo 14, immagine 1 di 3 HP ProBook 450 G4 Battery Replacement: passo 14, immagine 2 di 3 HP ProBook 450 G4 Battery Replacement: passo 14, immagine 3 di 3
    • Use the spudger to disconnect the nine cable connectors that secure the top case of the laptop to the body of the laptop.

    • Be extra careful while disconnecting the cable connectors because they can tear easily.

  15. HP ProBook 450 G4 Battery Replacement: passo 15, immagine 1 di 2 HP ProBook 450 G4 Battery Replacement: passo 15, immagine 2 di 2
    • Insert the spudger in between the top case of the laptop and its outer frame.

    • Slide the spudger around the edge of the laptop until the top case comes off.

    • Remove the top case.

  16. HP ProBook 450 G4 Battery Replacement: passo 16, immagine 1 di 2 HP ProBook 450 G4 Battery Replacement: passo 16, immagine 2 di 2
    • Insert the opening tool underneath the left side of the battery to remove it from the laptop.

Conclusione

To reassemble your device, follow these instructions in reverse order.

Altre 8 persone hanno completato questa guida.

Sebastian Dow

Membro da: 01/23/20

1.043 Reputazione

6 Guide realizzate

Team

Cal Poly, Team S1-G3, White Winter 2020 Membro di Cal Poly, Team S1-G3, White Winter 2020

CPSU-WHITE-W20S1G3

4 Membri

18 Guide realizzate

0 Commenti

Aggiungi Commento

Visualizza Statistiche:

Ultime 24 Ore: 8

Ultimi 7 Giorni: 57

Ultimi 30 Giorni: 296

Tutti i Tempi: 21,284