Salta al contenuto principale

HP Pavilion x360 14m-cd0005dx Heat Sink and Fan Replacement

Cosa ti serve

  1. HP Pavilion x360 14m-cd0005dx Heat Sink and Fan Replacement, Back Cover: passo 1, immagine 1 di 1
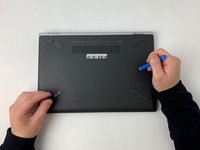
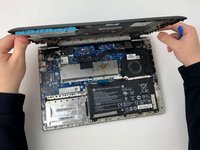
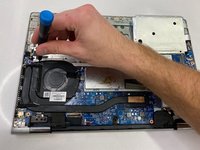
    • Turn off and shut down the computer.

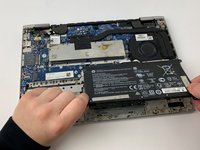
    • Disconnect the power adapter and all external devices connected to the computer.

    • Do not work with the device powered on. It may result in bodily harm through electric shock.

  2. HP Pavilion x360 14m-cd0005dx Heat Sink and Fan Replacement: passo 2, immagine 1 di 1
    • Flip the device with the backplate up and with the hinge on the far side.

  3. HP Pavilion x360 14m-cd0005dx Heat Sink and Fan Replacement: passo 3, immagine 1 di 2 HP Pavilion x360 14m-cd0005dx Heat Sink and Fan Replacement: passo 3, immagine 2 di 2
    • Use the opening tool to remove the rubber feet attached to the bottom of the device.

  4. HP Pavilion x360 14m-cd0005dx Heat Sink and Fan Replacement: passo 4, immagine 1 di 2 HP Pavilion x360 14m-cd0005dx Heat Sink and Fan Replacement: passo 4, immagine 2 di 2
    • Remove all screws located on the bottom of the device:

    • Two Phillips #0 7.0mm screws

    • Three Phillips #00 4.5mm screws

    • Make sure to keep track of all screws removed from the device.

  5. HP Pavilion x360 14m-cd0005dx Heat Sink and Fan Replacement: passo 5, immagine 1 di 3 HP Pavilion x360 14m-cd0005dx Heat Sink and Fan Replacement: passo 5, immagine 2 di 3 HP Pavilion x360 14m-cd0005dx Heat Sink and Fan Replacement: passo 5, immagine 3 di 3
    • Using the opening tool, carefully remove the bottom cover from the device.

  6. HP Pavilion x360 14m-cd0005dx Heat Sink and Fan Replacement, Battery: passo 6, immagine 1 di 3 HP Pavilion x360 14m-cd0005dx Heat Sink and Fan Replacement, Battery: passo 6, immagine 2 di 3 HP Pavilion x360 14m-cd0005dx Heat Sink and Fan Replacement, Battery: passo 6, immagine 3 di 3
    • Use a #00 Phillips screwdriver to remove:

    • Six 2.5 mm screws

  7. HP Pavilion x360 14m-cd0005dx Heat Sink and Fan Replacement: passo 7, immagine 1 di 2 HP Pavilion x360 14m-cd0005dx Heat Sink and Fan Replacement: passo 7, immagine 2 di 2
    • Carefully lift from the base and remove the battery.

  8. HP Pavilion x360 14m-cd0005dx Heat Sink and Fan Replacement, Heat Sink and Fan: passo 8, immagine 1 di 1
    • Remove the tape that secures the fan to the computer.

  9. HP Pavilion x360 14m-cd0005dx Heat Sink and Fan Replacement: passo 9, immagine 1 di 2 HP Pavilion x360 14m-cd0005dx Heat Sink and Fan Replacement: passo 9, immagine 2 di 2
    • Find the fan cable

    • Use the Reverse Tweezers to unplug the fan cable

  10. HP Pavilion x360 14m-cd0005dx Heat Sink and Fan Replacement: passo 10, immagine 1 di 3 HP Pavilion x360 14m-cd0005dx Heat Sink and Fan Replacement: passo 10, immagine 2 di 3 HP Pavilion x360 14m-cd0005dx Heat Sink and Fan Replacement: passo 10, immagine 3 di 3
    • Remove all screws securing the fan to the device:

    • Two Phillips #00 4.5mm screws

    • Four Phillips #00 4.5mm screws

  11. HP Pavilion x360 14m-cd0005dx Heat Sink and Fan Replacement: passo 11, immagine 1 di 2 HP Pavilion x360 14m-cd0005dx Heat Sink and Fan Replacement: passo 11, immagine 2 di 2
    • Lift and remove the fan and heat sink from the device.

    • When removing the fan, there will be an adhesive strip attached to the bottom. There may be some resistance as the device is being removed. Use a spudger to hold the adhesive down during removal.

Conclusione

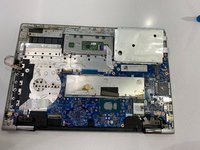
To reassemble your device, follow these instructions in reverse order.

Altre 2 persone hanno completato questa guida.

0 Commenti

Aggiungi Commento

Visualizza Statistiche:

Ultime 24 Ore: 0

Ultimi 7 Giorni: 0

Ultimi 30 Giorni: 1

Tutti i Tempi: 478