Salta al contenuto principale
HP Pavilion x360 11-p110nr Speakers Replacement

HP Pavilion x360 11-p110nr Speakers Replacement

Aeorrell

Aeorrell e 3 altri collaboratori

Ultimo aggiornamento il May 7, 2024

5 - 15 minuti
Facile

Introduzione

Vai al passo 1

This guide helps you to replace your speakers on your HP laptop using only a screwdriver, tweezers, and the replacement part. The entire process is fairly quick and easy, and with a bit of care, it can be completed safely at home.


Caution: Anytime you are working with batteries or power, be sure to take care around the electricity and always unplug the battery before you attempt to replace the port.

Cosa ti serve

Strumenti

  1. HP Pavilion x360 11-p110nr Speakers Replacement, Speakers: passo 1, immagine 1 di 3 HP Pavilion x360 11-p110nr Speakers Replacement, Speakers: passo 1, immagine 2 di 3 HP Pavilion x360 11-p110nr Speakers Replacement, Speakers: passo 1, immagine 3 di 3
    • Eleven case screws are located on the bottom of the laptop. Two will be underneath the rubber feet.

    • Use a Phillips #0 screwdriver to remove all 6.7 mm screws from the bottom cover.

    • Carefully take the bottom cover off.

    • Don't force the bottom plate off. There will be a cable connecting the bottom plate to the rest of the laptop. If you pull too hard you risk damaging this cable.

  2. HP Pavilion x360 11-p110nr Speakers Replacement: passo 2, immagine 1 di 3 HP Pavilion x360 11-p110nr Speakers Replacement: passo 2, immagine 2 di 3 HP Pavilion x360 11-p110nr Speakers Replacement: passo 2, immagine 3 di 3
    • Before fully removing the top cover, locate the cable that connects the audio controls.

    • Once located, lift the small black flap and carefully pull the cable out.

  3. HP Pavilion x360 11-p110nr Speakers Replacement: passo 3, immagine 1 di 3 HP Pavilion x360 11-p110nr Speakers Replacement: passo 3, immagine 2 di 3 HP Pavilion x360 11-p110nr Speakers Replacement: passo 3, immagine 3 di 3
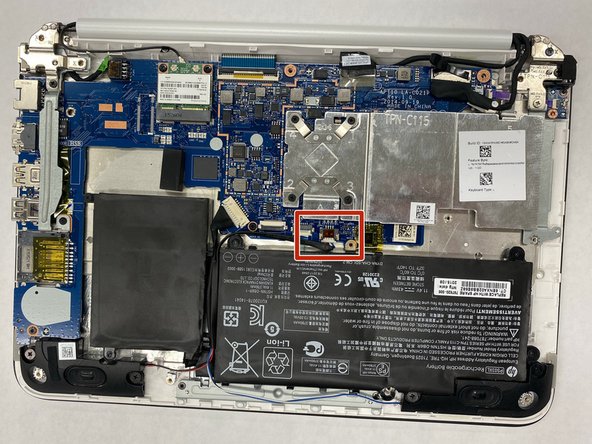
    • Remove the large cable connecting the battery to the main board

    • Caution: Lithium Ion batteries provide a risk of electrocution or fire if mishandled. Failure to disconnect the battery before removing the speakers could also lead to risk of electrocution.

  4. HP Pavilion x360 11-p110nr Speakers Replacement: passo 4, immagine 1 di 3 HP Pavilion x360 11-p110nr Speakers Replacement: passo 4, immagine 2 di 3 HP Pavilion x360 11-p110nr Speakers Replacement: passo 4, immagine 3 di 3
    Attrezzo utilizzato in questo passaggio:
    Tweezers
    $4.99
    • Locate the cable for the speakers and unplug, as shown.

    • If needed, use the tweezers to gently remove the cable from its connector.

  5. HP Pavilion x360 11-p110nr Speakers Replacement: passo 5, immagine 1 di 3 HP Pavilion x360 11-p110nr Speakers Replacement: passo 5, immagine 2 di 3 HP Pavilion x360 11-p110nr Speakers Replacement: passo 5, immagine 3 di 3
    • Use a Phillips #0 screwdriver to remove the four 5.8 mm screws from the speakers.

    • The speakers are now not secured to the laptop.

  6. HP Pavilion x360 11-p110nr Speakers Replacement: passo 6, immagine 1 di 3 HP Pavilion x360 11-p110nr Speakers Replacement: passo 6, immagine 2 di 3 HP Pavilion x360 11-p110nr Speakers Replacement: passo 6, immagine 3 di 3
    • Lift each speaker out of the laptop.

    • Carefully remove each speaker.

    • The speakers are connected to each other by a wire.

Conclusione

To reassemble your device, follow these instructions in reverse order.

Aeorrell

Membro da: 03/27/23

433 Reputazione

3 Guide realizzate

Team

IUPUI, Team 1-2, Harley Spring 2023 Membro di IUPUI, Team 1-2, Harley Spring 2023

IUPUI-HARLEY-S23S1G2

3 Membri

3 Guide realizzate

0 Commenti

Aggiungi Commento

Visualizza Statistiche:

Ultime 24 Ore: 0

Ultimi 7 Giorni: 0

Ultimi 30 Giorni: 1

Tutti i Tempi: 82