
HP Envy x360 15-bp143cl SSD Replacement

Introduzione
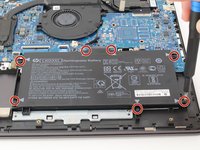
Vai al passo 1There are many different reasons that you may want to replace or upgrade your Solid State Drive (SSD), including improving your machine's boot time and increasing disk storage space. Some similar models of HP Envy laptops do not come with a pre-installed SSD, but can be upgraded through a similar procedure as listed in this guide. Upgrading your mass storage device can help with your boot and operating speeds. One of the main reasons to upgrade is the ability to improve storage capacity without compromising space (Hard Disk Drives (HDDs) are much larger). HDDs also have a significantly higher propensity to failure due to being a magnetic rotary mechanism with many moving parts. The steps outlined in this procedure walk you through replacing the mass storage device in an HP Envy x360 15m-bq021dx laptop with an SSD.
If you're noticing prolonged boot times, energy consumption issues such as poor battery life, or loud fan noise, a failing mass storage device may be your issue. It is important to note that the mass storage device is something that the vast majority of the other components in the laptop rely on, so addressing issues here can prevent a lot of headaches later with other pieces of hardware being over-worked.
This replacement or upgrade does not require any special skills such as soldering.
Cosa ti serve
Kit di riparazione
Questi kit contengono tutti i ricambi e gli strumenti necessari per completare questa guida.


Ricambi


Strumenti


Mostra di più…


To reassemble your device, follow these instructions in reverse order.
To reassemble your device, follow these instructions in reverse order.
Annulla: non ho completato questa guida.
Altre 2 persone hanno completato questa guida.

Team

The Citadel Military College of South Carolina, Team 1-2, Eggleston Spring 2022 Membro di The Citadel Military College of South Carolina, Team 1-2, Eggleston Spring 2022
CMCSC-EGGLESTON-S22S1G2
2 Membri
3 Guide realizzate