Salta al contenuto principale
Dell XPS 15 9500 SSD Replacement

Dell XPS 15 9500 SSD Replacement

Bryan Chung

Bryan Chung e 3 altri collaboratori

Ultimo aggiornamento il November 15, 2022

15 - 25 minuti
Moderato

Introduzione

Vai al passo 1

This guide will show the steps required to replace the M.2 SSD on a Dell XPS 15 9500. The M.2 SSD is used to store data and the operating system on this laptop. You may want to follow this guide if you are having trouble with running out of storage space on your laptop, or if you noticed the storage speeds are getting slow and want to replace it. You may want to wear an anti-static strap but that is optional as it should be fine to do this process without one.

Before you begin this process make sure to completely shut down the laptop. It will require that you take off the bottom panel on the laptop, remove the screw holding the SSD in place, and lift the SSD out of its slot.

Cosa ti serve

Kit di riparazione

Questi kit contengono tutti i ricambi e gli strumenti necessari per completare questa guida.

Ricambi

Strumenti

Mostra di più…

  1. Dell XPS 15 9500 SSD Replacement, Base Panel: passo 1, immagine 1 di 1
    • Remove the eight 3.0 mm screws from the bottom panel with a T5 Torx screwdriver.

  2. Dell XPS 15 9500 SSD Replacement: passo 2, immagine 1 di 2 Dell XPS 15 9500 SSD Replacement: passo 2, immagine 2 di 2
    • Gently wedge an opening tool in the gap between the base panel and chassis, and pry vertically around the perimeter until it releases from the chassis.

    • Lift the base panel up and away from the chassis.

  3. Dell XPS 15 9500 SSD Replacement, SSD: passo 3, immagine 1 di 1
    • Use a Phillips #000 screwdriver to remove the single 3.0 mm screw on the right side of the SSD.

  4. Dell XPS 15 9500 SSD Replacement: passo 4, immagine 1 di 1
    • Lift the card a few millimeters, then pull it directly out of its slot.

  5. Dell XPS 15 9500 SSD Replacement: passo 5, immagine 1 di 2 Dell XPS 15 9500 SSD Replacement: passo 5, immagine 2 di 2
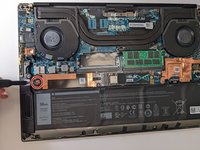
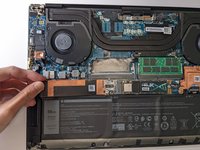
    • If you wish to install a second SSD, there is an empty slot for an additional SSD underneath the copper cover. If you're just replacing the existing SSD, stop here.

    • Use a Phillips #000 screwdriver to remove the one 3.0 mm screw on the left side of the SSD slot.

    • Pull the cover out directly toward the left.

Conclusione

To reassemble your device, follow these instructions in reverse order.

Bryan Chung

Membro da: 10/18/19

437 Reputazione

4 Guide realizzate

Team

0Commenti sulla guida

Aggiungi Commento

Visualizza Statistiche:

Ultime 24 Ore: 2

Ultimi 7 Giorni: 16

Ultimi 30 Giorni: 101

Tutti i Tempi: 4,855