Salta al contenuto principale
Dell XPS 14 L401X Mini Card Replacement

Dell XPS 14 L401X Mini Card Replacement

Mark

Mark e un altro collaboratore

Ultimo aggiornamento il December 13, 2017

3 - 5 minuti
Facile

Introduzione

Vai al passo 1

A mini card (or wifi card) is an adapter card that allows the device to connect to the internet. If you have troubleshooted your internet connectivity issues and the problem seems to be with the mini card adapter, it may need to be replaced.

Cosa ti serve

Strumenti

  1. Dell XPS 14 L401X Mini Card Replacement, Battery: passo 1, immagine 1 di 2 Dell XPS 14 L401X Mini Card Replacement, Battery: passo 1, immagine 2 di 2
    • Make sure that the laptop is shut off before attempting to remove any components from the device.

    • The laptop in this example did not have a battery equipped.

    • Locate the spring latch on the bottom of the device that will unlatch the battery.

    • Hold the spring latch in the open position and pull the battery out of its recess.

  2. Dell XPS 14 L401X Mini Card Replacement, Mini Card: passo 2, immagine 1 di 3 Dell XPS 14 L401X Mini Card Replacement, Mini Card: passo 2, immagine 2 di 3 Dell XPS 14 L401X Mini Card Replacement, Mini Card: passo 2, immagine 3 di 3
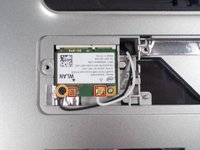
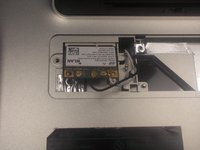
    • Locate the mini card access panel marked with a radio tower emblem on the bottom of the laptop near the battery bay.

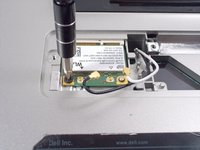
    • Use a JIS 1 screwdriver to loosen the captive screw securing the panel to the device.

    • The captive screw will not come off of the panel.

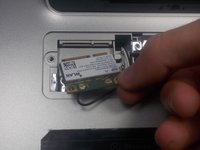
    • Carefully remove the panel by prying it upwards, unlocking it from the tabs that are securing it in place.

  3. Dell XPS 14 L401X Mini Card Replacement: passo 3, immagine 1 di 3 Dell XPS 14 L401X Mini Card Replacement: passo 3, immagine 2 di 3 Dell XPS 14 L401X Mini Card Replacement: passo 3, immagine 3 di 3
    • Disconnect the two wires on the mini card by carefully plucking them upwards by the metal contact points at the terminals.

    • Do not pluck the contacts off of the terminals by pulling on the wires, this can damage the cables.

    • Remove (1) 2mm screw from the bottom left corner of the mini card with a JIS 1 screwdriver.

  4. Dell XPS 14 L401X Mini Card Replacement: passo 4, immagine 1 di 2 Dell XPS 14 L401X Mini Card Replacement: passo 4, immagine 2 di 2
    • Remove the mini card as it flips upward.

Conclusione

To reassemble your device, follow these instructions in reverse order.

Mark

Membro da: 10/19/17

655 Reputazione

6 Guide realizzate

Team

0 Commenti

Aggiungi Commento

Visualizza Statistiche:

Ultime 24 Ore: 1

Ultimi 7 Giorni: 1

Ultimi 30 Giorni: 9

Tutti i Tempi: 317