
DeWalt DW938 Clam Shell Replacement
4 minuti
Facile
Introduzione
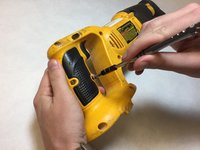
Vai al passo 1This guide will demonstrate how to separate the Clam Shell from the DeWalt DW938.
Cosa ti serve


-
-
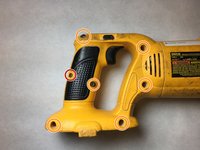
Use a torque bit screw driver to remove the T10 18.3 mm screw on the handle.
-
Use a torque bit screw driver to remove 6 T10 21.5 mm screws on the handle.
-
-


Quasi finito!
To reassemble your device, follow these instructions in reverse order.
Conclusione
To reassemble your device, follow these instructions in reverse order.
Team

IUPUI, Team S4-G4, Baechle Spring 2017 Membro di IUPUI, Team S4-G4, Baechle Spring 2017
IUPUI-BAECHLE-S17S4G4
4 Membri
3 Guide realizzate
1Commento della guida
do you know where I can find a clam shell just like this one?
file:///C:/Users/Tony/Desktop/clam%20shell1.jpg