Salta al contenuto principale
D-Link DIR-890L Case Removal

D-Link DIR-890L Case Removal

Rachel Shaw

Rachel Shaw e 4 altri collaboratori

Ultimo aggiornamento il January 20, 2023

2 - 4 minuti
Moderato
Solo Prerequisita
Questa guida è destinata a essere usata solo come prerequisito per altre guide. Da sola è incompleta.

Introduzione

Vai al passo 1

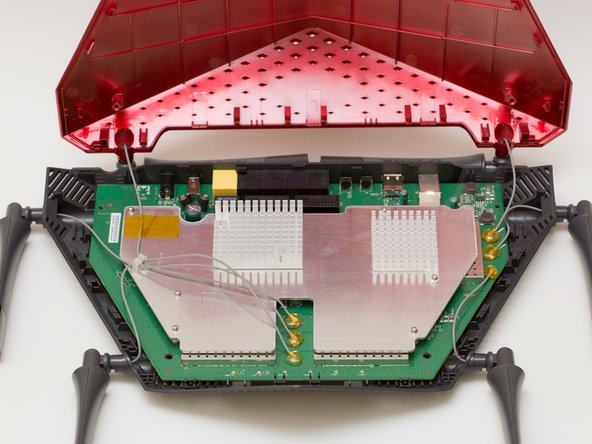
All of the components you would need to replace are contained under the red case of this router. In order to access all components of the device, the top case needs to be opened. This is a Prerequisite Only guide

Cosa ti serve

Strumenti

Mostra di più…

  1. D-Link DIR-890L Case Removal, Case: passo 1, immagine 1 di 3 D-Link DIR-890L Case Removal, Case: passo 1, immagine 2 di 3 D-Link DIR-890L Case Removal, Case: passo 1, immagine 3 di 3
    • Peel off the four rubber rectangular feet with your fingers.

    • The feet may be hard to remove. Apply additional force if necessary.

  2. D-Link DIR-890L Case Removal: passo 2, immagine 1 di 3 D-Link DIR-890L Case Removal: passo 2, immagine 2 di 3 D-Link DIR-890L Case Removal: passo 2, immagine 3 di 3
    • Unscrew the 5mm screws in each corner using the Phillips #1 screwdriver.

  3. D-Link DIR-890L Case Removal: passo 3, immagine 1 di 3 D-Link DIR-890L Case Removal: passo 3, immagine 2 di 3 D-Link DIR-890L Case Removal: passo 3, immagine 3 di 3
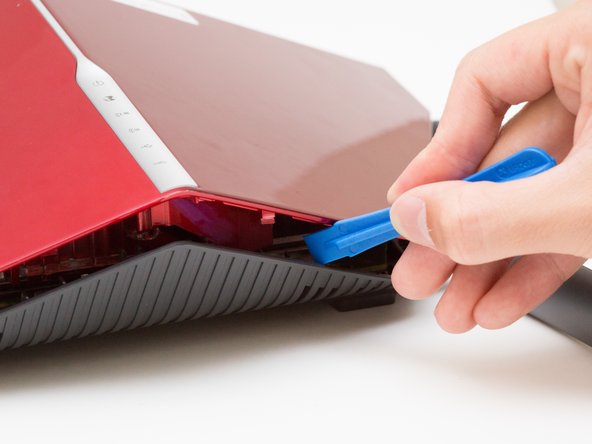
    • Wedge the opening tool between the red top panel and the gray bottom panel.

    • Twist the opening tool to separate the panels. Work your way around the case until both of the panels are separated.

Conclusione

To reassemble your device, follow these instructions in reverse order.

Rachel Shaw

Membro da: 10/06/16

553 Reputazione

5 Guide realizzate

Team

Cal Poly, Team 10-7, Livingston Fall 2016 Membro di Cal Poly, Team 10-7, Livingston Fall 2016

CPSU-LIVINGSTON-F16S10G7

4 Membri

12 Guide realizzate

0 Commenti

Aggiungi Commento

Visualizza Statistiche:

Ultime 24 Ore: 1

Ultimi 7 Giorni: 1

Ultimi 30 Giorni: 2

Tutti i Tempi: 142