Salta al contenuto principale
Canon Powershot Pro1 Flash Replacement

Canon Powershot Pro1 Flash Replacement

Seana Meegan

Seana Meegan e 2 altri collaboratori

Ultimo aggiornamento il January 23, 2020

40 minuti
Moderato
Attrezzi Non Corretti

Introduzione

Vai al passo 1

Follow this guide to replace the flash of your Canon Powershot Pro1. Nearly every camera on today’s market is equipped with a flash. The flash allows the user to take high quality pictures in poorly lit conditions and capture quickly moving objects. This guide will detail the steps necessary to replace the flash bulb and capacitor. The flash capacitor is capable of storing large amounts of energy. Therefore, it is important to remove the battery prior to disassembly. The capacitor can be discharged by pressing the flash Also, be sure to use ESD safe tools.

Cosa ti serve

Strumenti

Mostra di più…

  1. Canon Powershot Pro1 Flash Replacement, Battery: passo 1, immagine 1 di 1
    • Locate the battery compartment cover on the right hand side of the camera. The cover features the text: “CF/BATT.OPEN”.

  2. Canon Powershot Pro1 Flash Replacement: passo 2, immagine 1 di 1
    • There is an arrow beside the text. Using your hands, slide the cover in the direction of this arrow.

  3. Canon Powershot Pro1 Flash Replacement: passo 3, immagine 1 di 1
    • Pull the cover toward you. After doing so you will see the battery sitting inside the compartment.

  4. Canon Powershot Pro1 Flash Replacement: passo 4, immagine 1 di 1
    • Press the orange battery lock inside the compartment.

    • Remove the battery.

    • This photo show the battery compartment after the battery has been removed.

  5. Canon Powershot Pro1 Flash Replacement, Flash: passo 5, immagine 1 di 2 Canon Powershot Pro1 Flash Replacement, Flash: passo 5, immagine 2 di 2
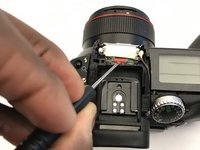
    • Remove the 25.4 mm Phillips #0 flash screw. The screw is near the flash.

    • Be careful not to damage the screw.

  6. Canon Powershot Pro1 Flash Replacement: passo 6, immagine 1 di 1
    • Locate the small points on both sides of the lens.

    • Pry the lens housing using the black nylon spudger so that it is lifted out of these points.

    • Don't use a screwdriver as a prying tool, this could cause damage.

  7. Canon Powershot Pro1 Flash Replacement: passo 7, immagine 1 di 1
    • Use the plastic spudger to remove the upper portion of the flash housing.

  8. Canon Powershot Pro1 Flash Replacement: passo 8, immagine 1 di 3 Canon Powershot Pro1 Flash Replacement: passo 8, immagine 2 di 3 Canon Powershot Pro1 Flash Replacement: passo 8, immagine 3 di 3
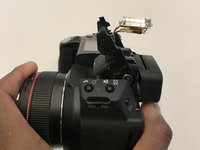
    • Use the nylon spudger to dislodge the flash bulb and capacitor from the housing.

    • Don't use a screwdriver as prying tool, this could cause damage.

  9. Canon Powershot Pro1 Flash Replacement: passo 9, immagine 1 di 1
    • Cut the flash and capacitor cables with a wire cutter.

Conclusione

To reassemble your device, follow these instructions in reverse order.

0 Commenti

Aggiungi Commento

Visualizza Statistiche:

Ultime 24 Ore: 1

Ultimi 7 Giorni: 7

Ultimi 30 Giorni: 16

Tutti i Tempi: 883