
Canon EOS 600 LCD Backlight Deactivation

Introduzione
Vai al passo 1One day my EOS 600 started to "eat" batteries. A fresh battery would last only a few days, even though I did not use the camera. After asking for help in de.rec.fotografie I discovered that this problem was common with aging EOS 600 cameras. The cause for the high energy consumption was in most cases caused by a faulty LCD-backlight, which was causing a short circuit. I thought it was reasonable that disconnection of the backlight should solve the problem, and it proved relatively easy to accomplish. I reproduce my steps in this document so that other people can restore their EOS to energy saving life. I want to say thanks to the people of de.rec.fotografie (especially Erik Krause) because without their help all this would not be possible.
The following instructions should also apply for the Canon EOS 620 and Canon EOS 630.
This instruction comes without any warranty! I don't guarantee anything: neither that this works, nor that it will not damage any equipment or person. I recommend that you first read this instruction completely before you begin any work on your camera.
Because some of the screws of the camera body have different sizes, I suggest that you keep track of the different screws as you unscrew them from the camera. I drew a small sketch and put each screw on its corresponding circle, so that I could replace each screw into the correct hole during reassembly.
This camera is a precision instrument that can be damaged or put out of alignment. Therefore, you should be careful and work with fine, precision tools. Before beginning work, remove any lens and put the body cap on the lens mount. If you do not have a body cap, mount an old (unimportant) lens on the camera.
Cosa ti serve

-
-
With the 2-Cent coin you can open the battery case and remove the battery. The screws in this section will be removed with the smaller one (#00) of the two crosshead screwdrivers.
-
-
-
Now the bottom plastic cover can be loosened. It is secured with five screws: one above and one below the serial number; one beside the tripod mount; one on the edge of the battery case; and the last one (it can't be seen on the picture) on the right side beside the "flap" on the back of the camera.
-
The screws can be very tight and you must be very careful not to strip the slots in the head of the screw. I suggest that you exert very firm pressure down on the screwdriver, and only then turn the screw slowly but certainly.
-
-
-
Although the bottom case is now loosened, you cannot take it off the camera because it is held in place by a lug to the front case.
-
Removing the front cover completely is unnecessary, especially since it makes reassembly more difficult (the closing mechanism of the camera back likes to go to pieces and the position of the single parts of it is logically difficult to reconstruct).
-
Therefore it should be sufficient to loosen the front cover just slightly. Refer to Figure 3, and remove screws 1 and 4, while loosen, but do not remove screws 2 and 3. Keep these screws separate from the previous ones, because they have different sizes!
-
-
-
-
This picture shows the result of performing the next step, and why special care is needed. The bottom plastic cover is held in place by a small plastic loop (2) that engages a lug (1) on the front cover. All these parts are plastic and can be easily damaged.
-
-
-
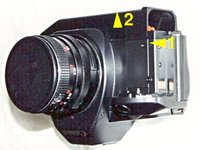
Be gentle! Using the small flat-head screwdriver, you can now carefully (!) lever the front case slightly ajar (2mm should be enough) to disengage the plastic lug at the position marked 1 in the picture.
-
After that you can remove the bottom plastic cover completely by pulling it carefully in direction of arrow 2 and wiggling it slightly. It helps to hold the camera upside down, so that the plastic shell above the battery contacts (2nd photo) does not fall off. (If this piece accidentally becomes detached, simply plug it back on the contacts again).
-
-
-
After you have removed the bottom cover, you still have to reach the wire contacts that are hidden by the tripod mount. The tripod mount can be easily removed by unscrewing the three crosshead screws using the larger screwdriver.
-
-
-
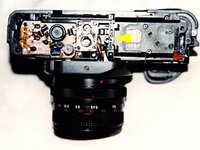
The two wires at the pins marked 1 and 2 now have to be disconnected. First, pull them carefully out from under clip 3 with the small screwdriver. On my circuit board pin no. 1 was marked with "TP3" and a white wire was soldered on it. Pin no. 3 was labelled "TP2" and was connected with a black wire.
-
-
-
At the positions marked with arrows the LCD-backlight is connected with the power supply. You can now cut the two small wires with an edge cutter or disconnect it carefully from the pins with the soldering iron.
-
-
-
It is advisable to insulate the ends of the wires. Two centimetres of electrical tape are enough for this if you wrap the tape around the bare ends of the wire. I squeezed insulated ends of the wire in the top right corner (arrow). On the picture you can see very well the empty pins 1 and 2.
-


Reassembly is basically the same as the assembly - only backwards. First you have to reattach the tripod mount: tighten down the screws well so that nothing will jiggle later. Next, take care of the small piece of plastic that is on top of the battery contacts. Then, you can reengage the clip on bottom cover the camera body. When doing so, take care of the little "flap" that hides the buttons on the back of camera. If everything fits well you can first tighten the screws on the front case (don't forget that there are two which were just loosened and another two which should lay around somewhere) and then the five screws that hold the bottom case. After inserting the battery and closing the battery case with the 2-Cent coin the camera is ready for use, except that pressing the LCD-backlight button now does not cause illumination of the LCD. However, you can still use that button for setting the aperture/shutter speed manually (depending on the setting of custom function no. 5.)
Reassembly is basically the same as the assembly - only backwards. First you have to reattach the tripod mount: tighten down the screws well so that nothing will jiggle later. Next, take care of the small piece of plastic that is on top of the battery contacts. Then, you can reengage the clip on bottom cover the camera body. When doing so, take care of the little "flap" that hides the buttons on the back of camera. If everything fits well you can first tighten the screws on the front case (don't forget that there are two which were just loosened and another two which should lay around somewhere) and then the five screws that hold the bottom case. After inserting the battery and closing the battery case with the 2-Cent coin the camera is ready for use, except that pressing the LCD-backlight button now does not cause illumination of the LCD. However, you can still use that button for setting the aperture/shutter speed manually (depending on the setting of custom function no. 5.)
Annulla: non ho completato questa guida.
Un'altra persona ha completato questa guida.
