Salta al contenuto principale
Battery Disconnection

Battery Disconnection

Spencer Day

Spencer Day e 3 altri collaboratori

Ultimo aggiornamento il October 11, 2024

Nessuna stima
Moderato
Solo Prerequisita
Questa guida è destinata a essere usata solo come prerequisito per altre guide. Da sola è incompleta.

Introduzione

Vai al passo 1

This is a prerequisite-only guide! This guide is part of another procedure and is not meant to be used alone.

Cosa ti serve

Strumenti

Mostra di più…

  1. Battery Disconnection, Access the rubber feet: passo 1, immagine 1 di 2 Battery Disconnection, Access the rubber feet: passo 1, immagine 2 di 2
    • Before you begin, shut down your laptop and unplug it.

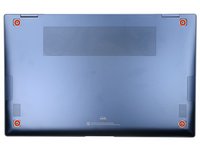
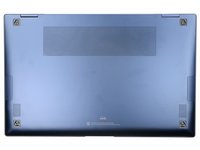
    • Close the screen and lay your laptop down with the rear case facing up to access the four rubber feet.

  2. Battery Disconnection, Remove the rubber feet: passo 2, immagine 1 di 3 Battery Disconnection, Remove the rubber feet: passo 2, immagine 2 di 3 Battery Disconnection, Remove the rubber feet: passo 2, immagine 3 di 3
    Attrezzo utilizzato in questo passaggio:
    Tweezers
    $4.99
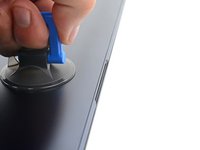
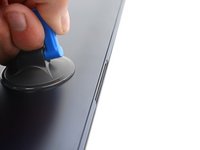
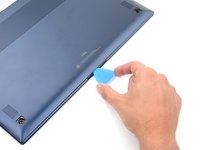
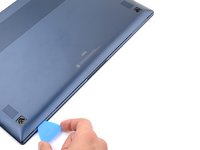
    • Insert an opening pick between the rear case and the rubber foot.

    • Pry up with the pick and dislodge the foot from the rear case.

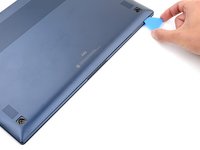
    • Use tweezers or your fingers to remove the rubber foot.

    • Repeat this process on the remaining rubber feet.

    • There are two types of rubber feet for this laptop. During reassembly, make sure the top feet say "M4" and the bottom feet say "M1".

    • To reinstall a rubber foot, align it over the recess and push down until it's secured.

  3. Battery Disconnection, Unfasten the rear case: passo 3, immagine 1 di 2 Battery Disconnection, Unfasten the rear case: passo 3, immagine 2 di 2
    Attrezzo utilizzato in questo passaggio:
    Magnetic Project Mat
    $19.95
    • Use a Phillips screwdriver to remove the four 4.5 mm screws securing the rear case.

    • Throughout this repair, keep track of each screw and make sure it goes back exactly where it came from.

  4. Battery Disconnection, Insert an opening pick: passo 4, immagine 1 di 3 Battery Disconnection, Insert an opening pick: passo 4, immagine 2 di 3 Battery Disconnection, Insert an opening pick: passo 4, immagine 3 di 3
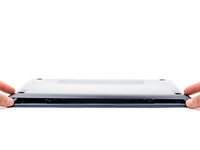
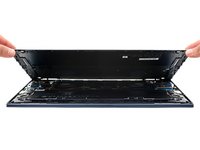
    • Apply a suction handle to the middle of the rear case's bottom edge, as close to the edge as possible.

    • Pull up on the handle with a strong, steady force to create a small gap between the rear case and the frame.

    • This may take significant force and multiple tries.

    • Insert an opening pick into the gap you created.

  5. Battery Disconnection, Release the clips: passo 5, immagine 1 di 3 Battery Disconnection, Release the clips: passo 5, immagine 2 di 3 Battery Disconnection, Release the clips: passo 5, immagine 3 di 3
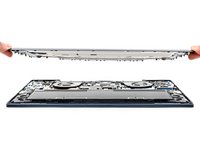
    • Slide the opening pick along the bottom edge to release the clips securing the rear case.

    • Continue sliding the pick along the perimeter of the laptop until all the clips securing the rear case have been released.

  6. Battery Disconnection, Remove the rear case: passo 6, immagine 1 di 3 Battery Disconnection, Remove the rear case: passo 6, immagine 2 di 3 Battery Disconnection, Remove the rear case: passo 6, immagine 3 di 3
    • Lift the rear case up and away from the laptop and remove it.

    • During reassembly, this is a good point to power on your laptop and test all functions before sealing it up. Be sure to power your laptop back down before you continue working.

  7. Battery Disconnection, Remove the battery connector's tape: passo 7, immagine 1 di 2 Battery Disconnection, Remove the battery connector's tape: passo 7, immagine 2 di 2
    Attrezzo utilizzato in questo passaggio:
    Tweezers
    $4.99
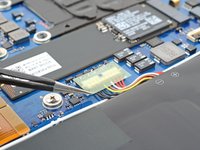
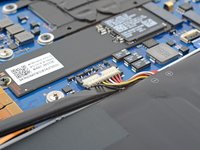
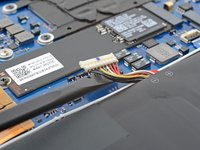
    • Use tweezers or your fingers to peel up and remove the tape covering the battery connector.

    • Set the tape aside. You'll reuse it during reassembly.

  8. Battery Disconnection, Disconnect the battery: passo 8, immagine 1 di 2 Battery Disconnection, Disconnect the battery: passo 8, immagine 2 di 2
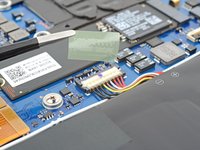
    • Insert the flat end of a spudger under the battery cables, as close to the connector as possible.

    • Gently pry up and disconnect the battery connector from its socket.

Conclusione

To reassemble your device, follow these instructions in reverse order.

Spencer Day

Membro da: 09/14/22

95.583 Reputazione

662 Guide realizzate

Team

iFixit Membro di iFixit

Staff

119 Membri

19.521 Guide realizzate

0 Commenti

Aggiungi Commento

Visualizza Statistiche:

Ultime 24 Ore: 0

Ultimi 7 Giorni: 13

Ultimi 30 Giorni: 22

Tutti i Tempi: 60