Questa traduzione è stata generata automaticamente e non è stata ancora revisionata da una persona. Parli questa lingua? Dai un’occhiata.
Introduzione
L'Asus ROG G20CB è un desktop da gaming compatto che utilizza un raffreddamento personalizzato e una disposizione interna specifica. Sostituire la scheda grafica (GPU) può migliorare notevolmente le prestazioni, ma a causa del fattore di forma ridotto e del design interno personalizzato, l'operazione è leggermente più complicata rispetto a un case tower standard. Questa guida ti accompagnerà nel processo con attenzione.
Controlla le dimensioni della GPU: il G20CB supporta GPU a doppio slot di dimensioni ridotte (generalmente inferiori a 266 mm di lunghezza). Solo connettori PCIe a 6 o 8 pin.
Cosa ti serve
-
-
-
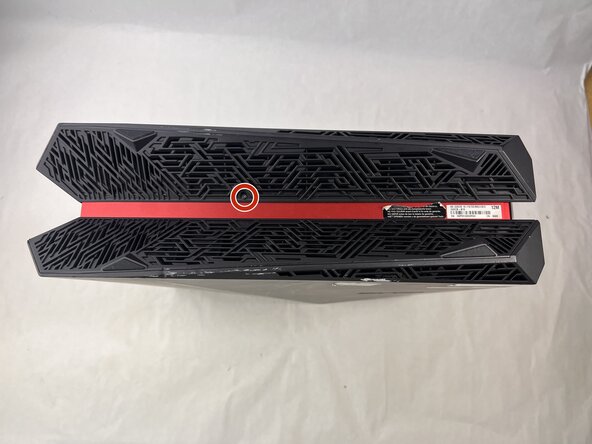
Rimuovi ciascuna delle due viti a croce Phillips da 4,6 mm sulla parte superiore e inferiore della torre.
 Chiedi a FixBot
-
-
-
Fai scorrere il pannello anteriore verso sinistra e sollevalo delicatamente.
-
-
-
Scollega il connettore con attenzione, tirando delicatamente su entrambi i lati.
-
-
-
Rimuovi le cinque viti a croce Phillips da 4,6 mm che fissano il vassoio della ventola e poi estrai il vassoio della ventola dal sistema.
-
-
-
-
Scollega con attenzione i due cavi della ventola dalla scheda madre tirando verso l'alto dalla base del connettore.
-
-
-
Rimuovi le sei viti a croce Phillips da 4,6 mm che collegano le ventole al vassoio delle ventole.
-
-
-
-
-
Rimuovi le tre viti a croce Phillips da 4,6 mm dall'alloggiamento della scheda grafica.
-
-
-
Spingi verso il basso la clip sul connettore del cavo rosso e tira con decisione il cavo dalla scheda grafica.
-
-
-
Rimuovi la vite a croce Phillips da 3,7 mm dalla scheda grafica e dal suo alloggiamento.
-
-
-
Usa una mano per sollevare la clip del riser PCIe, quindi con l'altra mano spingila via dalla scheda grafica.
-
-



Per riassemblare il tuo dispositivo, segui i passaggi precedenti nell'ordine inverso.
Porta i tuoi rifiuti elettronici presso un centro di riciclo certificato R2 o e-Stewards.
La riparazione non è andata come previsto? Prova delle soluzioni di base ai problemi, oppure rivolgiti alla nostra comunità Risposte per trovare aiuto.

Team

UMass Dartmouth, Team 3-3, Botvin Spring 2025 Membro di UMass Dartmouth, Team 3-3, Botvin Spring 2025
UMASSD-BOTVIN-S25S3G3
3 Membri
44 guide realizzate
