Salta al contenuto principale
Alienware 15 R3 Hard Drive Replacement

Alienware 15 R3 Hard Drive Replacement

Yutong Yin

Yutong Yin e 2 altri collaboratori

Ultimo aggiornamento il February 19, 2025

15 - 45 minuti
Moderato
Vigilanza sulla Grammatica
Testo Confuso
Studente al lavoro

Introduzione

Vai al passo 1

Use this guide to solve the Blue Screen of Death of Alienware 15 R3 which usually occurs when booting.

Alienware 15 R3 failed to properly read the SSD containing system files when booting resulting the Blue Screen of Death. Changing the booting option in BIOS will not help to solve the problem. Therefore, replacing the hard drive from Alienware 15 R3 is the most effective solution.

I recommend backup important files in your hard drive before repairing.

Cosa ti serve

iFixit guadagna commissioni quando acquisti tramite questi link.
  1. Alienware 15 R3 Hard Drive Replacement, Hard Drive: passo 1, immagine 1 di 3 Alienware 15 R3 Hard Drive Replacement, Hard Drive: passo 1, immagine 2 di 3 Alienware 15 R3 Hard Drive Replacement, Hard Drive: passo 1, immagine 3 di 3
    • Find Power in start menu and click Shut Down to turn off your Alienware 15 R3.

    • Wait a few seconds until all the lights around are off.

    • Unplug the power supply.

  2. Alienware 15 R3 Hard Drive Replacement: passo 2, immagine 1 di 3 Alienware 15 R3 Hard Drive Replacement: passo 2, immagine 2 di 3 Alienware 15 R3 Hard Drive Replacement: passo 2, immagine 3 di 3
    • Remove the seven M2.5x13 screws from the base cover.

    • Remove the base cover carefully.

    • Save these screws for later.

    • The screw on the top middle of base cover cannot be removed after unscrewing. But it is okay to remove the base cover.

  3. Alienware 15 R3 Hard Drive Replacement: passo 3, immagine 1 di 3 Alienware 15 R3 Hard Drive Replacement: passo 3, immagine 2 di 3 Alienware 15 R3 Hard Drive Replacement: passo 3, immagine 3 di 3
    • Remove the two M3x3 screws that are holding the bracket and one M2.5x8 screw holding the hard drive assembly .

    • Remove the hard drive from the laptop.

  4. Alienware 15 R3 Hard Drive Replacement: passo 4, immagine 1 di 2 Alienware 15 R3 Hard Drive Replacement: passo 4, immagine 2 di 2
    • Prior to reassembly, clean the dust on fans as circled in picture if needed.

    • Put bottom plate back on your laptop and secure the bottom plate with the screws removed previously.

  5. Alienware 15 R3 Hard Drive Replacement: passo 5, immagine 1 di 1
    • Your Alienware 15 R3 is ready to roll.

Conclusione

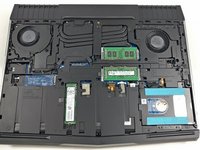
By removing the HDD from the laptop, BSOD will never happen again when you boot the laptop. Please note that, the storage space than it was in the past.

Un'altra persona ha completato questa guida.

Yutong Yin

Membro da: 05/10/21

145 Reputazione

1 Guida realizzata

Team

0 Commenti

Aggiungi Commento

Visualizza Statistiche:

Ultime 24 Ore: 0

Ultimi 7 Giorni: 6

Ultimi 30 Giorni: 15

Tutti i Tempi: 1,490