
Acer Chromebook C720-2827 Battery Replacement
Introduzione
Vai al passo 1This guide explains how to remove the battery. Before removing the battery, the front panel assembly will also need to be removed. Once the battery is reached, you will need to unplug some cables and unscrew some screws.
Cosa ti serve
Ricambi

Strumenti


Mostra di più…
-
-
Remove the thirteen 6.0mm screws on the back panel using your Phillips #1 screwdriver.
-
-
-
-
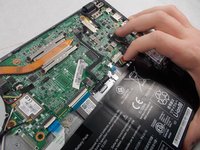
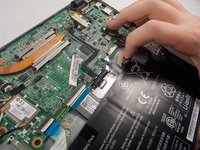
Remove the two 6.0mm screws securing the battery with your Phillips #1 screwdriver.
-


To reassemble your device, follow these instructions in reverse order.
To reassemble your device, follow these instructions in reverse order.
Annulla: non ho completato questa guida.
Altre 3 persone hanno completato questa guida.
Team

UMass Dartmouth, Team S4-G7, Julie Fall 2017 Membro di UMass Dartmouth, Team S4-G7, Julie Fall 2017
UMASSD-JULIE-F17S4G7
1 Membro
7 Guide realizzate