Salta al contenuto principale
Acer Aspire Switch 10 SW5-012-18MY Battery Replacement

Acer Aspire Switch 10 SW5-012-18MY Battery Replacement

Grecia Corrada

Grecia Corrada e 5 altri collaboratori

Ultimo aggiornamento il February 14, 2025

10 - 15 minuti
Moderato
Guida Studente in Evidenza

Introduzione

Vai al passo 1

If your device is not charging or turning on, you may need to replace the internal battery on your device. Before attempting to replace the battery, please visit the troubleshooting page for this device. If you have attempted the recommendations on the troubleshooting page and the device is still not functioning properly, you can replace the internal battery in your device. Carefully follow the steps in this guide to replace the battery.

Cosa ti serve

Ricambi

Strumenti

Mostra di più…

  1. Acer Aspire Switch 10 SW5-012-18MY Battery Replacement, Battery: passo 1, immagine 1 di 2 Acer Aspire Switch 10 SW5-012-18MY Battery Replacement, Battery: passo 1, immagine 2 di 2
    • Remove the tablet from the keyboard.

    • You will not be needing the keyboard for this guide.

  2. Acer Aspire Switch 10 SW5-012-18MY Battery Replacement: passo 2, immagine 1 di 3 Acer Aspire Switch 10 SW5-012-18MY Battery Replacement: passo 2, immagine 2 di 3 Acer Aspire Switch 10 SW5-012-18MY Battery Replacement: passo 2, immagine 3 di 3
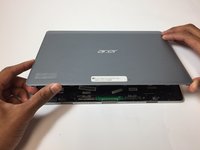
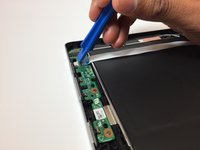
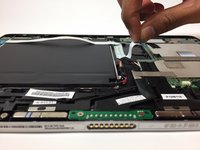
    • Use the opening tool to open the back cover. The opening tool should fit under the cover if you place it above the power button.

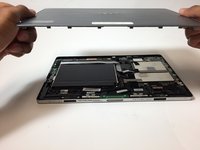
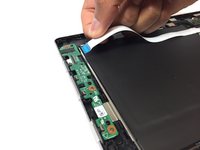
    • Lift this side of the back cover once the opening tool is inside the device.

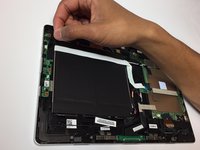
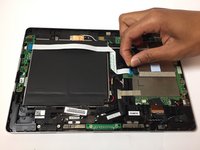
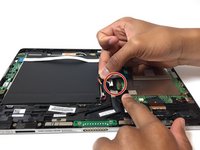
    • Use the opening tool and your hands to gradually work around the edges of the cover.

  3. Acer Aspire Switch 10 SW5-012-18MY Battery Replacement: passo 3, immagine 1 di 2 Acer Aspire Switch 10 SW5-012-18MY Battery Replacement: passo 3, immagine 2 di 2
    • Lift the back cover off of the device with your hands.

    • You will need to use some force to pull off the back cover.

  4. Acer Aspire Switch 10 SW5-012-18MY Battery Replacement: passo 4, immagine 1 di 2 Acer Aspire Switch 10 SW5-012-18MY Battery Replacement: passo 4, immagine 2 di 2
    • Remove the piece of black, thin tape that is attached to the circuit board closest to the power button.

  5. Acer Aspire Switch 10 SW5-012-18MY Battery Replacement: passo 5, immagine 1 di 3 Acer Aspire Switch 10 SW5-012-18MY Battery Replacement: passo 5, immagine 2 di 3 Acer Aspire Switch 10 SW5-012-18MY Battery Replacement: passo 5, immagine 3 di 3
    • Use the opening tool to lift the ZIF connector holding the ribbon cable in place on the circuit board.

    • Pull out the ribbon cable from the circuit board. This cable should have the word "Audio" on it.

  6. Acer Aspire Switch 10 SW5-012-18MY Battery Replacement: passo 6, immagine 1 di 3 Acer Aspire Switch 10 SW5-012-18MY Battery Replacement: passo 6, immagine 2 di 3 Acer Aspire Switch 10 SW5-012-18MY Battery Replacement: passo 6, immagine 3 di 3
    • Remove the piece of thin, black tape that is attached to the circuit board on the other side of the battery.

    • Use the opening tool to lift the black ZIF connector holding the ribbon cable in place.

    • Pull out the ribbon cable from the circuit board.

  7. Acer Aspire Switch 10 SW5-012-18MY Battery Replacement: passo 7, immagine 1 di 2 Acer Aspire Switch 10 SW5-012-18MY Battery Replacement: passo 7, immagine 2 di 2
    • Partially remove the piece of black tape that is holding the bundled cable connector to the battery in place.

    • Pull on the battery's bundled cable connector to unplug it from the circuit board.

  8. Acer Aspire Switch 10 SW5-012-18MY Battery Replacement: passo 8, immagine 1 di 1
    • Using the Phillips #000 screwdriver, remove the 3 mm screw that is holding the battery in place.

  9. Acer Aspire Switch 10 SW5-012-18MY Battery Replacement: passo 9, immagine 1 di 1
    • Gently remove the ribbon cable from the battery.

  10. Acer Aspire Switch 10 SW5-012-18MY Battery Replacement: passo 10, immagine 1 di 2 Acer Aspire Switch 10 SW5-012-18MY Battery Replacement: passo 10, immagine 2 di 2
    • Carefully remove the battery from the device by lifting it up.

Conclusione

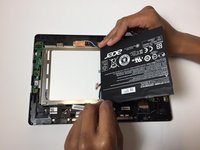
To reassemble your device, follow these instructions in reverse order.

Altre 4 persone hanno completato questa guida.

Grecia Corrada

Membro da: 03/19/18

1.134 Reputazione

6 Guide realizzate

Team

Baylor, Team S3-G3, Williams Spring 2018 Membro di Baylor, Team S3-G3, Williams Spring 2018

BU-WILLIAMS-S18S3G3

3 Membri

7 Guide realizzate

0Commenti sulla guida

Aggiungi Commento

Visualizza Statistiche:

Ultime 24 Ore: 1

Ultimi 7 Giorni: 11

Ultimi 30 Giorni: 83

Tutti i Tempi: 5,003