Salta al contenuto principale
Acer Aspire One D255E RAM Replacement

Acer Aspire One D255E RAM Replacement

Brian

Brian e 2 altri collaboratori

Ultimo aggiornamento il September 16, 2019

Nessuna stima
Moderato

Introduzione

Vai al passo 1

The RAM on a computer is used to store temporary information for your computer to run swiftly. If you computer seems to studder or slow down it might mean that you could use an upgrade of the RAM. RAM upgrades are one of the more common upgrades in a computer unit. You should read through the entire guide before performing the repair and should have all necessary tools readily available. You should also find a safe location to store the various screws taken out of the computer to ensure that they do not get mixed up or lost.

Cosa ti serve

Strumenti

  • Spudger
    Spudger
  • Phillips #0 Screwdriver
    Phillips #0 Screwdriver
  1. Acer Aspire One D255E RAM Replacement, Keyboard: passo 1, immagine 1 di 1
    • Start by removing the battery found on the back of the device.

    • The battery must be removed in order to ensure the device does not have power! Make sure you do not skip this step!

  2. Acer Aspire One D255E RAM Replacement: passo 2, immagine 1 di 2 Acer Aspire One D255E RAM Replacement: passo 2, immagine 2 di 2
    • Using plastic opening tools press down the 6 clips located around the keyboard.

  3. Acer Aspire One D255E RAM Replacement: passo 3, immagine 1 di 3 Acer Aspire One D255E RAM Replacement: passo 3, immagine 2 di 3 Acer Aspire One D255E RAM Replacement: passo 3, immagine 3 di 3
    • Using a plastic opening tool or spudger move the keyboard out of position.

    • There is a thin cable on the backside of the keyboard. Make sure when you move the keyboard out of position you do so slowly to prevent damage to this cable.

    • If you use a spudger it is recommended that you use a plastic spudger to reduce the chance of damaging any internal parts.

  4. Acer Aspire One D255E RAM Replacement: passo 4, immagine 1 di 1
    • Using a spudger gently push the tab on the port forward then pull out the cable.

    • Be careful to do so as gently as possible. You do not want to damage the port.

  5. Acer Aspire One D255E RAM Replacement, Back Panel: passo 5, immagine 1 di 2 Acer Aspire One D255E RAM Replacement, Back Panel: passo 5, immagine 2 di 2
    • Unscrew seven 1.2 mm Phillips #1 screws from the back of the device

  6. Acer Aspire One D255E RAM Replacement: passo 6, immagine 1 di 2 Acer Aspire One D255E RAM Replacement: passo 6, immagine 2 di 2
    • Unscrew eight more 1.2 mm Phillips #1 screws from the front of the computer.

  7. Acer Aspire One D255E RAM Replacement: passo 7, immagine 1 di 3 Acer Aspire One D255E RAM Replacement: passo 7, immagine 2 di 3 Acer Aspire One D255E RAM Replacement: passo 7, immagine 3 di 3
    • Using a spudger carefully push though the hole to dislodge the panel on the back of the device then remove the panel by hand.

    • It is recommended that you use a plastic spudger to reduce the chance of damaging any internal parts.

  8. Acer Aspire One D255E RAM Replacement, RAM: passo 8, immagine 1 di 3 Acer Aspire One D255E RAM Replacement, RAM: passo 8, immagine 2 di 3 Acer Aspire One D255E RAM Replacement, RAM: passo 8, immagine 3 di 3
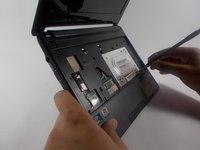
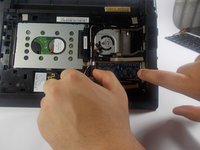
    • Using your hands pull apart the two clips holding the RAM in then pull out the RAM.

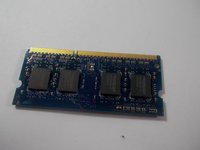
    • It uses (DDR3) 204pin PC3-10600 1333MHz DDR3 SO-DIMM Memory Modules

Conclusione

To reassemble your device, follow these instructions in reverse order.

Altre 7 persone hanno completato questa guida.

Brian

Membro da: 03/19/16

1.302 Reputazione

5 Guide realizzate

Team

0 Commenti

Aggiungi Commento

Visualizza Statistiche:

Ultime 24 Ore: 0

Ultimi 7 Giorni: 20

Ultimi 30 Giorni: 36

Tutti i Tempi: 4,742