Salta al contenuto principale
ASUS ROG G750JW-RS72-CB RAM Replacement

ASUS ROG G750JW-RS72-CB RAM Replacement

Ellie Moran

Ellie Moran e 2 altri collaboratori

Ultimo aggiornamento il April 6, 2018

2 minuti
Facile

Introduzione

Vai al passo 1

The RAM is where the working memory of the computer is and replacing it will allow your computer to perform better.

Replacing the RAM is the easiest and cheapest way to help speed up a computer.

Cosa ti serve

Strumenti

  1. ASUS ROG G750JW-RS72-CB RAM Replacement, Battery: passo 1, immagine 1 di 1
    • Make sure you completely power down the computer before beginning this process.

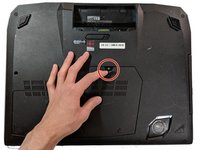
    • With your finger, push this slide to the right. The battery should pop out of place.

  2. ASUS ROG G750JW-RS72-CB RAM Replacement: passo 2, immagine 1 di 1
    • Pull the battery out of its place gently.

  3. ASUS ROG G750JW-RS72-CB RAM Replacement, RAM: passo 3, immagine 1 di 2 ASUS ROG G750JW-RS72-CB RAM Replacement, RAM: passo 3, immagine 2 di 2
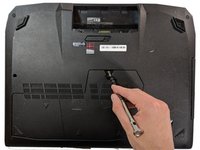
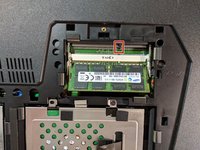
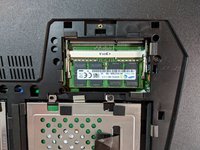
    • Open flap in center and underneath you will find a screw, remove the 5.2mm screw with a Phillips #0 screwdriver.

  4. ASUS ROG G750JW-RS72-CB RAM Replacement: passo 4, immagine 1 di 2 ASUS ROG G750JW-RS72-CB RAM Replacement: passo 4, immagine 2 di 2
    • Once the screw is out, pull on the plastic tab to pull off the plastic cover.

  5. ASUS ROG G750JW-RS72-CB RAM Replacement: passo 5, immagine 1 di 1
    • This exposes two hard drive caddies.

    • This also exposes two RAM slots.

  6. ASUS ROG G750JW-RS72-CB RAM Replacement: passo 6, immagine 1 di 1
    • Push the metal tabs outward that are located on both sides of the top ram.

    • Remove the RAM from the slot.

    • Repeat with bottom RAM

  7. ASUS ROG G750JW-RS72-CB RAM Replacement: passo 7, immagine 1 di 2 ASUS ROG G750JW-RS72-CB RAM Replacement: passo 7, immagine 2 di 2
    • Align new RAM's key with the slot.

    • Place RAM in slot at a 45 degree angle downward, until the teeth are hidden inside of the socket itself.

    • Push down on RAM until a clicking sound is heard, meaning it is in place.

    • Repeat with top RAM

Conclusione

To reassemble your device, follow Steps 1-4 in reverse order.

Un'altra persona ha completato questa guida.

Ellie Moran

Membro da: 01/22/18

142 Reputazione

1 Guida realizzata

Team

Cal Poly, Team S11-G5, Banghart Winter 2018 Membro di Cal Poly, Team S11-G5, Banghart Winter 2018

CPSU-BANGHART-W18S11G5

4 Membri

5 Guide realizzate

1Commento della guida

What about replacing the two internal RAM Modules?

Latiron London - Replica

Aggiungi Commento

Visualizza Statistiche:

Ultime 24 Ore: 0

Ultimi 7 Giorni: 5

Ultimi 30 Giorni: 18

Tutti i Tempi: 1,312