Join the Repair Community - Create Account
Asus VivoBook Q200E-BSI3T08 Webcam Replacement

Asus VivoBook Q200E-BSI3T08 Webcam Replacement

Mitchell Jackson

Mitchell Jackson and 4 other contributors

Last updated on Oct 3, 2017

4 - 5 minutes
Moderate

Introduction

Go to step 1

This guide will show you how to locate and remove your webcam if you are experiencing issues with your webcam.

What you need

Parts

Tools

Show more…

  1. Asus VivoBook Q200E-BSI3T08 Webcam Replacement, Display: step 1, image 1 of 2 Asus VivoBook Q200E-BSI3T08 Webcam Replacement, Display: step 1, image 2 of 2
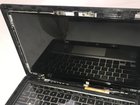
    • First open the laptop and place it so that you have access to the side of the display.

    • Next you want to place the laptop in a position where you have easy access to the display.

    • Use a metal or a plastic prying tool to split the front and back of the display.

    • Start on the side and work your way around.

  2. Asus VivoBook Q200E-BSI3T08 Webcam Replacement: step 2, image 1 of 2 Asus VivoBook Q200E-BSI3T08 Webcam Replacement: step 2, image 2 of 2
    • Pull the clear plastic display down from the bottom right and left.

    • If pulled from the top you might crack the actual plastic.

  3. Asus VivoBook Q200E-BSI3T08 Webcam Replacement: step 3, image 1 of 1
    • Remove the two 2.8mm screws on the top right and top left of the screen using a Phillips #0 screwdriver.

  4. Asus VivoBook Q200E-BSI3T08 Webcam Replacement: step 4, image 1 of 1
    • Remove the two 2.8 screws on the bottom right and left using a Phillips #0 screwdriver.

  5. Asus VivoBook Q200E-BSI3T08 Webcam Replacement: step 5, image 1 of 1
    • Once the screws are removed you should be able to move the display down. Be careful as there is a connection to the motherboard which will need to be removed.

  6. Asus VivoBook Q200E-BSI3T08 Webcam Replacement: step 6, image 1 of 1
    • Here is a picture of the connection that needs to be removed to free the display.

    • Pull connection from the plastic on the sides not the wires as these are fragile.

  7. Asus VivoBook Q200E-BSI3T08 Webcam Replacement: step 7, image 1 of 2 Asus VivoBook Q200E-BSI3T08 Webcam Replacement: step 7, image 2 of 2
    • Once this connection is removed here's what that should look.

  8. Asus VivoBook Q200E-BSI3T08 Webcam Replacement: step 8, image 1 of 1
    • Remove display and place your new one in it's place.

  9. Asus VivoBook Q200E-BSI3T08 Webcam Replacement, Webcam: step 9, image 1 of 1
    • Locate the webcam above and behind the display panel.

  10. Asus VivoBook Q200E-BSI3T08 Webcam Replacement: step 10, image 1 of 1
    • Disconnect the webcam from the display panel, using a nylon spudger.

    • Using a metal spudger around sensitive components has the potential to damage them. Be sure to use a nylon spudger or plastic opening tool before using a metal spudger.

  11. Asus VivoBook Q200E-BSI3T08 Webcam Replacement: step 11, image 1 of 1
    • Remove the webcam from the display panel.

Conclusion

To reassemble your device, follow these instructions in reverse order.

Gear Up For Future Repairs

Shop all

Mitchell Jackson

Member since: 05/17/17

742 Reputation

7 Guides authored

Team

IUPUI, Team S4-G4, Wilson Summer 2017 Member of IUPUI, Team S4-G4, Wilson Summer 2017

IUPUI-WILSON-SU17S4G4

4 Members

7 Guides authored

0 Guide Comments

Add Comment

View Statistics:

Past 24 Hours: 0

Past 7 Days: 1

Past 30 Days: 34

All Time: 1,171