Salta al contenuto principale
Unisciti alla Community delle riparazioni - Crea un account

Microsoft Surface Book Keyboard Battery Replacement

Cosa ti serve

  1. Microsoft Surface Book Keyboard Battery Replacement, Howdy! Let's get started - Gather Your Tools: passo 1, immagine 1 di 1
    Strumento utilizzato in questo passaggio:
    Jimmy
    $7.95
    • You should use an iFixit jimmy tool, a set of screwdrivers containing a Torx T4, a Phillips bit, and an iOpener. You can be risky like me and use a hair dryer and a scraper! The T4 is necessary, though.

    • Jimmy Tool

    • iOpener

    • Make sure to fully discharge the battery in your Surface Book. In most cases, this is irrelevant because your battery is dead anyway. If it's not, wait a while until the battery dies.

    • Please make sure to fully discharge the battery. You can ruin your Surface Book or, in rare cases, your whole home. BE CAREFUL!☺️

    Chiedi a FixBot

    Aggiungi Commento

    • Heat up the area until unpleasant to touch using a heat gun or hair dryer.

    • This should be around 130 degrees Fahrenheit.

    • Careful! Don't get too brave! Heat guns get hot very quickly.

    Chiedi a FixBot

    Aggiungi Commento

    • Use your jimmy to GENTLY pry the cover up. This is hard. It will take a while if you suck like me.

    • Be careful. Don't stick your jimmy too far in. This could damage the internals.

    Chiedi a FixBot

    Aggiungi Commento

    • Insert Jimmy.

    • Tilt the jimmy flat.

    • Give the pick a little room to insert.

    • Pull out the Jimmy.

    • Insert into a different location on the device.

    • In the video, the device had already been opened and replaced, which is why it seems easier to open.

    Chiedi a FixBot

    Aggiungi Commento

  2. Microsoft Surface Book Keyboard Battery Replacement, Cable Disconnection: passo 5, immagine 1 di 1
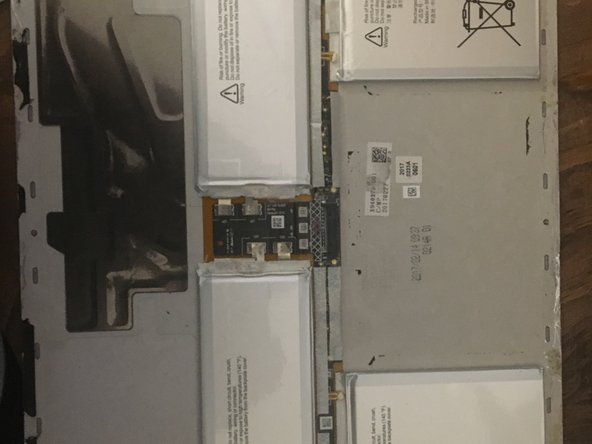
    • Disconnect the ribbon cable from the battery to the motherboard. You can disconnect it from the battery side.

    Chiedi a FixBot

    Aggiungi Commento

  3. Microsoft Surface Book Keyboard Battery Replacement: passo 6, immagine 1 di 2 Microsoft Surface Book Keyboard Battery Replacement: passo 6, immagine 2 di 2
    • Separate the back panel from the top panel.

    Chiedi a FixBot

    Aggiungi Commento

    • Heat the back panel to about 130 degrees Fahrenheit.

    • Heating batteries can be dangerous is dangerous, Proceed with caution!

    Chiedi a FixBot

    Aggiungi Commento

    • Grab a non-metal bucket and fill it with sand. (1/2 gallon should do it)

    • This is in case the batteries get punctured or catch fire when being removed.

    • If you notice that you have punctured the battery or notice a sweet, metallic smell, throw the backplate into the bucket, and move the bucket and yourself outside. If you have trouble breathing, do something relating to calling 911 or the ER or something.

    • See here: iFixit Battery Safety

    Chiedi a FixBot

    Aggiungi Commento

    • Gently, take your opening picks, and VERY, VERY gently, scrape the adhesive out from under the battery.

    • Put the batteries in the bucket and take them to a nearby battery recycling facility. battery recycling facility list

    Chiedi a FixBot

    Aggiungi Commento

    • Unpack your new, beautiful, fantastic Surface Book Keyboard battery.

    • Take that battery, and take some of that adhesive, stick it to the back of the battery.

    • Put it on the backplate.

    • Plug in the connector that was keeping you from being able to pull the backplate off.

    Chiedi a FixBot

    Aggiungi Commento

    • Take your adhesive, line the edges with the adhesive, and put the backplate back on

    Chiedi a FixBot

    Aggiungi Commento

Conclusione

Congratulations! You did it!

TYSM for reading this guide!

To reassemble your device, follow these instructions in reverse order. Just don't pry in reverse. That won't work.

Annulla: non ho completato questa guida.

Altre 4 persone hanno completato questa guida.

Aj Chiappini

Membro da: 08/30/23

340 Reputazione

Una guida realizzata

1Commento della guida

Which adhesives should I purchase for this replacement?

Gabriel A Ohnstad - Rispondi Condividi

Aggiungi Commento

Visualizza statistiche:

Ultime 24 ore: 6

Ultimi 7 giorni: 61

Ultimi 30 giorni: 276

Tutti i Tempi: 8,923