Introduzione
Segui questa guida per sostituire il disco rigido SATA nel iMac 21.5'' Retina 4K 2019. Tieni presente che se stai sostituendo il disco, dovrai clonare il tuo disco esistente installato prima di fare il cambio di disco in modo da mantenere il sistema operativo e i file annessi.
Alcune immagini in questa guida usano un iMac più vecchio, quindi ci saranno delle differenze. Questo però non influisce sulla procedura di riparazione in alcun modo.
Cosa ti serve
-
-
Se la cerniera è libera di muoversi, l'iMac si può sbilanciare e rendere difficile il lavoro. Sistema sotto lo stand un supporto di riparazione iMac per rendere stabile il dispositivo.
-
-
-
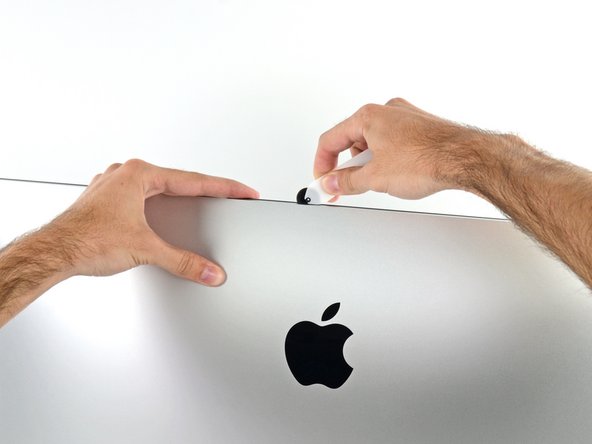
Iniziando dal lato sinistro dello schermo, vicino al pulsante di alimentazione, inserisci lo Strumento di apertura iMac nella fessura tra il pannello di vetro e la cover posteriore.
-
-
-
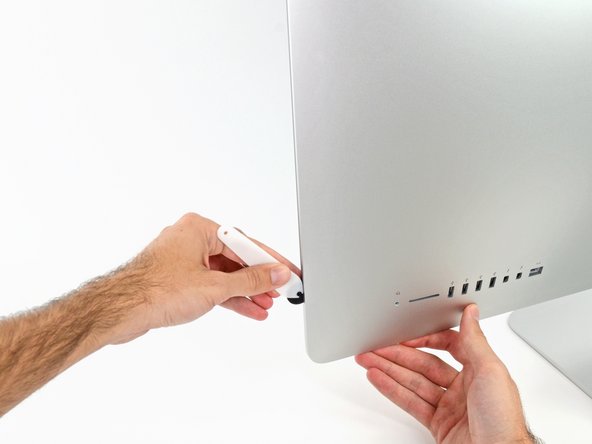
Usa l'attrezzo come se fosse una rotella per tagliare la pizza: fallo girare lungo la fessura, tagliando così l'adesivo in schiuma tra la scocca e lo schermo.
-
Passa l'attrezzo attorno al lato sinistro dello schermo.
-
-
-
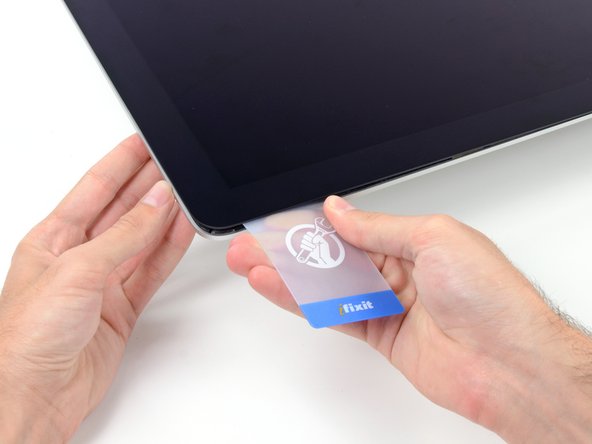
Iniziando dall'angolo superiore destro dell'iMac, infila una scheda di plastica tra lo schermo e la scocca.
-
-
-
-
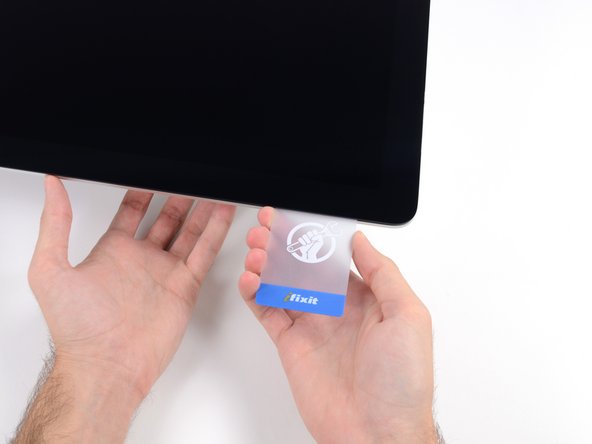
Torci delicatamente la scheda di plastica per creare una fessura tra il display e la scocca.
-
Agisci lentamente stai attento a non stressare troppo il vetro dello schermo: ti basta creare una fessura di circa sei mm.
-
-
-
Con le schede di plastica inserite come in figura vicino agli angoli, applica ad entrambe una torsione per allargare la fessura tra lo schermo e il case.
-
Inizia a sollevare la parte superiore dello schermo dalla scocca.
Ich habe den unteren Klebestreifen gar nicht gelöst! --> Monitor (Glasscheibe) nach vorne auf ein dickes Kissen gelegt - so dass das Glas nur ca. 80° Winkel nach vorne zu liegen kommt und dann habe ich die Festplatte getauscht! So konnte ich die untere Klebeleiste wieder verwenden und hatte genügend Platz um die senkrechten und oberen Leisten zu verkleben!
Tip: Klebestreifen zuerst auf dem Alugehäuse befestigen...... -
-
-
Mantieni lo schermo con uno mano mentre con l'altra stacchi il cavo di alimentazione dello schermo .
Can this cable be replaced? I am worried mine is damaged. I have no display after the screen fell and stressed the display flex cables following an SSD upgrade.
This step should be done with extreme caution and care, as this step 19 is not described in great detail (sorry, author).
The first (most outward) cable will slide out by gently pulling it by its tabs. The second (inner) cable is more tricky, as the locking lever must be moved backward first, before gently pulling backward on the cable connector. The angled tweezers are useful here, to help lift that locking lever, because fingers are too big for this.
I found the best way to unplug this display power cable was to use my right hand, and the fingernails of my index finger and thumb to grab the ends of the tabs on either side of the connector, squeeze, and pull the connector out gently.
i think the cable nearest the case edge is held in by friction and can be gently pulled, maybe with fingernails or a spudger. The next cable is held by a wire lever clip as described above it unlocks so the cable can be removed. These cables are also fiddly to re-insert, I didn't get one of them home and had no display after power-up, so at the end, don't re-seal the screen until tested.
-
-
-
Continua a tenere lo schermo con una mano, sblocca la staffa metallica di ritenuta del cavo dati dello schermo.
-
Stacca con cautela il cavo dati dello schermo dalla sua presa nella scheda madre.
Cannot seem to find a replacement cable for this, as I suspect mine is damaged. Can’t even find a part number. Anyone know what it might be?
https://www.amazon.com/gp/product/B08TTL...
That's the part I ordered for mine and it seems to work ok. I did make a point of contacting the seller and advising them of my requirement and they ensured I got the right part and it matches the description of the link. Bear in mind I bear no responsibility if yours does not work since I am just sharing what I did and what I ordered. Thanks.
I also need that cable.
It's a little difficult to tell... but looking at the connection to the logic board on the video data cable, are the pins faced up or down?
On the display, same question since it appears you have to "twist" the cable during the reconnection step.
For this particular cable, take a good look before pulling on anything. Plug is locked on its socket with a bracket. You can lift this bracket by holding the small, flat black plastic handle that is attached to it. If you're struggling to grab it, use the end of the pizza roller handle to lift it, or the tweezers. Cable then comes off by pulling parallel to the main board.
How can I tell if either of this cable is bad? My iMac display won't turn on after reconnecting it. I'm using an external display and everything is working except for the iMac display. If I go to settings - display the built-in display is recognize. But again nothing shows up in the screen - not even the apple logo when turning it on.
-
-
-
Solleva lo schermo in posizione all'incirca verticale.
I was fretting that i would break my screen, it's really hard to see what is holding the screen in place and i was ready for it to snap the last 1/2 inch or 12mm of the glass I worked slowly and as you say, keep lifting and working it gently until you can see and cut the remaining adhesive.
-
-
The bottom adhesive strips have small tags at a 90 degree angle that can be used as handles to strip them out at this point. https://d3nevzfk7ii3be.cloudfront.net/ig...
-
-
Rimuovi le seguenti viti Torx T10 che tengono ancorato il supporto del'hard drive sull'iMac:
-
Due viti da 21 mm
-
Una vite da 9 mm
-
Una vite da 27 mm
At step 26, when reassembling, it's super easy to over-tighten the 9mm screw and strip the brass ferrule out of its hole in the plastic bracket (%#*@).
Mine has 4 different length screws, the two red colored 21mm screws in this guide are actually two differ lengths
buongiorno, l'imac del 2019, non monta alcuna ssd, ma monta una m2 direttamente sulla scheda madre!
pertanto nella guida andrebbe aggiunto il cavo sata con sensore temperatura da aggiungere sulla scheda madre, per poter collegare un nuovo hd ssd altrimenti rimarrete come me bloccati con un imac aperto e non assemblato, in attesa di ricevere il cavo acquistato su internet da amazon o terze parti.
vi consiglio inoltre di aggiungere una foto reale del ò'imac 2019 nella guida in cui manca l'ssd, renderà subito la problematica che avranno in molti!
Hi, mine doesn’t HAVE an HD/SSD to remove, the bay is empty (yes it was fully working yesterday. So what do we do ? I see someone else with the sane issue above….
-
-
-
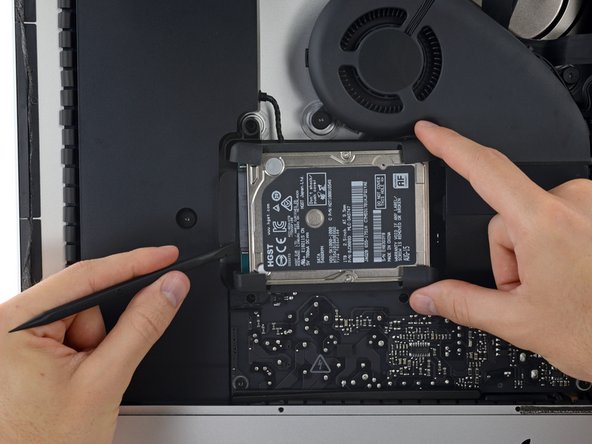
Solleva l'hard drive dal bordo più vicino alla scheda logica e tiralo leggermente fuori dal suo alloggiamento.
-
-
-
Usa uno spudger per disconnettere il singolo cavo SATA spingendolo con delicatezza lontano dal disco rigido.
-
Rimuovi l'hard drive dall'iMac.
Not only is it useful to loosen up the speaker next to the SATA connector I found it helpful to use a pen to mark the exact location of the edges of the SATA connector on top of the new drive, so I could guide the connector in place. It also helps to put the bumpers in after you get this SATA connector in place.
Waiting to put the bumpers on until after the SATA cable is attached was a must! Also loosing the speaker and moving over a couple centimeters was a huge help. Thanks
-
-
-
Stacca la protezione gommata da un lato del tuo disco fisso.
-
Ripeti l'operazione dall'altro lato del disco fisso.
reconnecting the new drive can be a little tricky as the sata connector in the Mac is hard to align. I found that it helps to move the end of the bumpers out of the way, then push them back into position once the drive is connected.
Thank you for the tip!
Can I install a Samsung 850 EVO 500GB to replace my 1TB 5400rpm disk? and is a seperate thermal sensor/cable needed to prohibit the fan to run at 100% all the time?
Yes you can install ANY SATA SSD.
And no … there is no thermal sensor on the drive. You don’t need them on these models.
Can I install a Seagate FireCuda 2TB to replace my 1TB 5400rpm disk? and is a seperate thermal sensor/cable needed to prohibit the fan to run at 100% all the time?
Did you ever find out if you could replace your 500 GB with that Firecuda? I’m looking at doing that. I need more storage for my 500 GB photos library and don’t want to pay so a ton for the SSD that is big enough.
The SSD was a HUGE performance boost over the 5400rpm drive my iMac came with. If you’re pulling your hair out because Lightroom has become excruciatingly slow, upgrade your hard drive to SSD. You will not be disappointed.
The kit has everything you need. Follow these instructions carefully and you’ll be fine.
Huge improvement! It’s like a new machine. Highly recommended upgrade.
Take care with the adhesive strips, and don’t forget to set new SSD as the boot disk (System Preferences, Startup Disk) after you’ve tested its bootable.
I previously had a fusion drive and installed a SSD. Will there be any issues with the ssd portion of the fusion drive? I still see it there in disc utility. Also, I’m showing two SSDs, along with the 32 gig one. Is that correct or did I create something that shouldn’t be there?
I have this same question. I’m showing 2 drives but 1 is grayed out on the computer screen when I click on it nothing happens.
Frank -
A fusion drive combines two physical disks via software to act as one. It it something that has to be done manually and expressly. When you first got the computer, your fusion drive combined disks A (SSD) and B (HDD). If you replaced B, then you probably have an unused 32 GB blade SSD along with your new SSD. It possible to create another Fusion drive, but you’d have to start from zero, because creating a fusion drive erases the individual disks completely.
also, not 100%, but I tried for several hours the other day and I’ve come to the conclusion that my version of Big Sur (11.1) doesn’t support Fusion Drives. Correct me if I’m wrong. Or maybe it’s because I’m running Big Sur on an unsupported iMac.
David -
The hardest part was to plug the connector into the new SSD. I loose the two screws of the adjacent (left) speaker and move it just enough to have sufficient space to introduce my fingers to push the conector into the SSD. Left the replace of the rubber bumpers after reconnect the SSD, is easy to handle without it.
I bought Samsung QVO 1TB SSD and now the fan is blasting fast and loud. So if these don’t use the thermal cables then what seems to be triggering the high temp? Obviously it’s the hard drive but could it be that the drive was cloned? I’m kinda stumped, I know I can control with software but some of you are saying it should run normal after install. Thanks for the info.
Is there a PCIe slot for an SSD instead of the SATA 3.0 2.5”?
thank you,
Not unless your iMac shipped with a Fusion drive or SSD.
The step-by-step guide was awesome and easy to follow. As others have commented, getting the SATA connector onto the SSD is tricky but not impossible. Just pull back the rubber bumpers long enough to reach the connector, then flip them back into place before seating the drive. One comment for my machine (late 2015 21.5”): There is no mic hole for my model, so while I was a little confused at the instructions on reinstalling the adhesive, the drive replacement went like a dream. And I saved myself the $120 labor the local Mac shop wanted to charge me.
Hat alles prima funktioniert. Leider läuft der Lüfter jetzt auf 100% und kernel_task Prozess ist bei über 300%. Was habe ich falsch gemacht. Diagnose meldet jetzt einen SMC Fehler und CPU-Proximity liefert keinen Wert.
Kann jemand helfen?
schau doch mal hier https://apple.stackexchange.com/question...
This is the least accurately described step (sorry, author). While removal is easy, inserting the new drive in its place is a bit tricky. The key here, is to insert the new drive with its rubber bumpers back in its space, so that it is fully seated down in its place *before* the connector can be re-attached. Once it is seated in place, use the flat end of the spudger to gently manoeuver the connector back into place until it is firmly connected to the drive.
Reassembling the iMac is not simply following these instructions in reverse order (sorry, author).
Before embarking on the home stretch, it is very important to carefully study the guide about the Adhesive Strips Replacement (iMac Intel 21.5" Retina 4K Display (2017) Adhesive Strips Replacement - iFixit Repair Guide), as this a tedious and time consuming process. Perfect alignment of those adhesive strips takes some concentration, because you will want to have your display panel back nice and tight and fully aligned with the case. Once all strips are in place, the 2 display connectors need to be gently reattached to the motherboard, before closing up the panel. I took my sweet time for that step, and thankfully have a perfectly aligned display panel back in place looking no different from the factory fit.
Here’s the rest of the information you need.
There needs to be more added to cover the first part of re-assembly. To connect up my SSD, I needed to remove screws that held in place the black plastic to the left of the drive bay. This was only way to get the added space needed to connect the SSD to the drive cable. I also connected the SSD first, then attached the rubber bumpers, simply to give me more room to maneuver the drive next to the connector. All in all, yes, a person well familiar with tearing down iMacs could do it in an hour or so. But frankly, the design of this iMac is a total horror show when it comes to repair or replacement of parts, especially given its reliance on glue and adhesives. Gee, just like other Apple products.
Ben, after you replaced the HDD with SSD, did you have any fan issues on the A1418 model iMac? Thinking of doing this but I’ve been reading for hours and seeing mixed reports about thermal sensors.
This iFixit tool (iFixit Opening Tool) will be your best friend when it's time to install your new 2.5" hard drive. Simply hook the tool to the back top corner of the iMac SATA adapter, connect your hard drive loosely to the SATA ports and use the tool to pull the SATA adapter forward into the hard drive.
After replacing the hard drive. All went well BUT -now my mic does not work. It's the single hole on the bottom. Any ideas anybody?
Did you notice step 14 in the guide to replacing the adhesive strips?
Please update the end of this guide, pointing the customer to the guide for replacing the display adhesive strips. You provide a single kit for this procedure, and the customer has to figure out that they must follow two independent guides, in order to successfully complete the installation.
Ich habe den unteren Klebestreifen gar nicht gelöst! --> Monitor (Glasscheibe) nach vorne auf ein dickes Kissen gelegt - so dass das Glas nur ca. 80° Winkel nach vorne zu liegen kommt und dann habe ich die Festplatte getauscht! So konnte ich die untere Klebeleiste wieder verwenden und hatte genügend Platz um die senkrechten und oberen Leisten zu verkleben! ⏎
Tip: Klebestreifen zuerst auf dem Alugehäuse befestigen...... -


Confronta la tua parte di ricambio con quella originale: potrebbe essere necessario il trasferimento di alcuni componenti o la rimozione di protezioni adesive dalla nuova parte prima di installarla.
Per riassemblare il tuo dispositivo, segui queste istruzioni in ordine inverso.
Porta i tuoi rifiuti elettronici a un riciclatore certificato R2 o e-Stewards.
La riparazione non è andata come previsto? Rivolgiti alla nostra comunità Risposte per trovare aiuto.
Annulla: non ho completato questa guida.
Altre 25 persone hanno completato questa guida.
Un ringraziamento speciale a questi traduttori:
100%


Questi traduttori ci stanno aiutando ad aggiustare il mondo! Vuoi partecipare?
Inizia a tradurre ›

15 Commenti
Great guide! I had a failing fusion drive and upgraded to an SSD and got the 64gb RAM maxxer kit while I was in there. everything went really smoothly and my computer is so much faster. My only mistake was that I didn’t clone the HDD before taking the imac apart. I had to put it all back together with the old drive, clone to the SSD, take it all apart again, replace the SSD, put it back together to verify that it was even gonna work, then take it all apart again to finish up the RAM upgrade. But… it’s all good. Thanks for the great guide!
You cannot replace a conventional “Hard drive” in this model iMac.
DO NOT attempt this upgrade until you understand two important facts:
1) The drive in your iMac MUST BE a ‘SSD’ or a ‘Fusion drive’. If it is a conventional HDD, stop. There is NO PCIe CONNECTOR inside to connect a new blade drive.
2) Click on the link in this iFixit for "clone your existing hard drive". All the more recent Apple CPU's are now classified as 'T2 secure chips'. Cloning is no longer straightforward, e.g. "Hold down Opt key during restart, etc." You have to bypass/disable certain security features on your iMac, and this is somewhat of a lengthy process. If you do not, when you try to boot from an external drive you will see nothing but a black screen.
Excellent step by step guide, thank you. I will definitely refer to this when I upgrade my 250G SSD which, BTW, is WAY too small. There's only 100G left, and only apps are Logic Pro X, Numbers/Keynote/Pages, iTunes & a few utilities... hardly any actual work
Thanks for the information given. One follow-up question having a SSD-only 2019 iMac: Is the 2.5" harddrive enclosure and Sata-Cable included in this one? I would like to a) upgrade the PCIe-SSD but also put in a slightly bigger 2.5" SSD in place of the - currently non-existent - harddrive. Knowing Apple I am pretty sure that they did not include the Harddrive enclosure in SSD-only 2019 iMacs - plus using proprietary Sata connectors probably >.<
The guide here mentions nothing of upgrading a blade ssd. If I open my imac and see a HDD can't I just swap it with a 2.5'SSD?
Your message is not clear. This guide is for a conventional drive upgrade for a Pre T2 2019 iMac.
This guide is also for an iMac that is Pre-T2, so your second point is not relevant either.
Sure, do not follow this guide if you wish to upgrade your SSD equiped iMac, or a 2020 iMac or iMac Pro.
You absolutely can replace a traditional drive in this model iMac.
Hi, i am confused: is it really impossible to replace the plain HD (aka non-fusiondrive) of the budget i3-iMac with an SSD, as user „Anti Spam“ wrote? Is the connector for the sata HD incompatible with an SSD-Drive, or is there any other problem?
Bit of a tip!, Make sure to absolutely sever all of the adhesive by running the tool up and down all sides - be particularly careful around the camera.
Performed procedure on 8GB memory, 1TB fusion disk "Retina 4K, 21.5-inch, 2019" with magnificent success (I don't know if the Fusion bit is accurate). I was worried about the screen breaking in step 23, but was lucky and careful. I didn't do a disk clone (i had a data backup), then in Recovery, i initialized the disk and installed across The Internet, then upgraded and using the handy drive enclosure and USB cable to restore Documents and Photos. Now the machine is so fast, it's snappy and responsive especially in Photos.
Hello,
Replacing only the SDD, will be present the fun speed bug ? must be buy also an extra thermal sensor ?
I have a 2019 model with the 1tb Fusion drive. I plan to replace this failing drive with the 1tb kit sold here. I have my data backed up using time machine, soI only need to load the OS onto the drive. Do I need to clone anything, or simply install the new drive and load the OS using apple's Option Command R process? I can load my data via the time machine.
Thanks in advance for any advice.
I have a 21.5" 2019 SSD model. The SSD is mounted on the back of the logic board. There is a SATA connector on the board. The plastic drive caddy is included in the chassis - but it is otherwise empty.
Having just upgraded the RAM I'm thinking of adding a second internal drive before I glue the screen back in place. Looks like I just need a SATA cable, power cable and a 2.5" SSD.
Maybe your directions should suggest fixers to buy RAM cards in pairs. I wanted 32 Gig of RAM, and I bought and installed one 32 G RAM and while it seems fine, one source told me it would be 5-10% faster if I had put in two 16 RAM cards. Is that accurate?
BRUCE CLARKE - Replica
it would at least be that much faster, in theory some applications should run twice as fast
blakebest -