Introduzione
Rimuovere lo schermo richiede il taglio dell'adesivo attorno al perimetro dello schermo. Dopo averlo tagliato, l'adesivo non può più essere usato per reincollare lo schermo, quindi dovrai applicare un nuovo set di strisce adesive.
Cosa ti serve
-
Attrezzo utilizzato in questo passaggio:iMac Intel 21.5" Cardboard Service Wedge$4.99
-
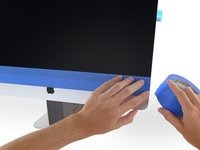
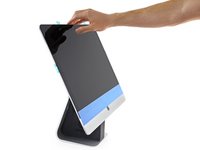
Con la copertura posteriore libera di muoversi, l'iMac non sarà bilanciato e sarà difficile lavorarci. Posiziona un supporto per iMac sulla base per bloccare la copertura.
-
-
Attrezzo utilizzato in questo passaggio:Tweezers$4.99
-
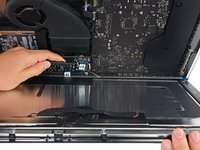
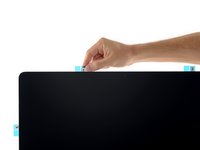
Se stai reinstallando lo schermo originale, dovrai rimuovere l'adesivo originale anche dal retro dello schermo.
-
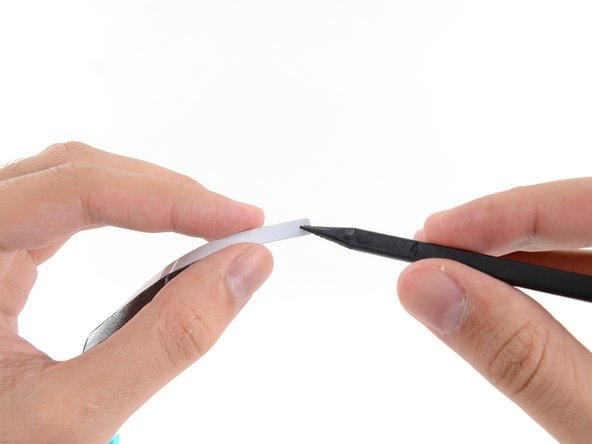
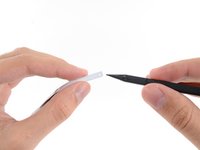
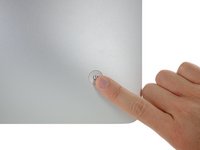
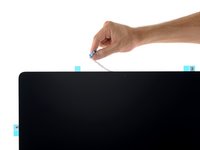
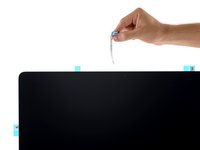
Rimuovi l'adesivo originale usando delle pinzette o le dita. Inizia sulla parte inferiore e tiralo verso l'alto, verso la parte superiore del dispositivo.
-
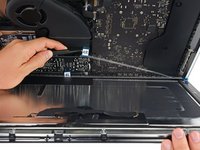
Dopo aver rimosso tutto l'adesivo originale, pulisci attentamente i residui di adesivo con dell'alcool isopropilico ad alta concentrazione (>90%) e un panno senza lanugine. Fai scorrere il panno in una sola direzione, non in avanti e indietro.
-
-
-
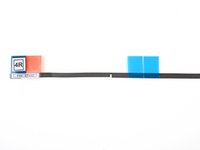
Prima di iniziare, appoggia sul tavolo le strisce adesive nella disposizione corretta in modo da non applicare accidentalmente una striscia nella posizione sbagliata:
-
Striscia 01 in alto a sinistra
-
Striscia 02 in alto a destra
-
Striscia 03 sul lato destro
-
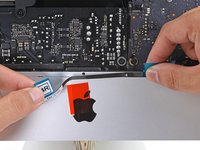
Striscia 4R in basso a destra, con il bordo scuro rivolto verso l'alto
-
Striscia 4L in basso a sinistra, con il bordo scuro rivolto verso l'alto
-
Striscia 05 sul lato sinistro
-
-
-
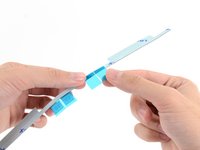
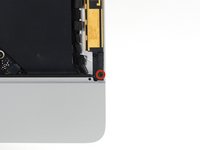
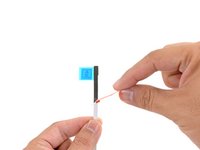
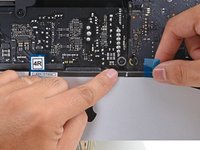
Inizia con la striscia 03, che va sul lato destro verticale del case posteriore.
-
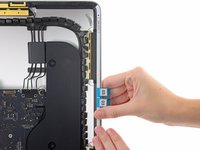
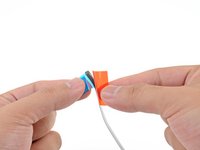
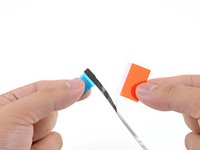
Afferra la linguetta blu e rimuovi il pezzo corto della pellicola protettiva dal retro della striscia per esporre una porzione di adesivo da incollare al case.
-
-
-
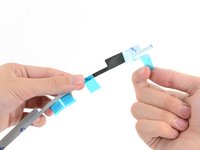
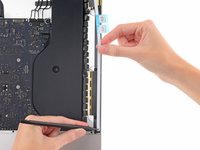
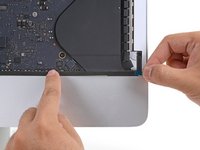
Infila la punta di uno spudger nel foro all'estremità della striscia dove hai appena rimosso uno strato di pellicola protettiva posteriore. Infila lo spudger dal lato che ha ancora la protezione bianca.
-
-
-
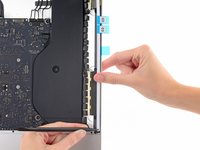
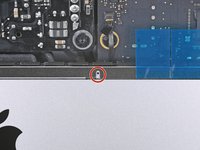
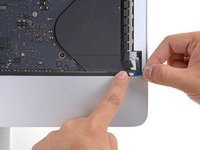
Con lo spudger che sporge dal foro nella striscia adesiva, spingi la punta dello spudger nel foro corrispondente nella cornice deell'iMac.
-
Usando il foro e lo spudger come punto fisso della striscia, allineala contro il bordo destro, tirandola delicatamente verso l'alto per assicurarti che sia tesa, quindi incollala alla cornice.
-
-
-
-
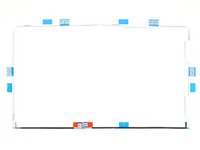
Continua in senso antiorario lungo il perimetro dell'iMac, incollando altre tre strisce adesive come fatto per la prima:
-
Striscia 02 in alto a destra
-
Striscia 01 in alto a sinistra
-
Striscia 05 sul lato sinistro
-
-
-
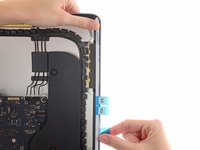
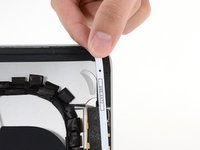
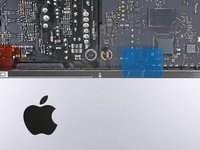
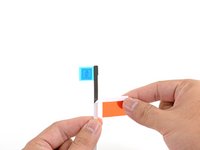
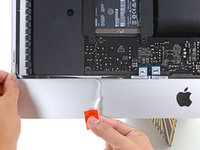
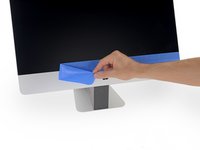
Afferra la linguetta rossa sulla striscia 4R e tirala per rimuovere circa 5 cm della pellicola protettiva bianca posteriore.
-
-
-
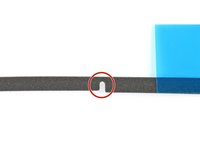
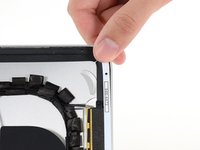
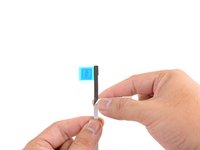
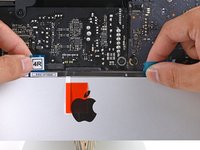
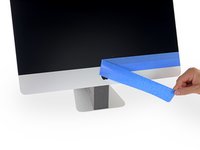
Allinea la striscia al bordo inferiore posizionando la rientranza nella striscia sopra il foro del microfono.
-
Se il tuo iMac non ha un foro per il microfono, allinea l'estremità destra della striscia in modo che la curva a L sia accanto alla striscia verticale sul lato destro. La curva a L non deve sovrapporsi alla striscia adesiva verticale sul lato destro.
-
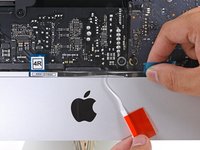
Una volta allineata la striscia, incolla attentamente l'adesivo esposto alla cornice per assicurarne l'allineamento.
-
-
-
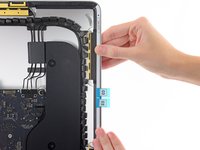
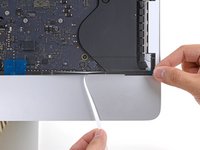
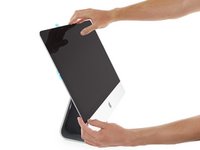
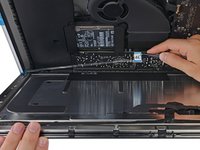
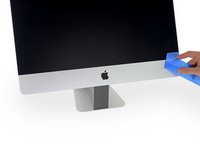
Appoggia delicatamente lo schermo sopra l'iMac e allinealo attentamente.
-
-
-
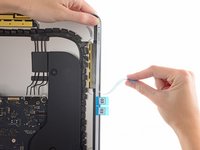
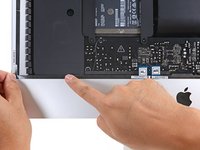
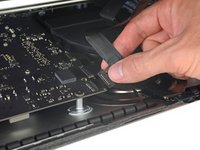
Infila il cavo di alimentazione dello schermo nella sua presa sulla scheda madre.
-
-
-
Appoggia lo schermo alla cornice dell'iMac.
-
A questo punto collega l'alimentatore del tuo iMac, accendilo e controlla la tua riparazione prima di continuare con la procedura di incollaggio dello schermo. Assicurati di controllare tutte le funzionalità di ogni componente che hai rimosso o scollegato.
-
-
-
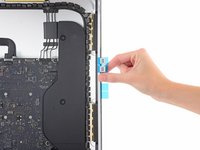
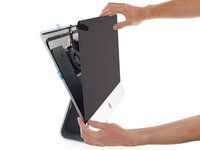
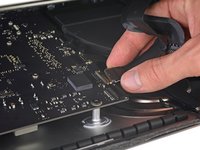
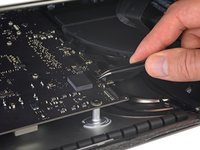
Dopo aver confermato che il tuo iMac funziona correttamente, scollega i cavi dello schermo e inclinalo attentamente in avanti.
-
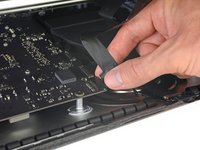
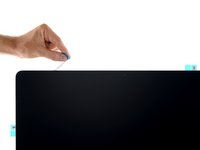
Rimuovi la pellicola protettiva dalle due strisce inferiori da sopra lo schermo, raggiungendole con un paio di pinzette e tirando le linguette blu dal bordo inferiore dello schermo verso l'alto.
-
-
-
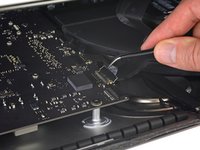
Ricollega i cavi di alimentazione e del segnale video per un'ultima volta.
-
-
Attrezzo utilizzato in questo passaggio:Microfiber Cleaning Cloths$3.99
-
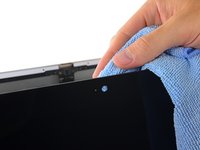
Tieni lo schermo con una mano mentre rimuovi le pellicole protettive nei seguenti passaggi, oppure appoggialo delicatamente sulla cornice.
-


Annulla: non ho completato questa guida.
Altre 314 persone hanno completato questa guida.
Un ringraziamento speciale a questi traduttori:
100%

Questi traduttori ci stanno aiutando ad aggiustare il mondo! Vuoi partecipare?
Inizia a tradurre ›


33 Commenti
Good Lord, why does Apple have to make it so difficult to upgrade or repair? There comes a point where design aesthetic just isn't worth it. Magnets, like I believe older iMacs use to attach the front glass, would have made it much easier. I'll take the extra bulk any day.
Have you actually done the replacement? It's actually pretty easy. Apple did everything they could to make it as painless as possible: the old adhesive separates without *any* residue, it doesn't rip apart, it doesn't make a mess. Things align like magic.
True, it could be easier. Like with the old color iMac SD. But since I don't take my iMac apart every day, doing this once or maybe twice in my computer's lifetime is a small price to pay for a *really* slim and good looking device.
I had some issues with steps 21, 22 and 23 ... the tabs would rip off. After the third one I used the plastic card to gently create some space for the strip to escape.
Thank you for this fantastic guide, and all of the iFixit guides! Just finished this replacement using the iFixit Adhesive Strips/iMac Opener tool combo--everything worked very well, except that the iMac Opener tool did not particularly like the broken glass area of the display, which bent the plastic of the "pizza cutter" wheel a little.
.
One bit of helpful advice is to use extreme care when placing the replacement display back into the iMac. Make sure that you do not put the display back in at too great of an angle, or there will be a very noticeable gap at the bottom, between the display glass and the iMac frame. Adhesive strips are not forgiving, and rarely give multiple chances!
We've revised the guide procedure and it makes positioning the screen very easy. You can drop it into place and fine-tune the position to your heart's content. :)
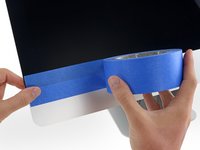
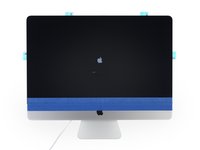
Place some sticky tape along the lower edge of the iMac either side of Apple logo. Position screen carefully onto the lower ledge and then use the tape to hold. Tape then acts as a hinge allowing you to raise or lower screen while in the right position. I did this and also used some tape at the top so I could reconnect screen and test HDD install. Then you can hinge screen down to remove the adhesive tape backing strips in order to close up the screen for good!!
Thanks for the tip! We've added it to the guide.
Somewhere between steps 2 and 3 you might want to add, that you also need to remove the old adhesive from the rear of the screen assembly
Good call! Done and done. Thanks!
Just successfully upgraded one of these to an SSD using the instructions, tools and adhesive strips from iFixit. The instructions are excellent, and the iMac opener tool does a good job of cutting the adhesive to get it open.The adhesive strips in the kit are excellent - don’t even think about trying to make your own - just buy these and make your life MUCH easier. The final part of using masking tape to position the display before final sealing is very important, and works brilliantly.
I found that for steps 10 & 11, it is better to attach 4R and 4L to the glass directly by removing the blue side of the adhesive strips and placing where they fit correctly onto the glass. Then remove the red tabs just before placing the glass onto the Mac. The right-angle ends of the tape align with the corners on the glass back.
Of course monitor won't turn on after putting it back in. Any hint?
Joao, I had the same problem just last week. In my case, it seems I hadn’t fully inserted the video cable. I opened it up again, reset the cables, and yes, the video still works. So, open it up, order some new adhesive strips, and be *extra* careful the second time you do it.
David -
This was the toughest part of the HD>>SSD upgrade.Removing all the gunk, and aligning the new strips took more than an hour. The rest half that! But all good now, Thanks Sam.
Thank you for this easy to use guide. Only read, look the pictures and do exactly what to do and the iMac looks like before
Tolle Anleitung, vielen Dank. Ich bin sehr frog, dass es eure Seite gibt. Die Klebestreifen habe ich bei euch gekauft und sie sind sehr gut.
This guide is accurate and works just fine. I also have had problems with the tabs pulling off the backing making it difficult to continue. I had problems with 4L & 4R on a previous install and today with the short end of 2. I find that after 4L & 4R removal and mating the bottom, pulling all the strips off keeping the screen spaced 2” or so at the top with one hand, removing all the strips, and then setting the entire screen works best for me.
Hi
Your description does not meet reality.
FIRST
There is another thing to my kit : Number 5 was too long. About 5 mm !!! Did I get the right one ?
Then let’s start with step TWO.
When lifting up the tape from the back of the screen, on the upper side the result was not like on the sides. The tape that came off from the top was almost 10mm wide !! After cleaning I realized that there is a second black tape on the back of the monitor. On the top it is gone now, on the sides it’s still there. What do I do ?
Step THREE
My kit had transparent tape on those tips. Had I everything the wrong way round ?
Let’s go to step ELEVEN
It’s about the second photo with the final image after putting the tapes in place. Why are they all black now ? Whatever is the reason for that, one feels pretty uncertain of the whole procedure. Are both the 4-tapes really the other way round ? On my kit, the red handle would take of the thick paperlike side… ???
So. What do I do with those tapies on the back of the screen. I take them off, right ?
You want to remove the foam adhesive, as shown in the photos, and nothing else. The wide black mylar layer you’re describing is part of the display itself and should not be removed. If it peels up by accident, carefully smooth it out and stick it back down. Yes, the 4R and 4L strips should be placed exactly as shown in the guide.
The same thing happened to me except I throw away the large tape (10mm wide) from the LCD before I realized I should have kept it in place.
Nevertheless, I completed the installation and everything works great except :
1) the LCD is slightly recessed in the enclosure (no big deal)
2) there is a section on the upper left of the screen where there is a gap between the enclosure and the LCD because the adhesive did not stick well there
May the removal of the large LCD tape (10mm wide) be causing the adhesive problem on the upper left of the screen ?
If I want to redo the job to get rid of the two problems I mentioned, what would you suggest me to do ?
AVOID SHOCK… just wanted to add - Even with the power cable removed during the process there is still a very strong chance of getting a belt off of the power board… These boards can hold charge for a long time. Do NOT touch the board with tweezers or your fingers when removing the 4L & 4R strips.
Brilliant guide btw.
However came across a major issue which I think you should update the guide with a note warning other people.
In newer IMacs apple has repositioned the microphone to the bottom bar where the 4r &4l strips are placed. The instructions in your guides don’t mention this and the adhesive strips will cover the microphone hole resulting in a muffled microphone input. Just be careful guys.
Great guide, kudos! Upgraded an old iMac 21.5 late-2012 (EMC 2544).
The stripes (bought with the “pizza-cutter” tool) were of the right length and shape.
One little remark on “Step 4” - “Insert the tip of a spudger into the hole …” : the hole is obstructed by clear film on both sides of the tape; the spudger can’t help with the alignment as suggested, although the film is clear and you can locate the reference hole/notch by looking-thru the clear film. Same holds true for strips 2, 1 and 5.
I found strips 4L and 4R (steps 10, 11) to be the challenging ones: start from the sides of the central screw, lay down in place the (partially peeled) portion of the tape and, while progressing, gently peel-off the portion of the tape to stick next. The lower edge of the tape almost sits on the ledge of the aluminum front part of the chassis. Never pull the tape as the peeled part is easy to stretch along its length.
On step 13, securing the bottom side of the screen with masking tape was a brilliant idea.
Many thanks!!
I have a difficult time removing the display. The adhesive seems to be sticking to much and I am afraid of damaging the display. I have damaged 3 tools and cannot get it to move a bit. Any thoughts?
Hello, did it thank you.
For the most part the guide was pretty accurate.
I don’t understand why I couldn’t see it translated (in french) although I know the translation exists
Hello! I’m glad you had a successful repair. We updated this guide recently and the updated guide has not been translated yet—it will soon!
Dear Sam and iFixit contributors,
So many thanks for you for this tutorial !
Everything worked fine for me. I replaced my hard disk and mounted back the screen. It took me three hours but I have been patient and I spent some time contemplating the computer’s inside. The ifixit replacement kit was OK.
Cheers !
An excellent guide. I was nervous before attempting this, but the steps were extremely clear and I completed this without any issue. ?
Great guide! I used the apple replacement part kit that comes with both the 04 and 4L & 4R stripes . I will highly suggest to use the 04 on those iMac with microphone on the top and not the center of the bottom adhesive stripe just like mine 21.5" late 2013.
If you use the 4L and 4R you are going to have both ends of the stripe hanging in the air.
I removed the screen in order to upgrade the HDD to an SSD. I found the old adhesive was very difficult to remove from the back of the display panel even with liberal lashings of 100% isopropyl alcohol. Some of the black (paint or tape, or whatever it is) coating on the back of the sides of the screen parted company with the glass thanks to the extended rubbing. Next time I might let it soak for a while and hopefully that will be more successful.
IT Helper's point (May 11 2015) is a good one and I wish I had read that before refitting the screen. If I had done so the result would've been neater.
The opener tool worked a treat.
Done!! Thank you all. Fantastic Guide.
I have learnt something really important when using your guides, spend sometime reading other users comments. It will save you time & money.
Mine --> iMac Retina 4K 21.5-inch 2017
Display removed and set again - 0 problems.
Well done team!!