Introduzione
Sostituisci l'interruttore di accensione del Nintendo DS Lite.
Cosa ti serve
-
-
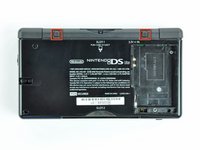
Svita la vite a croce Phillips che fissa il coperchio della batteria al case inferiore.
-
Solleva il coperchio della batteria verso l'alto con uno spudger o un'unghia e solleva il case inferiore.
-
-
-
Usa la punta di uno spudger per staccare entrambi i piedini in gomma dal DS Lite.
-
-
-
-
Rimuovi le seguenti viti che fissano il case inferiore al corpo del DS Lite:
-
Due viti a croce Phillips dorate da 4,3 mm
-
Una vite Tri-Wing nera da 3,9 mm
-
Una vite a croce Philips cromata da 3,3 mm
-
Tre viti Tri-Wing cromate da 5,5 mm
I cannot remove the tri-wing screws.
Same to me. I tried opening the case by force. Broke several parts of the motherboard…
Leon -
I can't remove the final tri wing screw in the battery section and it looks like I grinded the screw out too much for any screwdriver to work.Is there anything I can do?
From what I know, the only solution is to drill the screw out with a very small-headed drill :/
Polaris -
-
-
-
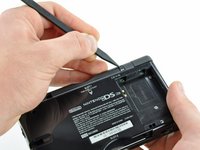
Inserisci il bordo di uno spudger tra il case inferiore e quello superiore vicino all'angolo superiore destro del DS Lite.
-
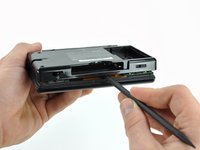
Fai scorrere con attenzione lo spudger lungo il bordo destro del DS Lite, creando nel frattempo un'apertura.
-
Continua a far scorrere lo spudger lungo il retro del DS Lite finché la maggior parte del case inferiore è stato separato da quello superiore.
Don’t forget to remove the GBA cartridge placeholder before removing the backside
You forgot to mention to remove the battery compartment Phillips screw.
-
-
-
Solleva il case inferiore dal resto del DS Lite.
When you reassemble, make sure that you have the volume and power buttons in place, and make sure they are in the right position to line up with the switches on the motherboard. If they are not aligned, you risk snapping off the tiny switches on the motherboard (in which case, you are in for some soldering work).
I should have read the comments first - broke off the power switch because I didn't know about aligning it. No way I can do soldering, guess it's for the dustbin :-(
Emma -
Whoops, remembered the power button but forgot the volume slider.
I'll do it later.
There is no way that the fact you have to line up the volume and power switch toggles upon reassembly is not in this guide. I just carefully followed this guide to replace the shoulder buttons but ruined my DS lite because I didn’t read these (practically hidden comments due to the design of the website) comments and broke the power switch. Thankfully there are 150 million DS I can buy second hand but “repeat the steps backwards” wasn’t sufficient in this repair. And that’s what this website is for.
Watch out with the shoulder buttons. The spring jumped out and I have to clear my entire room to find it ;_;
-
-
Attrezzo utilizzato in questo passaggio:Tweezers$4.99
-
Utilizza un paio di pinzette per rimuovere con attenzione l'interruttore dell'alimentazione.
-


Per riassemblare il tuo dispositivo, segui queste istruzioni in ordine inverso.
Per riassemblare il tuo dispositivo, segui queste istruzioni in ordine inverso.
Annulla: non ho completato questa guida.
Altre 19 persone hanno completato questa guida.
Un ringraziamento speciale a questi traduttori:
100%


Questi traduttori ci stanno aiutando ad aggiustare il mondo! Vuoi partecipare?
Inizia a tradurre ›
Team

Cal Poly, Team 16-30, Maness Winter 2010 Membro di Cal Poly, Team 16-30, Maness Winter 2010
CPSU-MANESS-W10S16G30
4 Membri
25 Guide realizzate
4 Commenti
What about replacing the soldered portion of the switch? The tip that moves with the plastic to turn the handheld on/off has broken off of mine
Yeah, what he said..
If the plastic tab has broken off of the soldered part of the switch, you could try to glue a replacement tab onto the internal sliding mechanism, but more likely you’ll end up gumming up the works and effectively destroying the part, but then again it’s not as if you have a lot to lose by trying.
Alternatively you’ll need to get a replacement switch and desolder the broken part then installing the new part. Be careful that you don’t get the iron in contact with the top of the switch as that may melt the moving parts together, potentially necessitating another replacement.
Emily H -
Just desolder the old faulty switch and solder in your new replacment.
A Phillips #000 (PH000) seems to give a more secure fit (no slipping) than the stated Phillips #00.
Ritchie - Replica
This will be good for mods
Matthew Bevins - Replica
I'm having a problem getting the screw to unscrew. I have the right Phillips ( it was included with all the stuff I got this) Any tips. it doesn't look like the screw is spinning but i haven't played my Nintendo DS Lite for 3 years.
whittlegirls - Replica
bonjour j’ai une petite question pour vous fais trés longtemps que j’ai pas utiliser mon nintendo ds lite et quand je le branche il allume 1 fois orange après il s’enteint même s’il est brancher ça veux tu dire qu’il faut que je change de batterie ? Merci
Marie-Julie Richer - Replica
Soit un changement de batterie, soit la carte-mère a peut-être un court-circuit :/
Polaris -