Introduzione
Segui i passi di questa guida per sostituire la fotocamera posteriore iSight del tuo iPhone 6s Plus.
Cosa ti serve
Panoramica Video
-
-
Spegni il tuo iPhone prima di iniziare lo smontaggio.
-
Rimuovi le due viti Pentalobe P2 da 3,4 mm sul lato inferiore dell'iPhone, vicino al connettore Lightning.
-
-
Attrezzo utilizzato in questo passaggio:Clampy - Anti-Clamp$24.95
-
Tira la manopola blu verso la cerniera per sbloccare i bracci dell'Anti-Clamp.
-
Fai scorrere le braccia o sul bordo sinistro o su quello destro del tuo iPhone.
-
Posiziona le ventose sullo schermo, subito sopra il tasto Home, una davanti e una sul retro.
-
Premi le ventose così che facciano presa sull'area desiderata.
-
-
-
Allontana la manopola blu dalla cerniera per bloccare le braccia
-
Ruota la manopola in senso orario di 360 gradi o finché vedi che la ventosa comincia ad allungarsi.
-
Aspetta un minuto per dare la possibilità all'adesivo di lasciarsi andare e alla parte inferiore dello schermo di aprirsi.
-
Salta i prossimi tre passi.
-
-
Attrezzo utilizzato in questo passaggio:Clampy - Anti-Clamp$24.95
-
Se non disponi di un Anti-Clamp, segui i prossimi tre passaggi per utilizzare una maniglia a ventosa.
-
Applica del calore moderato sul bordo inferiore dell'iPhone utilizzando un iOpener o un asciugacapelli per circa un minuto.
-
-
-
Il posto più sicuro da dove cominciare a far leva è l'intaglio nel pannello anteriore sopra il jack cuffie.
-
Mentre continui a tenere tirata la ventosa, inserisci la punta piatta di uno spudger nella fessura tra lo schermo e il case posteriore, direttamente al di sopra del jack cuffie.
-
-
-
-
Afferra con delicatezza il gruppo display e sollevalo verso l'alto per aprire il telefono, usando le clip nella parte alta del pannello anteriore come una cerniera.
-
Apri il display a un angolo di circa 90° e appoggialo contro qualche cosa per tenerlo sollevato mentre tu lavori sul telefono.
-
Usa un elastico per tenere il display in una posizione sicura mentre lavori. In questo modo eviterai di forzare i cavi del display.
-
-
-
Rimuovi le due viti Phillips che fissano la staffa del connettore della batteria alla scheda logica:
-
Una vite da 2,9 mm
-
Una vite da 2,3 mm
-
-
-
Rimuovi le seguenti viti a croce Phillips:
-
Tre viti da 1,3 mm
-
Una vite da 1,6 mm
-
Una vite da 3,0 mm
-
-
-
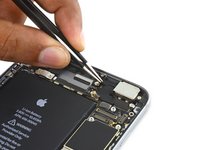
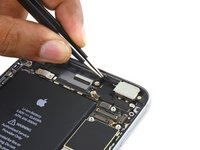
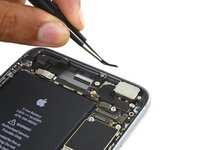
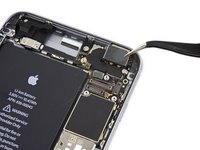
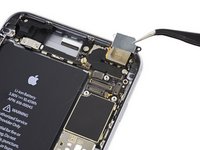
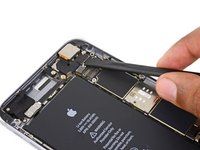
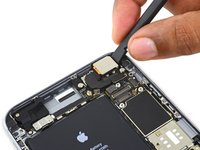
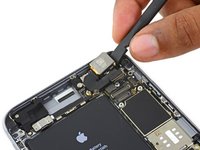
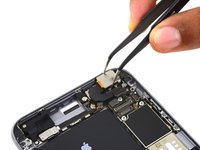
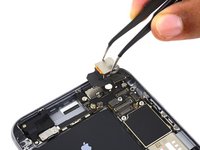
Stacca tutti i pezzi di nastro adesivo che coprono le viti della staffa della fotocamera iSight.
-


Per rimontare il tuo dispositivo, segui queste istruzioni in ordine inverso.
Per rimontare il tuo dispositivo, segui queste istruzioni in ordine inverso.
Annulla: non ho completato questa guida.
Altre 127 persone hanno completato questa guida.
Un ringraziamento speciale a questi traduttori:
100%

albertob ci sta aiutando ad aggiustare il mondo! Vuoi partecipare?
Inizia a tradurre ›

35 Commenti
really useful.
Great instructional video which saw me through the entire disassembly of my phone, and then clear and concise enough steps on the page to help me put it back together after installing the new camera. Thank you!!!!
I completed this repair at the same time as replacing my battery and headphone/lightening jack assembly. The problem I was experiencing with my camera was jittery video and unusable photos. The stabilization gimbal had died, though I am not sure that is the right word for it. It's more like it had an overdose. Anytime I would come to use the camera you could hear a tiny clicking noise as the lens armature shot itself about within its tolerances. Photos were out of focus and jittery, even when taken with the phone completely stable and untouched. I could most of the time just manage to make it take photos to deposit checks by holding the phone horizontally and in very bright sunlight, sometimes tapping the phone until the clicking noise stopped. Videos would hunt for focus and look as though I was actively shaking the camera, no matter what. Sometimes it was worse than others. Replacing this assembly completely fixed all issues.
Michael, you might have been interested to know that the focusing problems you experienced are chronic in the iPhone 6 Plus and Apple has created a repair program. You might have found this page useful if your serial number was eligible. https://www.apple.com/support/iphone6plu...
Micheal, I am having that same problem as well! Good to know that replacing it fixes it!
Talon, the repair program Apple has is only for the 6 plus not the 6s plus.