Introduzione
Questa guida mostra come rimuovere la copertura posteriore per accedere ai componenti interni del OnePlus 5. La parte più difficile è rilasciare i ganci della cornice. Dopodiché la copertura viene via facilmente.
Cosa ti serve
-
-
Infila uno strumento o una punta per l'eiezione della scheda SIM, o una graffetta raddrizzata nel piccolo foro sotto il vassoio della scheda SIM, posizionato vicino alle fotocamere posteriori sul bordo del telefono.
-
Premi con decisione per espellere il vassoio.
-
-
-
Svita le due viti Torx T2 da 2,6 mm accanto alla porta USB-C sul bordo inferiore del telefono.
What are the reference of the screws ? They are missing in the one I bought !
Hi Yôken,
They help hold the back cover on. Most of the time, the clips are enough to hold the phone together.
Just FYI, for whatever reason my brand new OnePlus 5 had 0,8 mm stars screws instead of T2 Torx.
Definitely T2 for me. Do watch out during assembly. I have a feeling that it’s easy to strip these.
T2 for me too. It was missing in my kit and iFixit sent it later when I asked them about it.
-
-
-
Fessura del pannello dello schermo: Questa fessura fa parte del gruppo dello schermo. Non fare leva in questa fessura, o separerai e danneggerai il pannello dello schermo.
-
Fessura della cornice: Questa è dove la cornice in plastica incontra la copertura posteriore. Fai leva solo in questa fessura.
-
Ci sono dodici ganci che fissano la cornice contro la copertura posteriore. Ricordati la loro posizione mentre rimuovi la copertura posteriore nei prossimi passaggi.
-
-
-
Fai aderire una ventosa vicino al bordo inferiore dello schermo.
-
Tira la ventosa con forza costante.
-
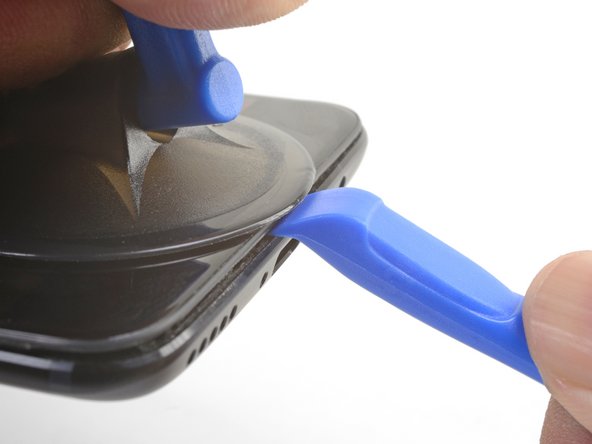
Premi il bordo di uno strumento di apertura nella fessura della cornice vicino alla ventosa finché non si infila tra la cornice in plastica e il bordo della copertura posteriore.
I found the suction cup to be more of a hindrance and kept hitting the power button, making it necessary to stop and turn the phone off again. I watched a youtube video where the person didn't use a suction cup at all and decided to try that. I also found that a guitar pick type spudger worked far better than the one shown in the picture. If you're having trouble getting it started, I suggest trying those two things.
-
-
-
-
Dopo aver infilato lo strumento di apertura, fallo scorrere attentamente sotto il bordo inferiore del telefono.
-
Guida attentamente lo strumento di apertura attorno all'angolo in basso a sinistra del telefono mentre lo tieni infilato nella fessura.
This was extremely difficult & took a lot of force. I needed a thin flat metal spudger and wrecked a couple of plastic ones in the process. I left a few scratches along the join in the process. It would be easier if I had something to hold the phone, in my hand I kept turning it on by accident.
what was the metal spudger did you use? I am having trouble as well. I cannot seem to pry the back cover and it feels like it is shut tightly, there are no crevices I can pry into. What was your strategy may I ask?
At first, I slightly opened the body with a plastic tool, but it was not enough to actually open the back cover. Then I used a thin metal screwdriver for this. It was difficult but nothing special. Just be sure that you are opening the correct seam between the body and the screen and don’t make sudden moves. I bent nothing, everything came back in place when reassembled.
ivan -
Same as David here: the plastic opening tools/guitar picks were doing nothing (not even creating the first "crack") . In the end I managed to open it using Jimmy (the metal knife/spudger), but not without scratching the whole metal cover.
-
-
-
Continua a far scorrere lo strumento di apertura sotto il bordo lungo, rilasciando i ganci sulla strada.
-
-
-
Dopo aver liberato i bordi inferiore e sinistro del telefono, fai ondeggiare delicatamente la cornice per rilasciare i ganci dei bordi superiore e destro.
-
Allinea il bordo superiore della cornice alla copertura posteriore ed assicurati che i ganci superiori si infilino in posizione.
-
Schiaccia i bordi lunghi del telefono per far scattare i ganci restanti.
Reinstalling the back cover stumped me for a second… If you’re struggling with aligning the top edge of the frame, remember that the camera is going to look off/pointed a bit too low until you actually clip the frame back in.
Really stupid but it was the only thing that tripped me up in this guide.
-
-
-
Usa la punta di uno spudger per sollevare e scollegare il cavo a nastro della copertura posteriore dalla sua presa.
If the flex cable pins are damaged, the flex cable can be replaced.
If the connecter pins (on the motherboard) are damaged, you might need to do microsoldering (or contact a microsoldering company) to replace the damaged connector.
Brendan -
-


Per rimontare il tuo dispositivo, segui le istruzioni in ordine inverso.
La riparazione non è andata come previsto? Prova delle soluzioni di base ai problemi, oppure rivolgiti alla nostra comunità Risposte per trovare aiuto.
Per rimontare il tuo dispositivo, segui le istruzioni in ordine inverso.
La riparazione non è andata come previsto? Prova delle soluzioni di base ai problemi, oppure rivolgiti alla nostra comunità Risposte per trovare aiuto.
Annulla: non ho completato questa guida.
Altre 10 persone hanno completato questa guida.
Un ringraziamento speciale a questi traduttori:
100%

Questi traduttori ci stanno aiutando ad aggiustare il mondo! Vuoi partecipare?
Inizia a tradurre ›

