Introduzione
Il nostro Kindle 2 è stato spedito Lunedì 23 Febbraio. Grazie a UPS Next Day Air, abbiamo avuto tra le mani il nostro lettore martedì mattina.
Cosa ti serve
-
-
Eccolo!
-
Grazia alla magia di E-Ink, il Kindle è fornito con le istruzioni di installazione visualizzate direttamente sullo schermo. Non è richiesto alcun collegamento.
-
-
-
Confronto dimensioni: non grande quanto un MacBook Pro Unibody da 17".
-
Il Kindle 2 pesa solamente 290 grammi circa. Al chilo, ciò rende il Kindle 2 ancora più costoso del MacBook Pro 17" Unibody da $2,799 che abbiamo smontato la settimana scorsa.
-
-
Attrezzo utilizzato in questo passaggio:Metal Spudger$2.99
-
Sollevando la parte posteriore...
-
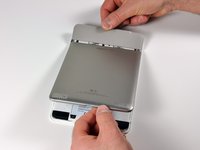
Entrare è semplice una volta che sai come fare. Noi abbiamo usato alcuni strumenti d'apertura in plastica ed uno spudger di metallo, e infine siamo riusciti ad entrare.
-
La cover superiore grigio opaco si stacca per prima.
-
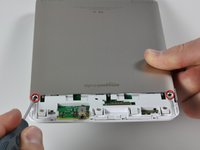
Ci sono due viti a croce Phillips da rimuovere prima che la parte posteriore in alluminio possa essere rimossa interamente.
If anyone is still looking for this in 2020 like I was, don’t try prying anything or poking around with those tools or you’re likely to break off some plastic tabs that you don’t want to break off while not accomplishing anything useful.
The gray plastic cover is attached to the metal cover by two tabs go under the metal cover. The location of these tabs is on each side of “amazonkindle” logo on the metal cover. Simply put your thumbs on each side of the logo to get them in the correct position, then slide them over to the plastic piece so that they are near the tabs (which you cannot see), and then press down gently to disengage the tabs while pushing the gray plastic piece away from the metal piece. If you do it right, it slides off easily.
Thank you very much for pointing this out (about to put in a new battery)! This is the right way to open it.
The gray plastic cover comes off easily, but I'm having trouble with the metal cover on the back. Any tips?
I couldn't get the “gentle” pressure to work to disengage the tabs. With the Kindle screen face down, note that the hooked part of the clip points up. I used a pry tool to create a gap, then another pry tool to press down directly on the clip.
-
-
-
-
Siamo dentro!
-
Non è ancora molto carino; solo altra plastica bianca.
-
Venti viti a croce Phillips fissano il rivestimento in plastica bianca al suo posto.
-
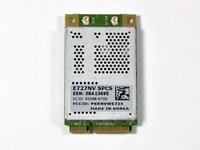
È interessante notare che nulla era collegato al grande connettore bianco e marrone vicino la parte superiore della scheda.
That's a standard mini-PCIe WWAN (EVDO) card - perhaps one could scope the AT commands being sent to the card, then insert the card into PC and send the same AT commands for unlimited (free) data...
Also, there's a missing SIM holder below the WWAN card - this means a GSM/UMTS version of the Kindle is planned!
Citazione da tnkgrl:
That's a standard mini-PCIe WWAN (EVDO) card - perhaps one could scope the AT commands being sent to the card, then insert the card into PC and send the same AT commands for unlimited (free) data...
Also, there's a missing SIM holder below the WWAN card - this means a GSM/UMTS version of the Kindle is planned!
It's a Novotel E725 Mini PCIe card. Despite the "E727NV" - the FCC ID of that card is the Novotel E725. In theory you'd just need the proper drivers and the modem's dialing strings/connection info from the unit itself, which may or may not be hard to find.
Also, the 'white and brown' connector you note is most likely the debugging connector, just as was on the Kindle 1.
Citazione da cepler:
that looks more like an SD card outline to me.
No, it is a SIM connector, a SD connector wouldn't make sense in that place, and SD connectors have more pins
-
-
-
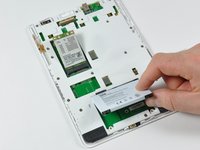
Rimuovi le due viti a croce Phillips e la batteria si solleverà facilmente.
-
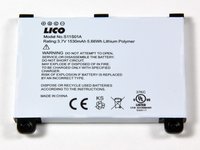
La batteria è il modello n° S11S01A. È una batteria a polimeri di litio da 3,7 V, 1530 mAh. La batteria pesa circa 31 grammi, poco più del 10% del peso totale del Kindle.
-
Anche la scheda wireless è facilmente rimovibile togliendo le due viti a croce Phillips.
-
-
-
Dopo aver rimosso 16 ulteriori viti, siamo giunti alla PCB principale.
-
Tutto ciò che è eccitante si trova al di sotto degli schermi EMI d'argento.
-
Il Kindle è stato progettato da Lab126, una filiale segreta di Amazon situata a Cupertino che progetta dispositivi di consumo. Finora, hanno rilasciato solo Kindle 1 e 2.
Are there part numbers for any of the switches on the left hand side of the unit (as shown in the picture)? In particular the 5-way switch!
I'm looking for the same information.
-
-
-
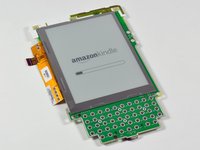
Anche con la batteria completamente rimossa, lo schermo proietta un'immagine cristallina.
-
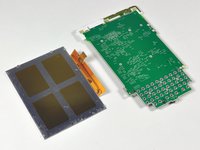
Il display è fissato da un "telaio della finestra" di adesivo. Delicati colpi e torsioni da tutti i lati con uno strumento d'apertura in plastica hanno separato il display.
-
La rimozione del display ha rivelato una serie di vie sul PCB. Nulla di troppo terribilmente eccitante.
How is the display connected to the PCB? Can you show a side view?
Citazione da Locke:
How is the display connected to the PCB? Can you show a side view?
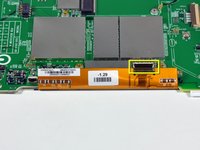
The orange display ribbon wraps around the edge of the logic board and connects with a ZIF connector. We added a photo on this step with a side view that shows the display connector.
Is the display glued to the logic board? How hard would it be to remove?
Citazione da Locke:
Is the display glued to the logic board? How hard would it be to remove?
The display is adhered to the logic board, but we were able to remove it without damaging either the logic board or display.
Citazione da luke:
The display is adhered to the logic board, but we were able to remove it without damaging either the logic board or display.
Just wanted to add a couple of comments to Luke's reply...
With a careful hand you can separate the display from the logic board in less than ten minutes. Just pry carefully on all sides. However, note that the display has a front bezel that attaches via several little "bumps" on all sides. If you're trying to remove the display, make sure not to dislodge the display's bezel by mistake, since the bezel will warp very easily and will have to be replaced.
Question, the wireless adapter in the kindle, looks strangely identical to Mini-PCI, if not Mini-PCIe, would it be plausible to take that and insert like normal on a PC? Wouldn't that be a sure way to tether? lmao.
just my 2 cents
Citazione da miro:
Just wanted to add a couple of comments to Luke's reply...
With a careful hand you can separate the display from the logic board in less than ten minutes. Just pry carefully on all sides. However, note that the display has a front bezel that attaches via several little "bumps" on all sides. If you're trying to remove the display, make sure not to dislodge the display's bezel by mistake, since the bezel will warp very easily and will have to be replaced.
Miro,
These Kindle 2's are slippery and not forgiving when you drop them. I've lost the screen on mine. It still reads but the background is very grey ... hard to read the black type. Amazon wants $200 to repair. I wonder if I can find the parts and replace them myself. Or if there is a way to reverse the type from black on white to white on dark grey. What do you think?
jjimbo
Very new to this ...
I also have a broken screen on a K2 [out of warranty]. Is there anyone out there repairing them?
sdfg -
-
-
-
Una foto ravvicinata dell'area centrale della scheda.
-
Il grande MC13783VK5 è un chip di gestione della carica della batteria di Freescale.
-
Il ISP1105 (chip più piccolo nell'area limitata a sinistra) è un ricetrasmettitore USB.
-
-
-
Il processore principale è in alto a sinistra. Il chip Freescale è etichettato MCIMX31LVKN5C M91E CTAH0850V. È un pacchetto 532 MHz, ARM-1190nm di 14 mm.
-
A destra del processore, il Samsung K4X1G323PC è un Chip SDRAM DDR mobile da 32 MB. C'è un altro chip SDRAM Samsung in basso a destra.
-
Il pacchetto grande Samsung in basso a sinistra è la memoria Kindle principale. È un pacchetto moviNAND da 2 GB, che include sia la memoria flash che il controller.
-
Il chip Epson ed E-Ink in co-branding sulla destra è il controller del display. È un pacchetto PFBGA che supporta "aggiornamenti dello schermo ad alta velocità (2048x1536 a 50Hz+)."
Hi,
K4X1G323PC is IMHO a 128MB chip:
it has 1G density and it's internal organization is x32, what makes it a 32Mx32 according to this document: http://www.samsung.com/global/system/bus...
But still, 1Gbit / 8 = 128MB.
nevertheless: you would not expect less than 128MB paired with such a processor installed...
Correct me if I am wrong.
Amazon has the best kindle fire cases anywhere online. Need a discount code? Just google AZON DEAL ZONER - They have a gold box on the site that will spit out a discount code of any kindle fire case that you enter (just type in kindle fire cases). Really neat and I use it all the time and save big on apps and other products using this tool.
-
Un ringraziamento speciale a questi traduttori:
100%
Questi traduttori ci stanno aiutando ad aggiustare il mondo! Vuoi partecipare?
Inizia a tradurre ›
5Commenti sulla guida
hey guys great post. Any idea how or where I can get a HIgh resolution image near the USB connector. I think I knocked off a capacitor or resistor for the kindle 2 model from Lab26 model D00701, just looking to put the part back on but need to confirm the location
since there are other NO LOADs (parts that are not populated).
thanks, Phil
anyone?
For anyone still looking for this, make sure you see my comment under Step 5 for how to properly get the back covers off.


