Introduzione
This guide will show you how to detach and replace the phone's touchscreen display.
Cosa ti serve
-
-
Using your fingers, pry along the groove at the top of the phone.
-
Pull back on the rear casing until it comes free from the device.
-
The casing will make a cracking sound as it is removed.
 Chiedi a FixBot
-
-
-
With your fingers, pry from the bottom of the battery to loosen it.
-
Lift away to remove the battery from the phone.
-
-
-
Locate the red and white sim card located above the battery housing.
-
Remove the sim card by sliding it downwards from its slot with your fingers.
-
-
Strumento utilizzato in questo passaggio:Tweezers$4.99
-
Remove the seven silver 3mm screws securing the rear panel using the Phillips #000 screwdriver.
-
-
-
Pry around the rear panel with a plastic opening tool to loosen it.
-
Remove the rear panel from the phone with your fingers.
-
-
-
Remove the four black 3mm screws securing the motherboard with the Phillips #000 screwdriver.
-
-
-
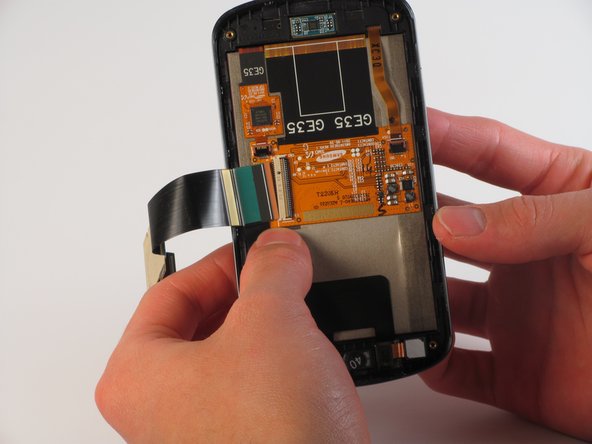
Locate the flex cable attachment at the tab with a green arrow printed on top.
-
Pry from the side the arrow is pointing with your fingers.
-
The cable will audibly snap as it is removed from its attachment.
-
Let the cable hang loosely to the side of the phone.
-
-
-
Pull the motherboard up from the side opposite the loose flex cable.
-
Lift to remove the motherboard from the device.
-
-
-
-
Insert a plastic opening tool into any side of the phone case to separate the keyboard from the rear panel.
-
Pry the keyboard away from the casing with the plastic opening tool.
-
-
-
Remove the 7 silver 2mm screws attaching the silver metal plate to the rear panel with the Phillips #000 Screwdriver.
-
-
-
Use the plastic opening tool to carefully loosen the golden metal plate.
-
-
-
Lift the gold plate with your fingers, repositioning it to slide through the keyboard casing underneath.
-
Carefully take off the keyboard casing with your fingers.
-
The golden metal plate should fit through the wide slot of the casing.
-
-
-
Slide the silver metal plate down and away from the to the flex cable and gold metal plate.
-
-
-
Unscrew the 4 black 3mm screws from the rear panel with the Phillips #000 Screwdriver.
-
-
-
Insert the plastic opening tool into the groove at the top of the rear panel.
-
Firmly slide the plastic opening tool all around the rear panel. The panel will audibly snap as it comes apart.
-
-
-
Lift the flex cable and position it so the part containing the metal plate can come free.
-
Pull the part containing the metal plate away from the rest of the rear panel.
-
-
Strumento utilizzato in questo passaggio:Tweezers$4.99
-
Use tweezers to loosen the front-facing camera from the plastic casing.
-
Pull the black rectangular piece, attached to the front facing camera, away from the rear panel.
-
-
-
Carefully peel the blue tape from the bottom of the flex cable and set it aside.
-
-
-
Use one of the plastic opening tools to loosen the flex cable from its central housing.
-
Pull lightly on the flex cable to free it from the housing.
-
The cable may audibly snap as it is freed from its attachment.
-
-
Strumento utilizzato in questo passaggio:Tweezers$4.99
-
Use tweezers to loosen the flex cable and speaker from the bottom of the phone.
-
Pull upward with the tweezers and the flex cable will come loose.
-
-
-
Locate the clamp holding the gold display cable to the back of the screen.
-
Using the plastic opener tool, lightly pry the cable attachment into an upright position.
-
Once completed, the attachment should resemble the marked section.
-
-
Strumento utilizzato in questo passaggio:Tweezers$4.99
-
Using the tweezers, carefully pull the gold display cable to remove it from its attachment.
-
-
-
Pry around the screen with a plastic opening tool to loosen it from the frame.
-
Repeat this process as necessary; a lot of adhesive holds the screen to the frame.
-
Gently push forward from the back of the display to remove the screen from the frame.
-


To reassemble your device, follow these instructions in reverse order.
Annulla: non ho completato questa guida.
Altre 13 persone hanno completato questa guida.
Team

Cal Poly, Team 11-32, Amido Fall 2013 Membro di Cal Poly, Team 11-32, Amido Fall 2013
CPSU-AMIDO-F13S11G32
4 Membri
6 guide realizzate
1Commento della guida
Overall this was a great presentation. Very thorough and detailed, yet simple, with great pictures. Thank you.