Questa versione può contenere modifiche errate. Passa all'ultima istantanea verificata.
Cosa ti serve
-
-
Scalda un iOpener e applicalo su uno dei bordi lunghi dell'S8 per circa due minuti.
-
-
-
Nei passi seguenti taglierai l'adesivo attorno al bordo del pannello di vetro posteriore.
-
L'adesivo sul case posteriore è stato applicato come si vede sulla prima immagine.
-
Visto dall'esterno, dovrai far leva secondo questa configurazione:
-
Strisce di adesivo spesse
-
Strisce di adesivo sottili
-
Evita di far leva qui per proteggere il sensore impronte digitali.
-
-
-
-
Usa delle pinzette per rimuovere l'adesivo rimasto sulla scocca del telefono. Quindi pulisci le aree di incollaggio con alcol isopropilico ad alta concentrazione (almeno 90%) e un panno privo di lanugine per preparare la superficie ad accogliere il nuovo adesivo.
-
Stacca la protezione dell'adesivo dal nuovo vetro posteriore, allinea con cura uno dei bordi del vetro contro la scocca del telefono e quindi premi con fermezza il vetro sul telefono stesso.
-
-
Questo passaggio è privo di traduzione. Aiuta a tradurlo
-
Prepare an iOpener and apply it to the rear camera bezel at the top of the rear glass for at least two minutes.
-
You may need to reheat and reapply the iOpener several times to get the phone warm enough. Follow the iOpener instructions to avoid overheating.
-
-
Questo passaggio è privo di traduzione. Aiuta a tradurlo
-
Insert an opening pick under top edge of the rear camera bezel.
-
Slide the opening pick around the edges of the camera bezel to separate the adhesive securing it to the rear glass.
-
Do not pry on the side that sits against the fingerprint sensor.
-
-
Questo passaggio è privo di traduzione. Aiuta a tradurlo
-
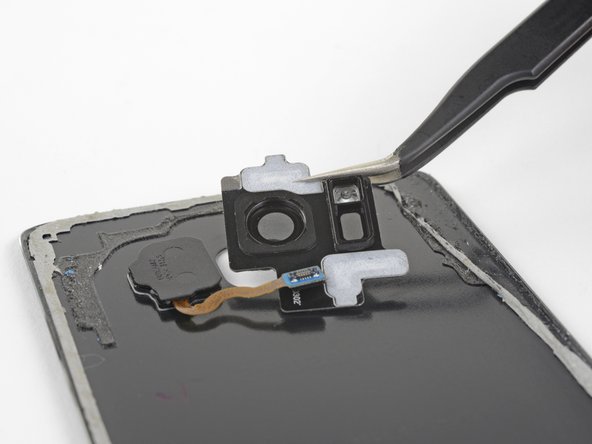
Use an opening pick or tweezers to lift the camera bezel away from the rear glass.
-
Take care to avoid catching the camera bezel on the fingerprint cable as you remove it.
-
If you encounter resistance, use an opening pick to cut any remaining adhesive.
-
-
Questo passaggio è privo di traduzione. Aiuta a tradurlo
-
Use a spudger to scrape away any adhesive where the camera bezel adheres to the rear glass.
-
Clean the adhesion area with high concentration isopropyl alcohol (at least 90%) and a lint-free cloth. Swipe in one direction only, not back and forth. This will help prep the surface for the new adhesive.
-
-
Questo passaggio è privo di traduzione. Aiuta a tradurlo
-
Peel away the clear backing from the camera bezel adhesive strip, exposing the adhesive on one side.
-
Very carefully line up the rear camera and flash cutouts on inside of the rear glass with the same cutouts on the adhesive strip.
-
Set the adhesive strip on the rear glass and make sure it does not overlap the edges of the camera or flash cutouts at all.
-
Use your fingers or the flat edge of a spudger to press the adhesive down so that it bonds to the glass.
-
-
Questo passaggio è privo di traduzione. Aiuta a tradurlo
-
Peel the green backing away from the adhesive strip. Make sure the adhesive does not come off of the glass with the backing.
-
-
Questo passaggio è privo di traduzione. Aiuta a tradurlo
-
Line up the rear camera bezel with the cutouts on the rear glass, then set it down on the adhesive. Make sure the side with the camera lens cover protruding is facing the rear glass.
-
Make sure the camera lens cover is completely seated in the rear glass's camera cutout so that the bezel lays flat against the glass.
-
Use your fingers to apply even pressure to the bezel for 30 seconds to make sure the adhesive bonds properly.
-
Right before you install the rear glass and seal the phone, peel off the black backing covering the camera glass.
-


Annulla: non ho completato questa guida.
Altre 3 persone hanno completato questa guida.
