Salta al contenuto principale
Unisciti alla Community delle riparazioni - Crea un account

Nintendo WaveBird Wireless Controller Joystick Replacement

Cosa ti serve

  1. Nintendo WaveBird Wireless Controller Joystick Replacement, Batteries: passo 1, immagine 1 di 2 Nintendo WaveBird Wireless Controller Joystick Replacement, Batteries: passo 1, immagine 2 di 2
    • Pull down on the battery cover release lever and pull back to remove the cover.

    Chiedi a FixBot

    Aggiungi Commento

  2. Nintendo WaveBird Wireless Controller Joystick Replacement: passo 2, immagine 1 di 1
    • Remove both batteries from the device.

    Chiedi a FixBot

    Aggiungi Commento

  3. Nintendo WaveBird Wireless Controller Joystick Replacement, Front Panel: passo 3, immagine 1 di 2 Nintendo WaveBird Wireless Controller Joystick Replacement, Front Panel: passo 3, immagine 2 di 2
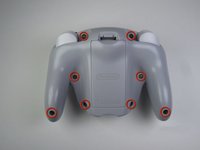
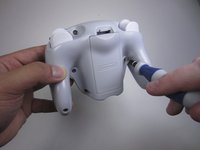
    • Remove the eight 9 mm screws from the back panel using the Tri-point Y1 screwdriver.

    • During reassembly, firmly hold the panels of the controller together while replacing the screws so the panels do not separate.

    Chiedi a FixBot

    Aggiungi Commento

  4. Nintendo WaveBird Wireless Controller Joystick Replacement: passo 4, immagine 1 di 2 Nintendo WaveBird Wireless Controller Joystick Replacement: passo 4, immagine 2 di 2
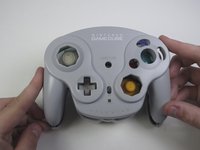
    • Carefully turn over the controller and place it on a flat surface.

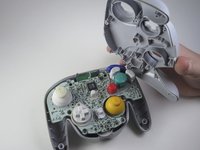
    • Slowly separate the top panel from the bottom panel.

    • The buttons are loose and may fall off the motherboard.

    • Once separated, set aside the top panel.

    • During reassembly, make sure the front panel lines up with the buttons so they slide back into place.

    Chiedi a FixBot

    Aggiungi Commento

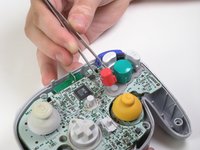
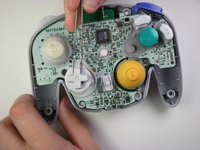
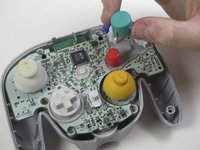
  5. Nintendo WaveBird Wireless Controller Joystick Replacement, Buttons: passo 5, immagine 1 di 3 Nintendo WaveBird Wireless Controller Joystick Replacement, Buttons: passo 5, immagine 2 di 3 Nintendo WaveBird Wireless Controller Joystick Replacement, Buttons: passo 5, immagine 3 di 3
    Strumento utilizzato in questo passaggio:
    Tweezers
    $4.99
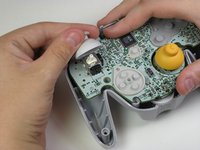
    • Use tweezers to remove the buttons.

    • It may be easier to remove the A button off of the pad by lifting it with your fingers.

    • During reassembly, make sure all buttons are in their respective sockets so they match up with the front panel.

    Chiedi a FixBot

    Aggiungi Commento

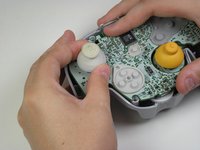
  6. Nintendo WaveBird Wireless Controller Joystick Replacement, Joystick: passo 6, immagine 1 di 2 Nintendo WaveBird Wireless Controller Joystick Replacement, Joystick: passo 6, immagine 2 di 2
    • Grab the base of the grey joystick cover with one hand and firmly hold down the rest of the controller with the other hand.

    • Pull off the grey joystick cover.

    • During reassembly, make sure the slots inside the joystick cover line up with the motherboard so it can fit back together.

    Chiedi a FixBot

    Aggiungi Commento

Conclusione

To reassemble your device, follow these instructions in reverse order.

Annulla: non ho completato questa guida.

Altre 8 persone hanno completato questa guida.

Team

Cal Poly, Team 10-40, Amido Spring 2013 Membro di Cal Poly, Team 10-40, Amido Spring 2013

CPSU-AMIDO-S13S10G40

4 Membri

38 guide realizzate

1Commento della guida

Question. My wavebird joystick wobbles a lot and gets stuck in directions I’m not inputting. Will replacing the top of the stick fix this? Or would I have to solder a new analog stick to the board?

Golgamang - Rispondi Condividi

Aggiungi Commento

Visualizza statistiche:

Ultime 24 ore: 4

Ultimi 7 giorni: 18

Ultimi 30 giorni: 112

Tutti i Tempi: 11,496