Salta al contenuto principale

Nintendo Switch WiFi Antenna Replacement

Cosa ti serve

  1. Nintendo Switch WiFi Antenna Replacement, Release the Joy Con controller locking tabs: passo 1, immagine 1 di 3 Nintendo Switch WiFi Antenna Replacement, Release the Joy Con controller locking tabs: passo 1, immagine 2 di 3 Nintendo Switch WiFi Antenna Replacement, Release the Joy Con controller locking tabs: passo 1, immagine 3 di 3
    • Before you begin this repair, make sure the device is completely powered off.

    • Press and hold down the small round button on the back of the Joy Con controller.

    • While you hold down the button, slide the controller upward.

  2. Nintendo Switch WiFi Antenna Replacement, Remove the Joy Con controllers: passo 2, immagine 1 di 3 Nintendo Switch WiFi Antenna Replacement, Remove the Joy Con controllers: passo 2, immagine 2 di 3 Nintendo Switch WiFi Antenna Replacement, Remove the Joy Con controllers: passo 2, immagine 3 di 3
    • Continue sliding the Joy Con upward until it's completely removed from the console.

    • Repeat this same process for the other Joy Con.

  3. Nintendo Switch WiFi Antenna Replacement, Remove the back-side screws: passo 3, immagine 1 di 1
    Attrezzo utilizzato in questo passaggio:
    Magnetic Project Mat
    $19.95
    Compra
    • Use a Y00 screwdriver to remove the four 6.3ย mm-long screws securing the rear panel.

    • Throughout this repair, keep track of each screw and make sure it goes back exactly where it came from.

  4. Nintendo Switch WiFi Antenna Replacement, Remove the top and bottom screws: passo 4, immagine 1 di 2 Nintendo Switch WiFi Antenna Replacement, Remove the top and bottom screws: passo 4, immagine 2 di 2
    • Use a JIS 000 driver or an official iFixit PH 000 driver to remove the following screws securing the rear panel:

    • One 2.5 mm-long screw on the top edge of the device

    • Two 2.5 mm-long screws on the bottom edge of the device

    • To prevent these tight screws from stripping, apply firm downward force, work slowly and try another JIS 000 or PH 000 driver if the screws won't come out.

  5. Nintendo Switch WiFi Antenna Replacement: passo 5, immagine 1 di 2 Nintendo Switch WiFi Antenna Replacement: passo 5, immagine 2 di 2
    • Use a JIS 000 screwdriver or an official iFixit PHย 000 driver to remove the two 3.8ย mm center screws on the sides of the device (one on each side).

  6. Nintendo Switch WiFi Antenna Replacement: passo 6, immagine 1 di 2 Nintendo Switch WiFi Antenna Replacement: passo 6, immagine 2 di 2
    • Use your finger to flip up the kickstand on the back of the device.

    • If there's a microSD card in the microSD card slot, remove it now before you continue to the next step.

  7. Nintendo Switch WiFi Antenna Replacement: passo 7, immagine 1 di 1
    • Use a JIS 000 screwdriver or an official iFixit PHย 000 driver to remove the 1.6 mm screw in the kickstand well.

    • Close the kickstand.

  8. Nintendo Switch WiFi Antenna Replacement: passo 8, immagine 1 di 3 Nintendo Switch WiFi Antenna Replacement: passo 8, immagine 2 di 3 Nintendo Switch WiFi Antenna Replacement: passo 8, immagine 3 di 3
    • Open the game card cartridge flap.

    • The game card cartridge flap attaches to the other half of the plastic shell, preventing you from completely lifting up the rear panel if it's closed.

    • Lift the rear panel up from the bottom of the device and remove it.

  9. Nintendo Switch WiFi Antenna Replacement, Remove the microSD card reader: passo 9, immagine 1 di 1
    • Use a JIS 000 screwdriver or an official iFixit PHย 000 driver to remove the 3.1 mm screw securing the microSD card reader to the device.

  10. Nintendo Switch WiFi Antenna Replacement: passo 10, immagine 1 di 2 Nintendo Switch WiFi Antenna Replacement: passo 10, immagine 2 di 2
    • Use your fingers or a pair of tweezers to lift the microSD card reader straight up from the device to disconnect and remove it.

    • During reassembly, make sure the press connector underneath the foam pad is firmly connected to the motherboard. It may help to remove the foam pad before reinstalling the card reader.

  11. Nintendo Switch WiFi Antenna Replacement, Remove the shield plate: passo 11, immagine 1 di 1
    • Use a JIS 000 screwdriver or an official iFixit PHย 000 driver to remove the six 3 mm screws securing the shield plate to the device.

  12. Nintendo Switch WiFi Antenna Replacement: passo 12, immagine 1 di 2 Nintendo Switch WiFi Antenna Replacement: passo 12, immagine 2 di 2
    • Use your fingers or a pair of tweezers to peel back the piece of foam on the top edge of the device near the fan exhaust port.

    • If the foam doesn't easily peel away, don't force it as it might end up tearing. Carefully peel at different spots to pull back the foam.

  13. Nintendo Switch WiFi Antenna Replacement: passo 13, immagine 1 di 3 Nintendo Switch WiFi Antenna Replacement: passo 13, immagine 2 di 3 Nintendo Switch WiFi Antenna Replacement: passo 13, immagine 3 di 3
    • Insert a spudger underneath the shield plate along the edge of the device.

    • Pry up to lift the shield plate and remove it from the device.

    • You may feel a bit of resistance. This is normal, since the shield plate is slightly bonded to the heat sink with thermal paste.

    • A thick pink thermal compound bridges the gap between the shield plate and the copper heat sink underneath. This helps prevent the Switch from overheating.

    • You can reuse the pink thermal compound if you're careful. Keep the compound clean and make sure it makes solid contact between the heat sink and the shield during reassembly.

    • If you need to replace it, refer to our thermal paste guide to remove the old thermal compound and replace it with an appropriate compound, such as K5 Pro, during reassembly.

  14. Nintendo Switch WiFi Antenna Replacement, Disconnect the battery: passo 14, immagine 1 di 2 Nintendo Switch WiFi Antenna Replacement, Disconnect the battery: passo 14, immagine 2 di 2
    • Use the point of a spudger to pry the battery connector straight up and out of its socket on the motherboard.

  15. Nintendo Switch WiFi Antenna Replacement, Remove the heat sink: passo 15, immagine 1 di 1
    • Use a JIS 000 screwdriver or an official iFixit PHย 000 driver to remove the three 3 mm screws securing the heat sink to the motherboard.

    • Carefully peel the two foam pieces stuck over both the heatsink and the fan away from the fan.

    • The foam only needs to be peeled back enough to clear the fan.

    • The foam is really delicate and tears easily. Use the following technique to peel the foam:

    • Insert the point of a spudger underneath the part of the foam that isn't stuck against anything,

    • Press the top of the foam with your finger to hold it in place.

    • Roll the spudger tip underneath the foam all the way to the other end of the foam to release it.

  16. Nintendo Switch WiFi Antenna Replacement: passo 17, immagine 1 di 3 Nintendo Switch WiFi Antenna Replacement: passo 17, immagine 2 di 3 Nintendo Switch WiFi Antenna Replacement: passo 17, immagine 3 di 3
    • Use a spudger or your fingers to lift the heatsink up and off the motherboard to remove it.

    • You may feel a bit of resistance. This is normal, since the heat sink is slightly bonded to the CPU with thermal paste.

    • Clean off the old thermal paste from the heat sink and CPU using high-concentration (90% or higher) isopropyl alcohol and a microfiber cloth. Apply new thermal paste to the CPU before reassembly.

    • Apply thermal paste to all surfaces that had thermal paste applied previously. This includes between the heatpipe and aluminum shield, which the Switch uses as additional heatsinking.

  17. Nintendo Switch WiFi Antenna Replacement, Remove the headphone jack and game card reader: passo 18, immagine 1 di 2 Nintendo Switch WiFi Antenna Replacement, Remove the headphone jack and game card reader: passo 18, immagine 2 di 2
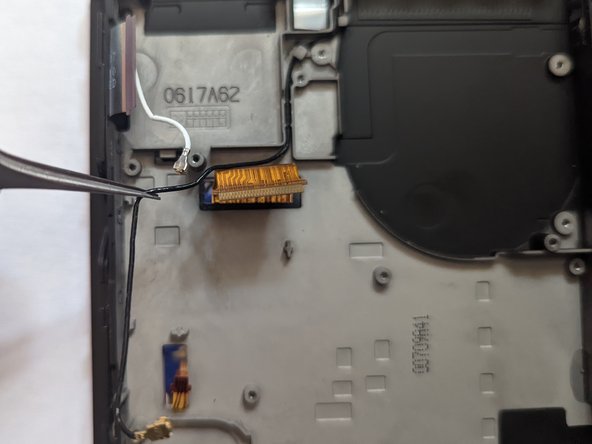
    • Use an opening tool or your fingernail to flip up the small, hinged locking flap on the digitizer cable's ZIF connector.

  18. Nintendo Switch WiFi Antenna Replacement: passo 19, immagine 1 di 2 Nintendo Switch WiFi Antenna Replacement: passo 19, immagine 2 di 2
    • Use a pair of tweezers to slide the digitizer cable horizontally out of its connector on the game card reader board.

    • Before inserting the cable during reassembly, make sure the ZIF connector locking flap is flipped up.

    • With the cable parallel to the board, gently slide it into its connector.

    • Don't force the cable into the connector. If it doesn't insert, ensure the locking flap is flipped up, reposition the cable, and try again.

    • If your touchscreen doesn't work after the repair but your Game Card reader does, make sure this cable is properly inserted. If your Game Card reader also doesn't work, check the Game Card connector in the next step instead.

  19. Nintendo Switch WiFi Antenna Replacement: passo 20, immagine 1 di 2 Nintendo Switch WiFi Antenna Replacement: passo 20, immagine 2 di 2
    • Use the point of a spudger to pry the headphone jack and game card reader connector straight up to disconnect it from the motherboard.

    • To re-attach press connectors like this one, carefully align and press down on one side until it clicks into place, then repeat on the other side. Do not press down on the middle. If the connector is misaligned, the pins can bend and cause permanent damage.

    • If the touch screen doesn't work and/or game cards aren't detected after reassembly, you might have not fully reconnected this press connector. Carefully disconnect it and try again.

  20. Nintendo Switch WiFi Antenna Replacement: passo 21, immagine 1 di 1
    • Use a JIS 000 screwdriver or an official iFixit PHย 000 driver to remove the three 3.1 mm screws securing the headphone jack and game card reader board to the device.

  21. Nintendo Switch WiFi Antenna Replacement: passo 22, immagine 1 di 2 Nintendo Switch WiFi Antenna Replacement: passo 22, immagine 2 di 2
    • Use a pair of tweezers or your fingers to remove the headphone jack bracket.

  22. Nintendo Switch WiFi Antenna Replacement: passo 23, immagine 1 di 2 Nintendo Switch WiFi Antenna Replacement: passo 23, immagine 2 di 2
    • Use a pair of tweezers or your fingers to remove the headphone jack and game card reader board.

  23. Nintendo Switch WiFi Antenna Replacement, Remove the motherboard: passo 24, immagine 1 di 2 Nintendo Switch WiFi Antenna Replacement, Remove the motherboard: passo 24, immagine 2 di 2
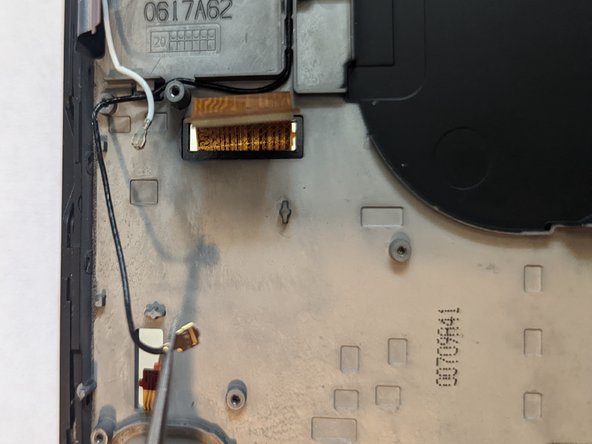
    • Use an opening tool, spudger, or your fingernail to flip up the small, hinged locking flap on the LCD ribbon cable ZIF connector.

  24. Nintendo Switch WiFi Antenna Replacement: passo 25, immagine 1 di 2 Nintendo Switch WiFi Antenna Replacement: passo 25, immagine 2 di 2
    • Use a pair of tweezers to pull the ribbon cable straight out of its connector on the motherboard.

  25. Nintendo Switch WiFi Antenna Replacement: passo 26, immagine 1 di 2 Nintendo Switch WiFi Antenna Replacement: passo 26, immagine 2 di 2
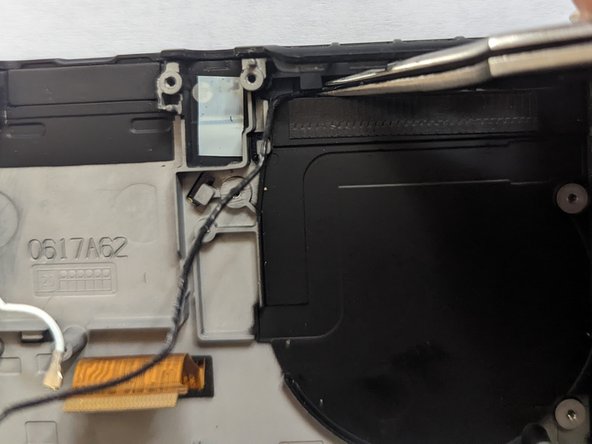
    • Use an opening tool, spudger, or your fingernail to flip up the small, hinged locking flap on the fan cable ZIF connector.

  26. Nintendo Switch WiFi Antenna Replacement: passo 27, immagine 1 di 2 Nintendo Switch WiFi Antenna Replacement: passo 27, immagine 2 di 2
    • Use a pair of tweezers to pull the fan cable straight out of its connector on the motherboard.

  27. Nintendo Switch WiFi Antenna Replacement: passo 28, immagine 1 di 2 Nintendo Switch WiFi Antenna Replacement: passo 28, immagine 2 di 2
    • Use an opening tool, spudger, or your fingernail to flip up the small, hinged locking flap on the power and volume button ribbon cable ZIF connector.

  28. Nintendo Switch WiFi Antenna Replacement: passo 29, immagine 1 di 2 Nintendo Switch WiFi Antenna Replacement: passo 29, immagine 2 di 2
    • Use a pair of tweezers to pull the ribbon cable straight out of its connector on the motherboard.

  29. Nintendo Switch WiFi Antenna Replacement: passo 30, immagine 1 di 2 Nintendo Switch WiFi Antenna Replacement: passo 30, immagine 2 di 2
    • Use an opening tool, spudger, or your fingernail to flip up the small, hinged locking flap on the smaller LCD ribbon cable ZIF connector.

  30. Nintendo Switch WiFi Antenna Replacement: passo 31, immagine 1 di 2 Nintendo Switch WiFi Antenna Replacement: passo 31, immagine 2 di 2
    • Use a pair of tweezers to pull the ribbon cable straight out of its connector on the motherboard.

  31. Nintendo Switch WiFi Antenna Replacement: passo 32, immagine 1 di 2 Nintendo Switch WiFi Antenna Replacement: passo 32, immagine 2 di 2
    • Use the point of a spudger, an opening tool, or your fingernail to flip up the small, hinged locking flap on the Joy Con sensor rail's data cable ZIF connector.

  32. Nintendo Switch WiFi Antenna Replacement: passo 33, immagine 1 di 2 Nintendo Switch WiFi Antenna Replacement: passo 33, immagine 2 di 2
    • Use a pair of tweezers to pull the ribbon cable straight out of its connector on the motherboard.

  33. Nintendo Switch WiFi Antenna Replacement: passo 34, immagine 1 di 2 Nintendo Switch WiFi Antenna Replacement: passo 34, immagine 2 di 2
    • Use the point of a spudger to pry up the black antenna cable straight up out of its socket on the motherboard.

  34. Nintendo Switch WiFi Antenna Replacement: passo 35, immagine 1 di 2 Nintendo Switch WiFi Antenna Replacement: passo 35, immagine 2 di 2
    • Use the point of a spudger to pry up the white antenna cable straight up out of its socket on the motherboard.

  35. Nintendo Switch WiFi Antenna Replacement: passo 36, immagine 1 di 2 Nintendo Switch WiFi Antenna Replacement: passo 36, immagine 2 di 2
    • Use your fingers or a pair of tweezers to pull the right speaker connector straight out of its socket on the motherboard.

    • Do not pull on the connector by the speaker wires. They're very thin and can easily snap off the connector.

  36. Nintendo Switch WiFi Antenna Replacement: passo 37, immagine 1 di 2 Nintendo Switch WiFi Antenna Replacement: passo 37, immagine 2 di 2
    • Use your fingers or a pair of tweezers to pull the left speaker connector straight out of its socket on the motherboard.

    • Do not pull on the connector by the speaker wires. They're very thin and can easily snap off the connector.

  37. Nintendo Switch WiFi Antenna Replacement: passo 38, immagine 1 di 2 Nintendo Switch WiFi Antenna Replacement: passo 38, immagine 2 di 2
    • Use an opening tool, spudger, or your fingernail to flip up the small, hinged locking flap on the Joy Con sensor rail data cable ZIF connector.

  38. Nintendo Switch WiFi Antenna Replacement: passo 39, immagine 1 di 2 Nintendo Switch WiFi Antenna Replacement: passo 39, immagine 2 di 2
    • Use a pair of tweezers to slide the Joy Con rail data cable straight out of its connector on the motherboard.

  39. Nintendo Switch WiFi Antenna Replacement: passo 40, immagine 1 di 1
    • Use a JIS 000 screwdriver or an official iFixit PH 000 driver to remove the following screws:

    • Four 2.5 mm screws

    • Two 3.1 mm screws

  40. Nintendo Switch WiFi Antenna Replacement: passo 41, immagine 1 di 3 Nintendo Switch WiFi Antenna Replacement: passo 41, immagine 2 di 3 Nintendo Switch WiFi Antenna Replacement: passo 41, immagine 3 di 3
    • Insert a spudger into a gap between the motherboard and the frame.

    • Carefully lift up the motherboard and remove it from the frame.

  41. Nintendo Switch WiFi Antenna Replacement, Remove the Fan: passo 42, immagine 1 di 1
    • Use a JIS 000 screwdriver or an official iFixit PH 000 driver to remove the three 4.8 mm screws securing the fan.

  42. Nintendo Switch WiFi Antenna Replacement: passo 43, immagine 1 di 2 Nintendo Switch WiFi Antenna Replacement: passo 43, immagine 2 di 2
    • Use a pair of tweezers or your fingers to lift the fan straight up and remove it from the device.

    • Compare your new replacement part to the original part. You may need to transfer remaining components (such as the rubber bushings) to the new part before installing.

  43. Nintendo Switch WiFi Antenna Replacement: passo 44, immagine 1 di 3 Nintendo Switch WiFi Antenna Replacement: passo 44, immagine 2 di 3 Nintendo Switch WiFi Antenna Replacement: passo 44, immagine 3 di 3
    • Deroute the black coax cable from the midframe.

  44. Nintendo Switch WiFi Antenna Replacement: passo 45, immagine 1 di 2 Nintendo Switch WiFi Antenna Replacement: passo 45, immagine 2 di 2
    • Continue following the wire, derouting it as you go.

  45. Nintendo Switch WiFi Antenna Replacement: passo 46, immagine 1 di 2 Nintendo Switch WiFi Antenna Replacement: passo 46, immagine 2 di 2
    • Pry the metal barrel surrounding the coax up from the midframe.

  46. Nintendo Switch WiFi Antenna Replacement: passo 47, immagine 1 di 2 Nintendo Switch WiFi Antenna Replacement: passo 47, immagine 2 di 2
    • Grasp the WiFi antenna board with a pair of tweezers and lift straight up to remove it.

Conclusione

To reassemble your device, follow these instructions in reverse order.

Altre 6 persone hanno completato questa guida.

Jerry Wheeler

Membro da: 03/21/22

56.157 Reputazione

69 Guide realizzate

Team

Oregonians Membro di Oregonians

Community

6 Membri

176 Guide realizzate

0 Commenti

Aggiungi Commento

Visualizza Statistiche:

Ultime 24 Ore: 30

Ultimi 7 Giorni: 234

Ultimi 30 Giorni: 1,020

Tutti i Tempi: 18,585