Salta al contenuto principale
Unisciti alla Community delle riparazioni - Crea un account

Logitech G27 C-Clamp Replacement

Cosa ti serve

  1. Logitech G27 C-Clamp  Replacement, Steering Wheel: passo 1, immagine 1 di 1
    • Remove the six gray 25mm hex screws with a 4mm allen wrench.

    • Watch out when you lift the wheel up, as there are fragile wires connected to the bottom side.

    • Carefully lift up the wheel, but do not disconnect it from the rest of the device.

    Chiedi a FixBot
  2. Logitech G27 C-Clamp  Replacement: passo 2, immagine 1 di 1
    • Carefully lift the wheel off of the hub, exposing the 2 shifter paddle wires and PCB board.

    Chiedi a FixBot
  3. Logitech G27 C-Clamp  Replacement: passo 3, immagine 1 di 1
    • Remove the two 7.5 mm silver screws holding the green PCB board in the wheel with a Phillips #1 screwdriver.

    Chiedi a FixBot
  4. Logitech G27 C-Clamp  Replacement: passo 4, immagine 1 di 1
    • Carefully remove the PCB board from the wheel hub.

    Chiedi a FixBot
  5. Logitech G27 C-Clamp  Replacement: passo 5, immagine 1 di 1
    • Carefully pinch and unplug the large 7-pin connector under the PCB board.

    • Be careful when unplugging this adapter, try not to pull on the wires to avoid damaging them. Instead, wiggle around the plastic connector while pulling on it to loosen it.

    Chiedi a FixBot
  6. Logitech G27 C-Clamp  Replacement: passo 6, immagine 1 di 1
    • You can now fully remove the wheel from the hub. Set it aside until you put the wheel back together.

    • Remove the innermost three 37.5mm silver screws with a Phillips #2 screwdriver.

    • Remove the wheel hub and push the connector through the center of the hub.

    Chiedi a FixBot
  7. Logitech G27 C-Clamp  Replacement: passo 7, immagine 1 di 1
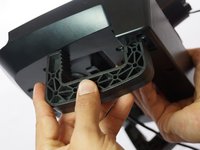
    • The wheel hub can now be set aside and flip over the steering wheel housing to reveal the under side.

    • Remove the eight 15.9mm silver surrounding screws underneath the wheel housing with a Phillips #1 screwdriver.

    Chiedi a FixBot
  8. Logitech G27 C-Clamp  Replacement: passo 8, immagine 1 di 1
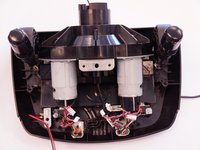
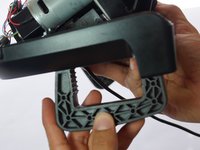
    • Rotate the housing back over and remove the top half of the housing revealing the majority of the components of the wheel.

    • The housing cover can be set aside until you put the wheel back together.

    Chiedi a FixBot
  9. Logitech G27 C-Clamp  Replacement: passo 9, immagine 1 di 1
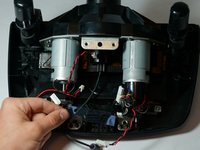
    • Remove the four 7.3mm silver screws attaching the green PCB board to the motor housing with a Phillips #2 screwdriver.

    Chiedi a FixBot
  10. Logitech G27 C-Clamp  Replacement: passo 10, immagine 1 di 1
    • Unplug the three plastic connectors on the left side of the PCB board.

    • Unplug the two plastic connectors on the top of the PCB board.

    • Unplug the three plastic connectors on the right side of the PCB board.

    • Pulling the plastic connectors requires a lot of force, but be careful and don't pull directly on the wires. Try to wedge or push the male side of the connector out.

    • If you need some extra leverage when removing these connectors, try using a plastic opening tool to pry off the connectors.

    • Removing these connectors allows easier access to the four screws attaching the PCB board mount to the motor housing.

    Chiedi a FixBot
  11. Logitech G27 C-Clamp  Replacement: passo 11, immagine 1 di 1
    • Remove the PCB board after all of the plastic connectors are disconnected.

    • You can now set it aside.

    Chiedi a FixBot
  12. Logitech G27 C-Clamp  Replacement: passo 12, immagine 1 di 1
    • Remove the two 12.3mm upper black screws with a Phillips #2 screwdriver.

    • Remove the two 15.5mm bottom silver screws with a Phillips #1 screwdriver.

    Chiedi a FixBot
  13. Logitech G27 C-Clamp  Replacement: passo 13, immagine 1 di 2 Logitech G27 C-Clamp  Replacement: passo 13, immagine 2 di 2
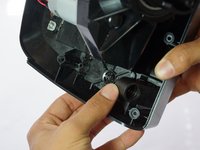
    • Remove the PCB board mount and remove the clear plastic piece underneath.

    • Set them aside until you reassemble the wheel.

    Chiedi a FixBot
  14. Logitech G27 C-Clamp  Replacement, C-Clamp: passo 14, immagine 1 di 1
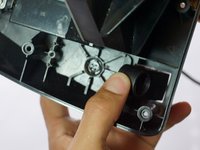
    • Unscrew the piece holding the C-Clamp in place with your hand.

    Chiedi a FixBot
  15. Logitech G27 C-Clamp  Replacement: passo 15, immagine 1 di 2 Logitech G27 C-Clamp  Replacement: passo 15, immagine 2 di 2
    • Push the remaining nob forward and then inward through the slot.

    Chiedi a FixBot
  16. Logitech G27 C-Clamp  Replacement: passo 16, immagine 1 di 2 Logitech G27 C-Clamp  Replacement: passo 16, immagine 2 di 2
    • The C-Clamp can now be easily pulled out of the bottom of the device.

    Chiedi a FixBot
Conclusione

To reassemble your device, follow these instructions in reverse order.

Altre 24 persone hanno completato questa guida.

Daniel Louis

Membro da: 04/28/15

758 Reputazione

Una guida realizzata

Team

Cal Poly, Team 15-4, Amido Spring 2015 Membro di Cal Poly, Team 15-4, Amido Spring 2015

CPSU-AMIDO-S15S15G4

4 Membri

25 guide realizzate

15Commenti sulla guida

Where would I buy the replacement C-Clamps from because one of mine are broken and I need to install a new one.

Mumin Mazhar - Rispondi Condividi

Look for it at eBay.

Eduardo - Rispondi Condividi

I also need to find a place to buy replacement C-clamps from

hockeyjockone - Rispondi Condividi

Can you tell me where I can buy these clamps?

kholiwen - Rispondi Condividi

step 9 to 13 not needed ... please confirm

Matt Na - Rispondi Condividi

Aggiungi Commento

Visualizza statistiche:

Ultime 24 ore: 6

Ultimi 7 giorni: 40

Ultimi 30 giorni: 183

Tutti i Tempi: 50,132