Questa traduzione potrebbe non riflettere gli aggiornamenti più recenti dalla guida originale. Aiuta ad aggiornare la traduzione o visualizza la guida d'origine.
Introduzione
Il bottone dei jeans (chiamato anche rivetto) mantiene saldamente chiusi i jeans in vita.
Questa guida mostrerà come installare un nuovo bottone per jeans.
Leggi l'intera guida prima di iniziare la riparazione e raccogli gli strumenti e i materiali necessari. Sebbene i materiali specifici di Patagonia siano ideali, non sono obbligatori. Puoi ottenere parti di ricambio Patagonia chiamando o inviando un messaggio al Servizio Clienti Patagonia.
In alternativa, i prodotti Patagonia possono essere portati in un negozio al dettaglio locale per una valutazione della riparazione oppure inviati a Patagonia tramite il loro servizio di riparazione per posta.
Iniziamo a riparare!
ATTENZIONE! Parti piccole. Patagonia sconsiglia di eseguire queste riparazioni su capi destinati a bambini di 3 anni o meno. Invece, raccomandiamo di restituire il prodotto per un servizio di riparazione professionale.
Tutorial correlato: Sostituzione rivetto su pantaloni da lavoro
Cosa ti serve
-
-
Raduna i pezzi di ricambio, inclusi un bottone e un chiodo.
-
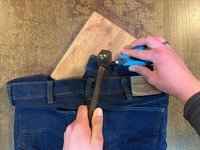
Appoggia i jeans con il lato anteriore rivolto verso l'alto su un tavolo o un piano da lavoro robusto.
-
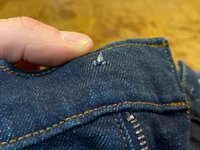
Tira giù la lampo e trova il foro in vita dove era situato il precedente bottone.
-
Rimuovi completamente le rimanenze del vecchio bottone prima di applicare quello nuovo. Smaltisci questi pezzi responsabilmente.
 Chiedi a FixBot
-
-
-
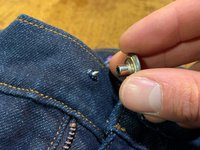
Inserisci il chiodo nella parte posteriore del foro.
-
Spingi il chiodo nel foro fino a quando non si allinea con la vita.
-
-
-
-
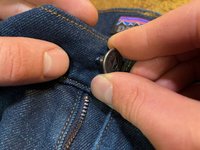
Tenendo il chiodo fermo da dietro nella sua posizione, posiziona il bottone sopra il chiodo. Tieni i pezzi in posizione con le dita.
-
-
-
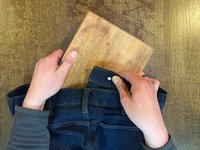
Capovolgi i jeans e posizionali su una superficie morbida e piana direttamente sotto il bottone, come per esempio un pezzo di legno morbido o della pelle.
-
Usa un paio di pinze a becchi d'ago per mantenere il chiodo in posizione, assicurandoti che il chiodo e il bottone siano ancora allineati.
-
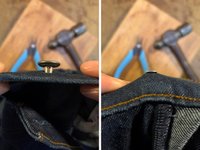
Martella il chiodo con un colpo dritto verso il basso.
-
-
-
Prova il nuovo bottone abbottonando i jeans e tirando la vita per assicurarti che sia fermo e sicuro.
-


Annulla: non ho completato questa guida.
Altre 51 persone hanno completato questa guida.
Un ringraziamento speciale a questi traduttori:
83%


Questi traduttori ci stanno aiutando ad aggiustare il mondo! Vuoi partecipare?
Inizia a tradurre ›


10Commenti sulla guida
Nice, but let's consider how this situation occurs. The tack comes out of its hole, just simply replacing it is not realistic, unless the new tack is significantly bigger. So how do you "repair" the hole such that it will hold a tack again?
As noted in step 2, you can move the tack over to where the denim isn't damaged. If that will cause the jeans not to fit properly, you can sew a folded piece of denim behind the hole (sew around the edges on the inside of the jeans) and punch the tack through the new piece.
I didn´t have a new button and was in a pinch. Just ripped the old button off completely, jammed it in the tail end of a hammer and yanked it apart with som pliers. Then i followed the instructions in this fix. Worked like a charm, so far...
Thanks I’m gonna try this first!
The best thing to do is patch the hole. I simply use fabric glue and some pieces of blue jeans that you probably have hanging around. Trim off the extra threads and then apply fabric glue to the back of the waist band covering the hole made by the old button. Do the same on the front and then let dry. about 30 minutes or so, if you have a machine I always stitch back and for on the edges. Trim any edges or use additional glue to tack them down. Now because you have strengthened the hole carefully push the back of the button through where you can see the end, add the front to the nail end and turning the garment face down on a protected hard surface hammer about 3 times and check to see if it is sturdy, continue to hammer until you have reached the objective. Now you have got many more years with that button.