Introduzione
Is the screen on your laptop malfunctioning? Here are some possible problems with your screen. If you determine that the screen needs to be replaced, follow this replacement guide!
Cosa ti serve
-
-
-
Flip the laptop over.
-
Slide the lever with the battery symbol beside it firmly until the battery pops out.
-
Remove the battery from the laptop.
 Chiedi a FixBot
-
-
-
-
Strumento utilizzato in questo passaggio:Tweezers$4.99
-
Orient the laptop keyboard-side up.
-
Use tweezers to remove the adhesive covers for the screws.
-
-
-
-
Remove the four 3mm screws with a Phillips #0 screwdriver near the corners of the screen to remove the display.
-
-
-
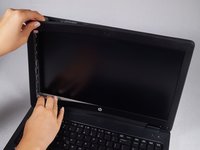
Gently lower the screen and lay it face down on the keyboard.
-
Lift the corners of the tape closest to the top of the screen and peel toward the center carefully.
-
Slowly pull the tape away from the sides.
-
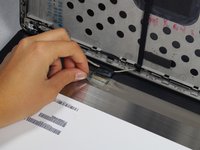
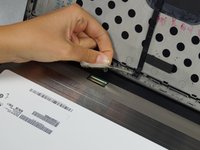
Lift the tape and disconnect the screen connector.
-
-


To reassemble your device, follow these instructions in reverse order.
Annulla: non ho completato questa guida.
Altre 9 persone hanno completato questa guida.
Team

Cal Poly, Team 8-43, Amido Winter 2015 Membro di Cal Poly, Team 8-43, Amido Winter 2015
CPSU-AMIDO-W15S8G43
4 Membri
19 guide realizzate
3Commenti sulla guida
Worked great! Only caution that I would add is that on one of the machines I took apart, the adhesive strip behind the bottom of the bezel stuck to the bezel and not the circuit board behind. I had to carefully slide my finger between the adhesive strip and the bezel to separate them. Once the bezel was removed, I was able to stick the adhesive back down. I think this laptop may have been exposed to some sort of liquid, so this may not be a common issue.
Hello can i replace my hd screen with another fhd one?