Salta al contenuto principale

HP Pavilion 15-cc561st I/O Board Replacement

Cosa ti serve

  1. HP Pavilion 15-cc561st I/O Board Replacement, Bottom Cover: passo 1, immagine 1 di 3 HP Pavilion 15-cc561st I/O Board Replacement, Bottom Cover: passo 1, immagine 2 di 3 HP Pavilion 15-cc561st I/O Board Replacement, Bottom Cover: passo 1, immagine 3 di 3
    Attrezzo utilizzato in questo passaggio:
    Magnetic Project Mat
    $19.95
    Compra
    • Before you begin to remove the bottom cover, shut down the computer. Disconnect all external devices and unplug the AC adapter. Flip the laptop upside down.

    • Use a Phillips #0 screwdriver to remove five screws from the bottom cover:

    • Two 5.6 mm screws

    • Each of these screws are beneath the two rubber feet on the rear side of the laptop (near the display hinges). You do not have to completely remove the rubber feet to remove the screws; simply peel the top of the feet to reveal the screws.

    • Three 5.8 mm screws

    • Throughout this repair, keep track of each screw size and location to avoid damaging your device.

  2. HP Pavilion 15-cc561st I/O Board Replacement: passo 2, immagine 1 di 2 HP Pavilion 15-cc561st I/O Board Replacement: passo 2, immagine 2 di 2
    • Insert an opening tool into the space between the display hinges and the bottom cover.

    • Firmly push the opening tool upwards to separate the bottom cover from these areas.

  3. HP Pavilion 15-cc561st I/O Board Replacement: passo 3, immagine 1 di 3 HP Pavilion 15-cc561st I/O Board Replacement: passo 3, immagine 2 di 3 HP Pavilion 15-cc561st I/O Board Replacement: passo 3, immagine 3 di 3
    • Insert your opening tool and firmly push the tool upwards along the rear edge.

  4. HP Pavilion 15-cc561st I/O Board Replacement: passo 4, immagine 1 di 3 HP Pavilion 15-cc561st I/O Board Replacement: passo 4, immagine 2 di 3 HP Pavilion 15-cc561st I/O Board Replacement: passo 4, immagine 3 di 3
    • Use the opening tool again on the left and right sides.

    • Start prying at the areas closer to the rear of the laptop (near the display hinges) before moving towards areas that are closer to the front of the laptop (away from the display hinges).

    • Pry a little bit on the left side, then pry a little bit on the right side before prying more on the left side again. Working on both sides in this incremental fashion is easier than completely prying one side before starting the other side.

  5. HP Pavilion 15-cc561st I/O Board Replacement: passo 5, immagine 1 di 1
    • Lift the bottom cover upwards to remove it.

  6. HP Pavilion 15-cc561st I/O Board Replacement, Battery: passo 6, immagine 1 di 1
    • Use a Phillips #0 screwdriver to remove the five 5.7 mm screws that secure the battery.

  7. HP Pavilion 15-cc561st I/O Board Replacement: passo 7, immagine 1 di 3 HP Pavilion 15-cc561st I/O Board Replacement: passo 7, immagine 2 di 3 HP Pavilion 15-cc561st I/O Board Replacement: passo 7, immagine 3 di 3
    • Pull the battery towards the front edge of the laptop to disconnect it from the 8-pin battery connector.

    • Lift the disconnected battery upwards to remove it.

    • Calibrate a newly-installed battery to help your laptop get an accurate battery percentage reading.

  8. HP Pavilion 15-cc561st I/O Board Replacement, I/O Board: passo 8, immagine 1 di 3 HP Pavilion 15-cc561st I/O Board Replacement, I/O Board: passo 8, immagine 2 di 3 HP Pavilion 15-cc561st I/O Board Replacement, I/O Board: passo 8, immagine 3 di 3
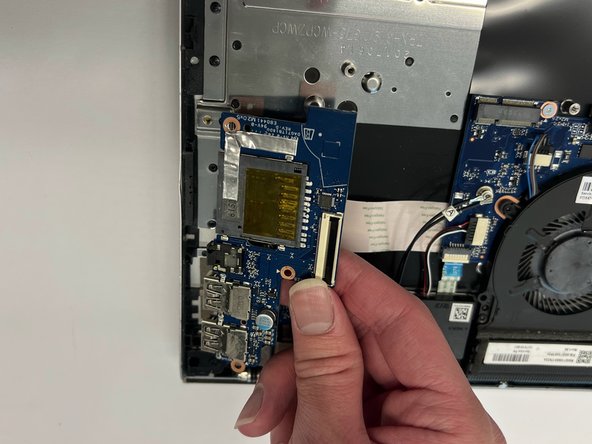
    • Gently release the slider of the ZIF connector that the USB port board is connected to.

    • Gently lift the Flat Flexible Cable away from the ZIF connector to disconnect the cable from the USB port board.

  9. HP Pavilion 15-cc561st I/O Board Replacement: passo 9, immagine 1 di 1
    • Use a Phillips #0 screwdriver to remove the two 5.8 mm screws that secure the USB port board.

  10. HP Pavilion 15-cc561st I/O Board Replacement: passo 10, immagine 1 di 2 HP Pavilion 15-cc561st I/O Board Replacement: passo 10, immagine 2 di 2
    • Lift the USB port board upwards to remove it.

Conclusione

To reassemble your device, follow these instructions in reverse order.

Nicholas Barger

Membro da: 09/26/22

181 Reputazione

2 Guide realizzate

Team

0 Commenti

Aggiungi Commento

Visualizza Statistiche:

Ultime 24 Ore: 0

Ultimi 7 Giorni: 0

Ultimi 30 Giorni: 5

Tutti i Tempi: 144