Questa traduzione è stata generata automaticamente e non è stata ancora revisionata da una persona. Parli questa lingua? Dai un’occhiata.

Sostituzione motore GravityLight

Anthony Jungquist e 3 altri collaboratori
Ultimo aggiornamento il 14 ago 2026
Visualizzazioni: 2719
Visualizza statistiche:
- Ultime 24 ore:
- 2
- Ultimi 7 giorni:
- 29
- Ultimi 30 giorni:
- 105
- Tutti i Tempi:
- 2.719
Commenti: 0
Nessuno ha lasciato commenti su questa guida. Sarai il primo?
Vai ai commenti della guidaCompletato: 1 2
1 persona ha contrassegnato questa guida come "completata". Sarai il prossimo?
2 persone hanno contrassegnato questa guida come "completata". Compreso te, ottimo lavoro!
Preferiti: 0 1
Nessuno ha preferito (e si è iscritto) questa guida. Sarai il primo?
1 persona ha aggiunto ai preferiti (e si è iscritta a) questa guida, e sei tu!
Introduzione
Vai al passo 1 ↓Se il LED bianco non si accende, potrebbe trattarsi di un problema al motore. Dovrai smontare la GravityLight e sostituire il motore.
Cosa ti serve
Strumenti


-
-
-
Capovolgi il GravityLight e posizionalo su una superficie stabile.
-
Svita le tre viti a croce Phillips da 2 cm sul retro del corpo del GravityLight.
 Chiedi a FixBot
-
-
-
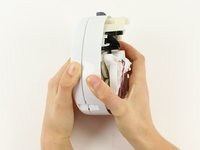
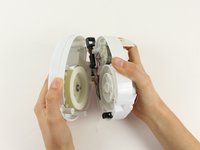
Afferra saldamente entrambe le parti del corpo del GravityLight e tirale in direzioni opposte.
-
-
-
-
-
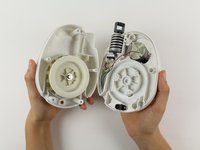
Prendi la più spessa delle due parti, il pezzo posteriore, e posizionalo con la parte anteriore rivolta verso il basso su una superficie robusta.
-
-
-
Posiziona il pannello posteriore, il più grande dei due pezzi, su una superficie robusta con il retro rivolto verso il basso.
-
Svita le due viti a croce Phillips da 2 cm all'interno del pannello posteriore.
-
-
-
Solleva delicatamente l'alloggiamento del LED (il disco bianco).
-
Appoggia l'alloggiamento del LED sul tavolo accanto al corpo del dispositivo.
-
-
-
Solleva il pezzo bianco con quattro bracci.
-
Solleva l'ingranaggio con il bordo nero.
-
Metti entrambi i pezzi da parte in un luogo sicuro.
-
-
-
Rimuovi le due viti a croce Phillips da 2 cm dall'alloggiamento del motore.
-
-
-
-
Afferra saldamente entrambe le parti del pannello posteriore e tirale in direzioni opposte per separarle.
-
-
-
Posiziona la sezione centrale in piano, con il lato che ospita il sistema di ingranaggi rivolto verso il basso, e individua il retro del motore.
-
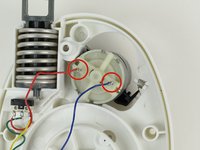
Solleva il motore ed estrailo dalla sezione centrale. Usando la tronchesina, taglia i fili rosso e blu situati sul retro del motore.
-
-




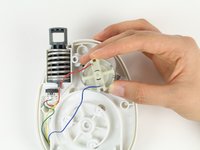
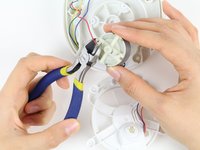

Per rimontare il dispositivo, segui queste istruzioni in ordine inverso.
Annulla: non ho completato questa guida.
Un'altra persona ha completato questa guida.

Team

Cal Poly, Team 12-2, Forte Fall 2014 Membro di Cal Poly, Team 12-2, Forte Fall 2014
CPSU-FORTE-F14S12G2
5 Membri
84 guide realizzate
